Few things sting like reading a teammate’s message an hour late. Slack notifications not working on Mac usually comes down to one overlooked setting, so MacKeeper’s Premium Services puts a tech expert on the case.
Slack alerts pass two gates—Slack’s preferences and the macOS permission. Either shuts quietly, so Slack not showing notifications on Mac rarely has one cause.
Here’s what usually sits behind the silence:
Paused notifications. A snooze set for a meeting, never lifted.
An active Focus.Do Not Disturb stays on until you switch it off.
Muted conversations. Channel overrides outrank your global settings.
Missing permission. Slack sends the alert, your MacBook hides it.
Screen sharing. Every Macintosh hides banners while you present.
How to fix Slack notifications on Mac?
Run the cheap checks first, since half the cases of Slack notifications not popping up on Mac clear inside a minute.
Start with these quick checks:
Confirm Slack is running, not hidden behind windows.
Look for the snooze bell beside your name.
Scan the menu bar for an active Focus icon.
Check the channel you’re waiting on isn’t muted.
A note from our experts:
Would you rather not spend your morning working down a list of menus while messages pile up? If that sounds like your day, try MacKeeper’s Premium Services. MacKeeper protects your Mac, and MacKeeper offers adware and malware removal, so the same app that keeps your system clean also connects you with a tech expert who’ll go through your notification settings with you. Our team has closed over a million cases and fixed more than 332,000 Macs this way, and 93% of customers came away satisfied.
Select Premium Services at the top of the left sidebar.
Click Chat Now, then describe what your Slack alerts are doing.
Follow the steps your expert sends, and ask them to stay on the chat while you run a test message.
Select Premium Services at the top of MacKeeper’s left sidebar and click Chat Now
1. Check Slack notification settings
We start here because one drop-down menu decides whether Slack speaks at all.
Walk through Slack’s preferences like this:
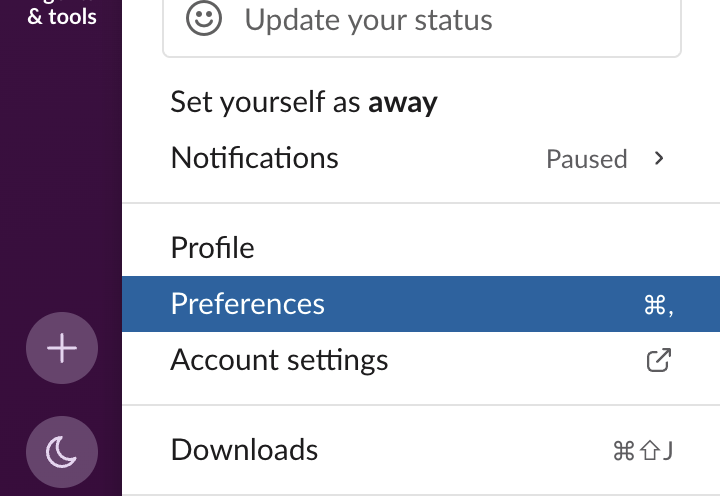
Click your profile picture, select Preferences, then click Notifications.
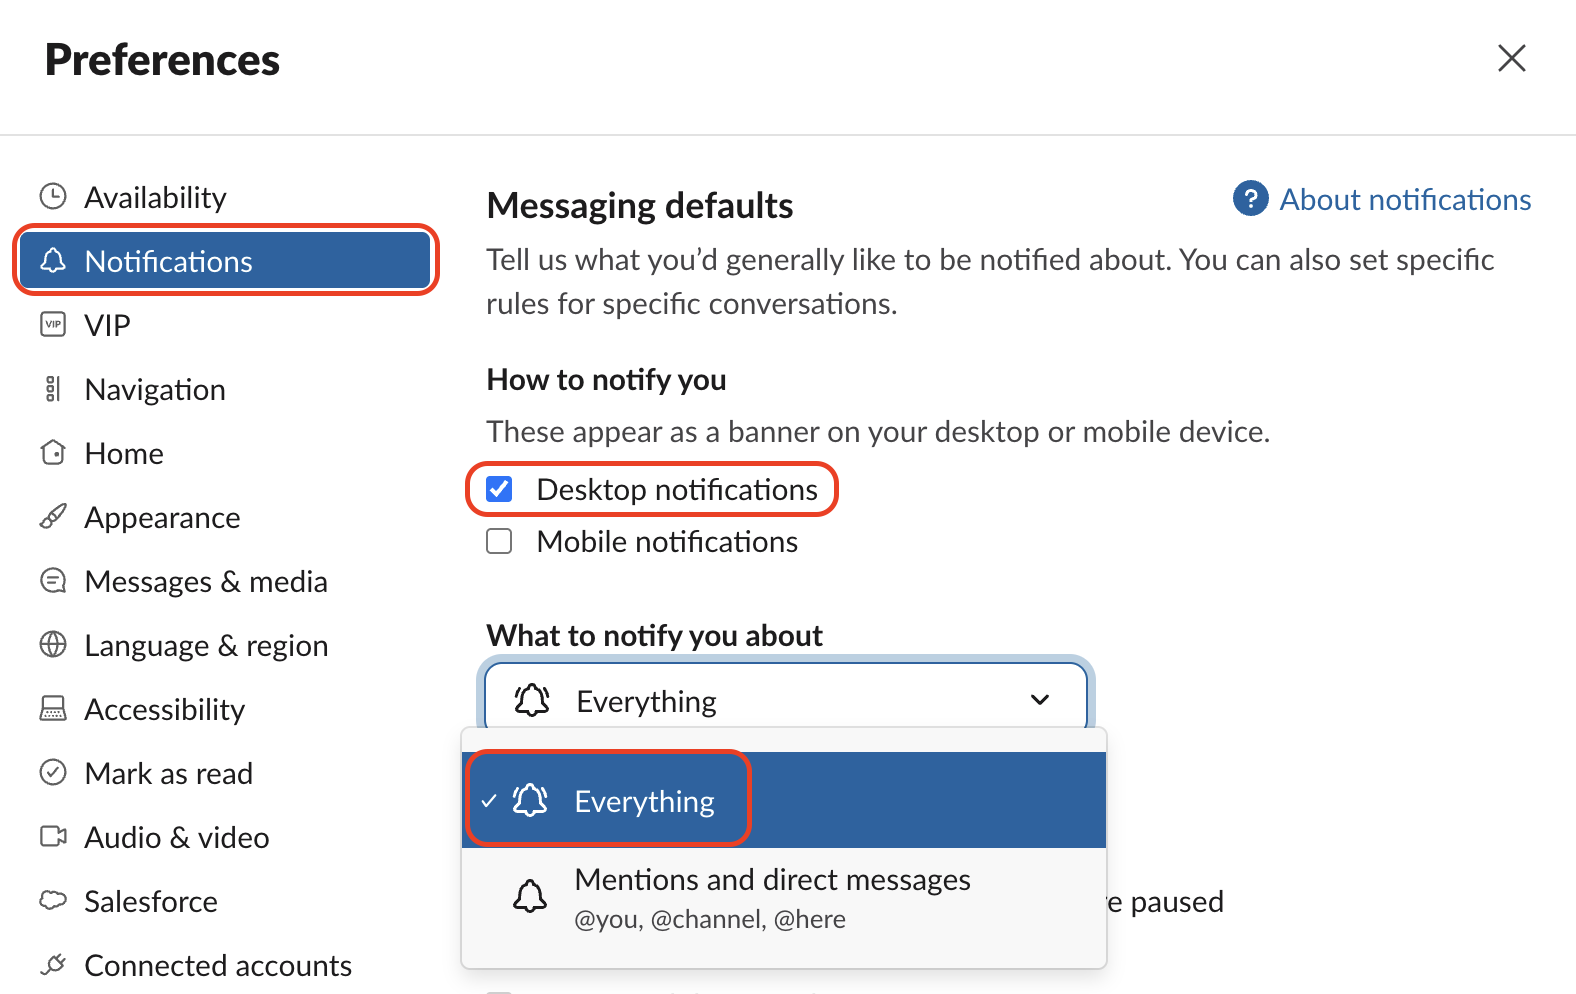
Select Desktop notifications under How to notify you.
Set What to notify you about to Everything.
Repeat in every workspace in your sidebar.
Step 1. Open your Slack profile menu, then select PreferencesStep 2. Select Desktop notifications under How to notify you and set What to notify you about to Everything
2. Resume paused notifications and review notification schedule
A pause is the commonest cause we see, and working hours silence Slack the same way.
Lift the pause and reset your hours:
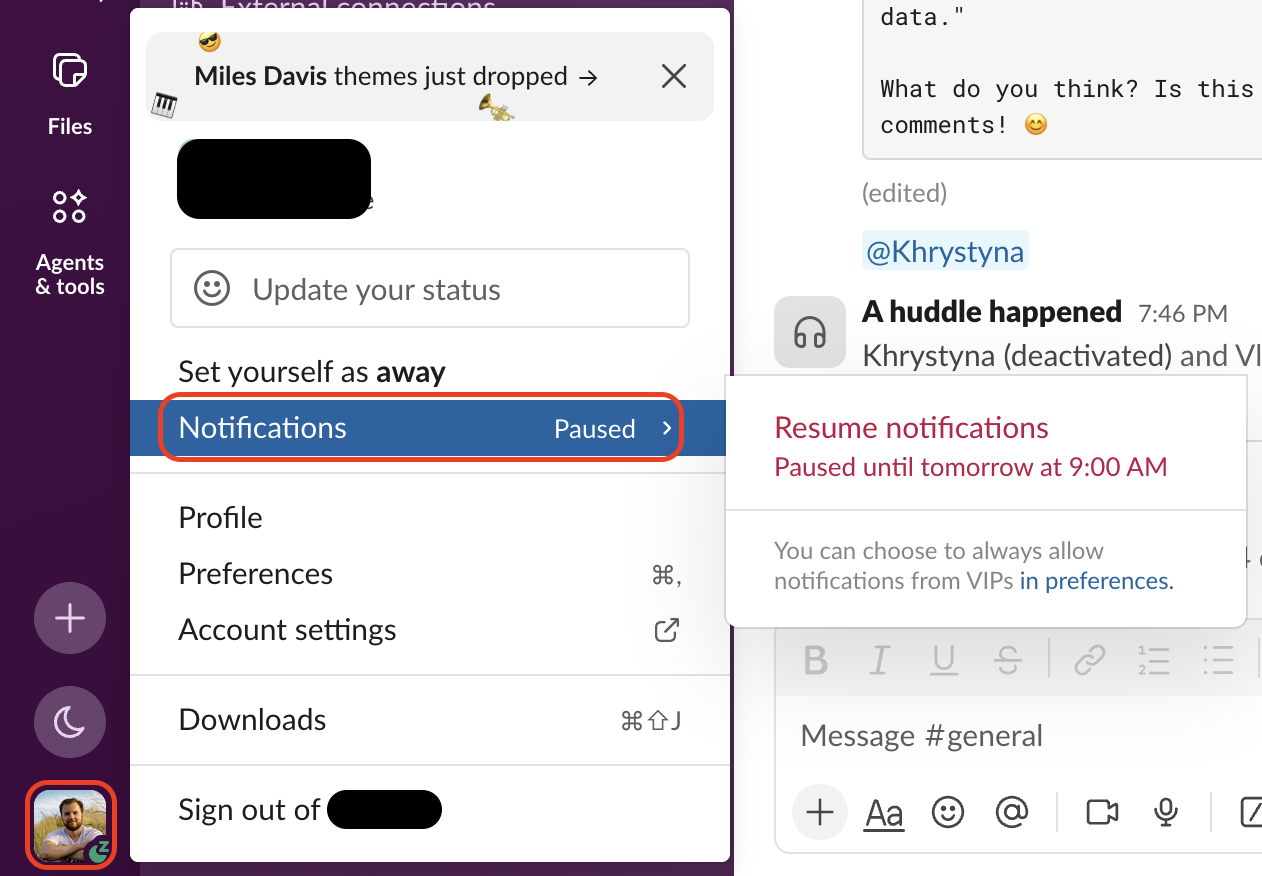
Click your profile picture, then hover over Notifications.
Select Resume notifications if a pause is running.
Under Working hours, set Allow notifications to Every day or Weekdays.
Hover over Notifications in your profile menu to resume them
3. Check channel and conversation notification settings
We’d turn a noisy channel down rather than mute it, since overrides beat your global settings.
Tune each conversation with these moves:
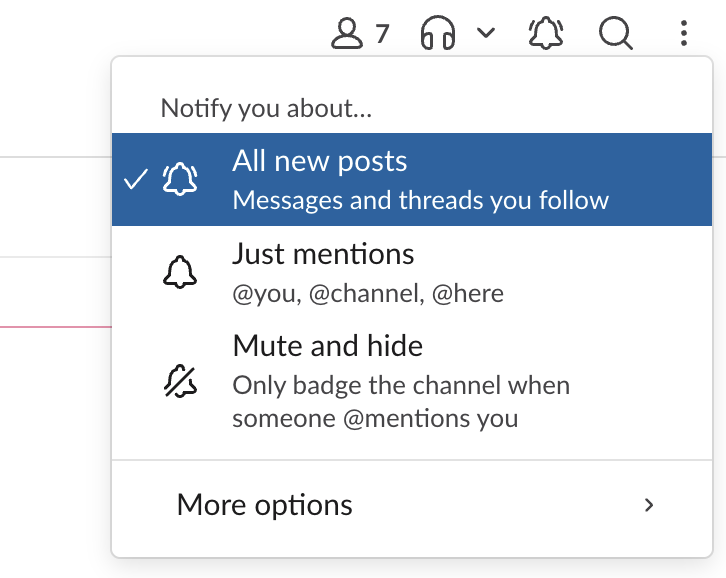
Click the notifications icon above the conversation.
Select All new posts or Just mentions.
In Advanced options, turn on Desktop notifications, then add Channel keywords.
Click the notifications icon above a channel to pick its alerts
4. Allow Slack notifications in macOS settings
Our experts check this when banners vanish everywhere, since macOS can revoke the permission and leave Slack not sending notifications on Mac.
Hand Slack the system permission it needs:
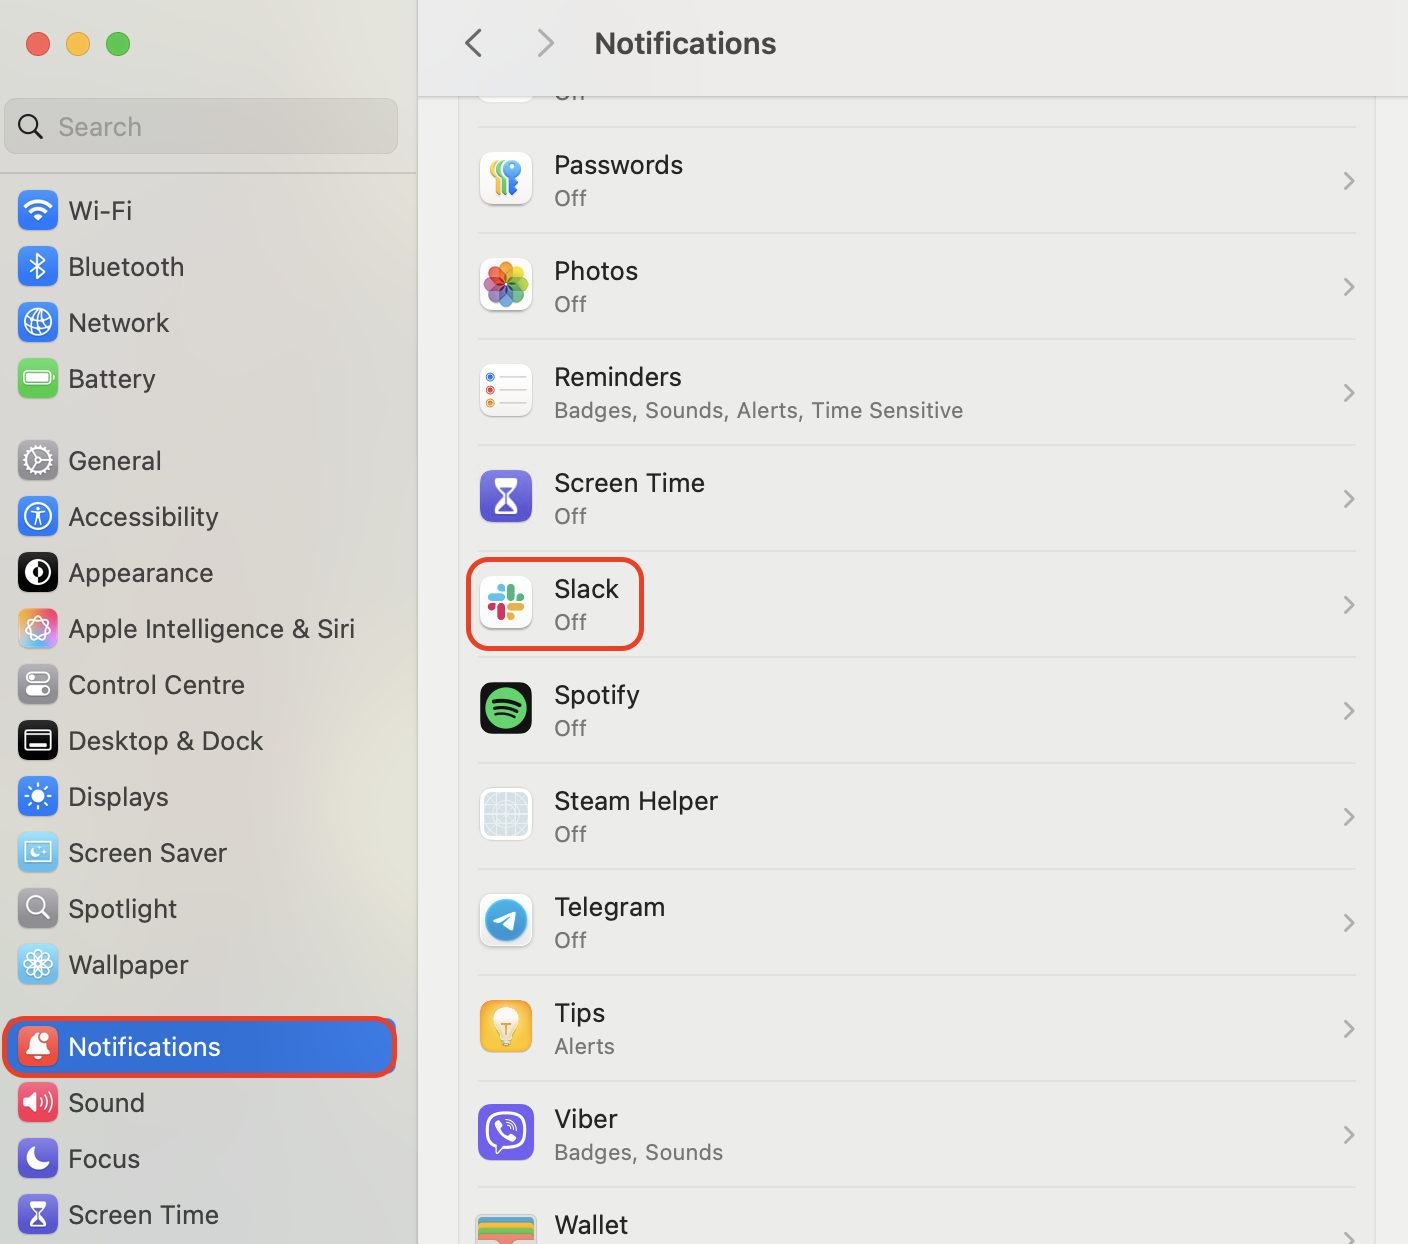
Open System Settings, then click Notifications.
Under Application Notifications, click Slack.
Turn on Allow notifications, choose Banners, then enable Show in Notification Center.
Step 1. Open System Settings, click Notifications, then select SlackStep 2. Turn on Allow notifications, choose Banners, then enable Show in Notification Center
5. Turn off Focus or allow Slack through it
A Focus starts itself by schedule or app, so Slack not notifying on Mac often begins at the same hour. You can unsilence Slack and keep it.
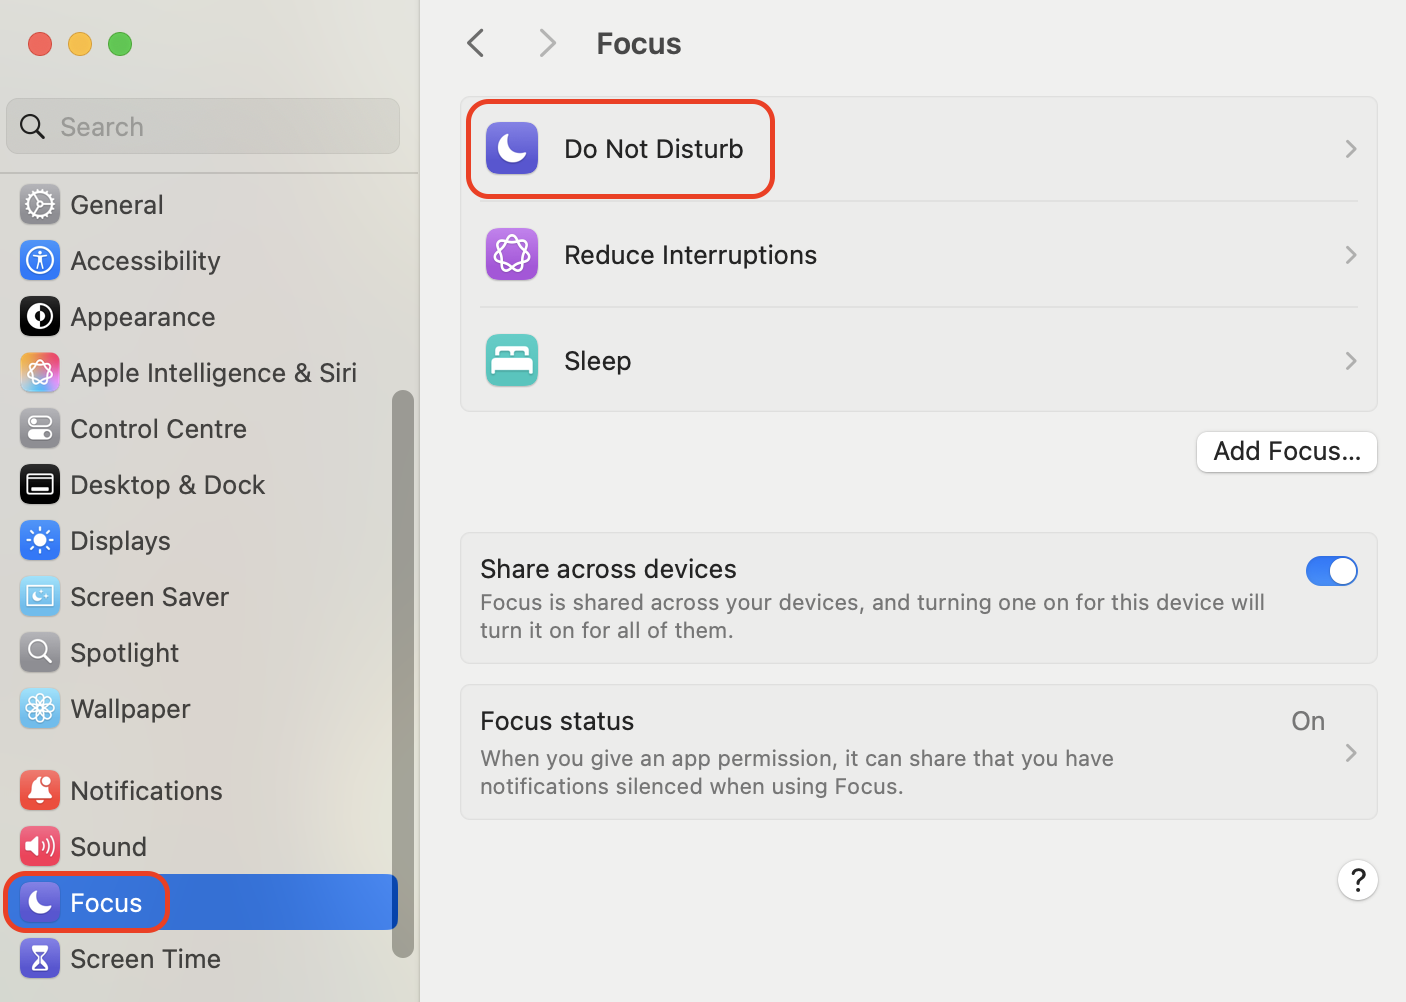
Or open System Settings, click Focus, then pick your Focus.
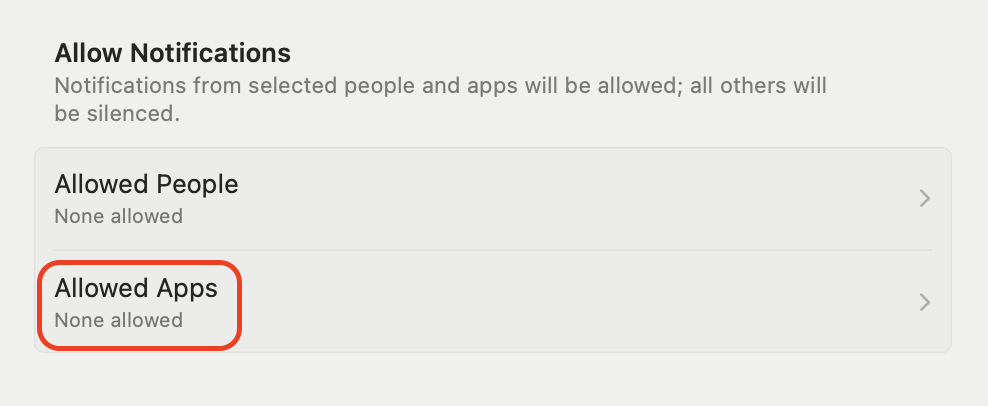
Click Allowed Apps, choose Allow Some Apps, then add Slack.
Step 1. Open System Settings, click Focus, and select your FocusStep 2. Click Allowed Apps in Focus settings, then add Slack
6. Check notification settings during screen sharing
Your Mac hides banners while you present, which we’d keep unless your day runs on demos.
Keep alerts alive while you present:
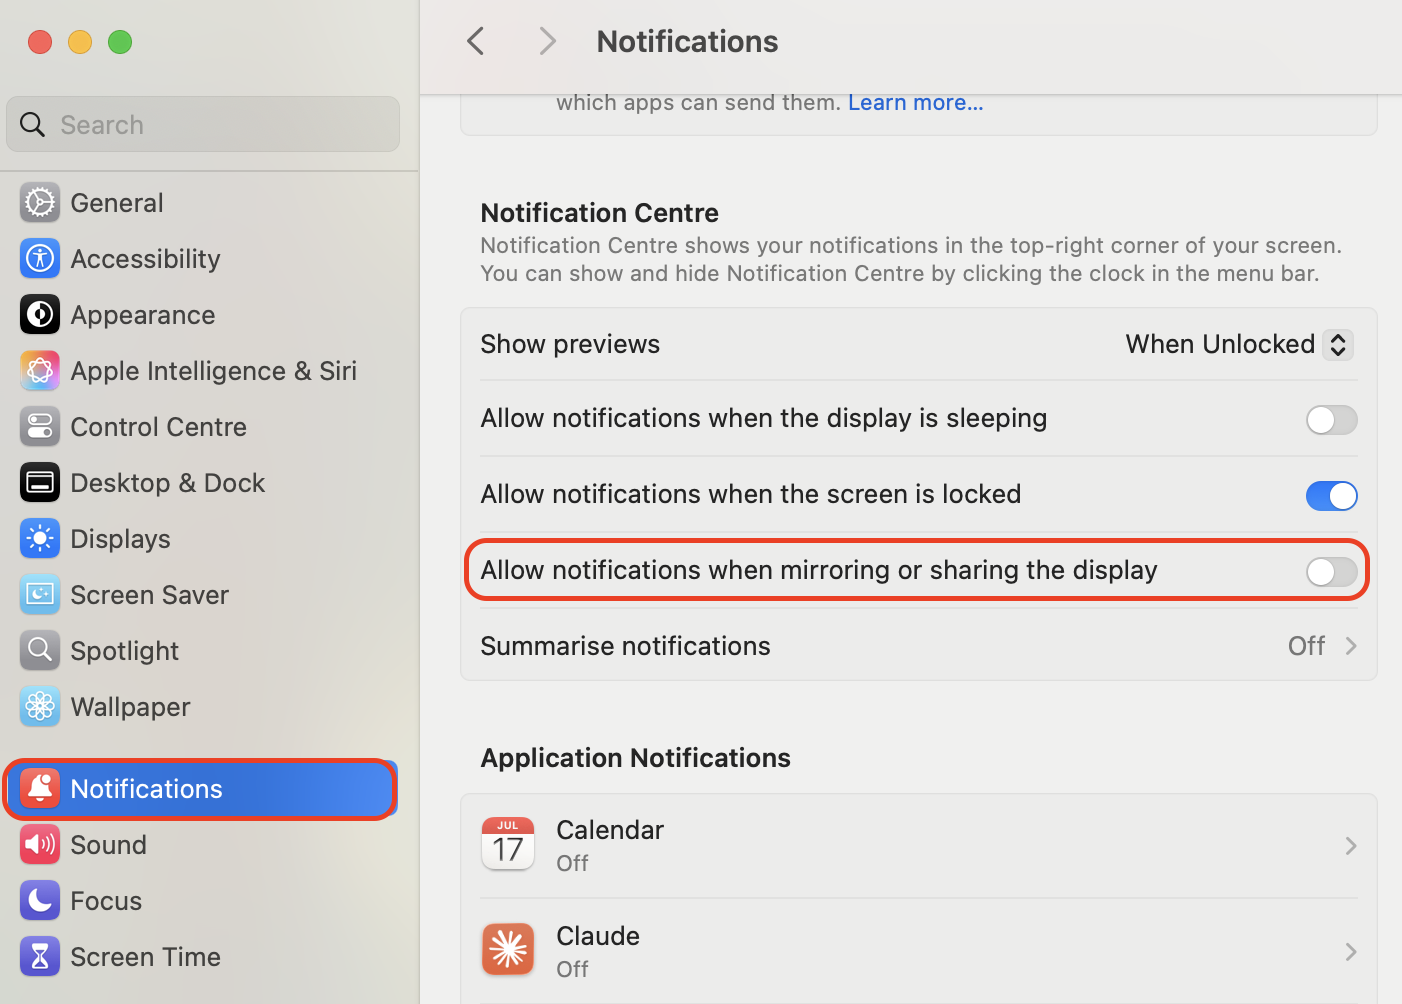
Open System Settings, then click Notifications.
Go to Notification Center at the top.
Set when mirroring or sharing the display to Allow Notifications.
Set the mirroring option to Allow Notifications
7. Make sure Slack is running and restart app
The red button only tucks the window away, so a real quit clears more stuck sessions.
Give Slack a proper restart:
Look for the dot under the Slack Dock icon.
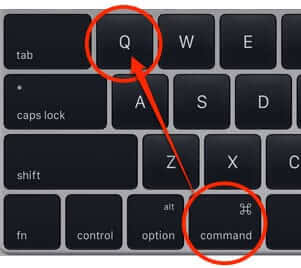
Press Command + Q with the Slack window active.
Reopen Slack, then send yourself a test.
Press Command and Q with the Slack window active
8. Restart your Mac
A restart clears the services that pass notifications around, so we’d restart MacBook properly rather than shut the lid.
Restart your Mac in this order:
Save your work, since a restart quits every app.
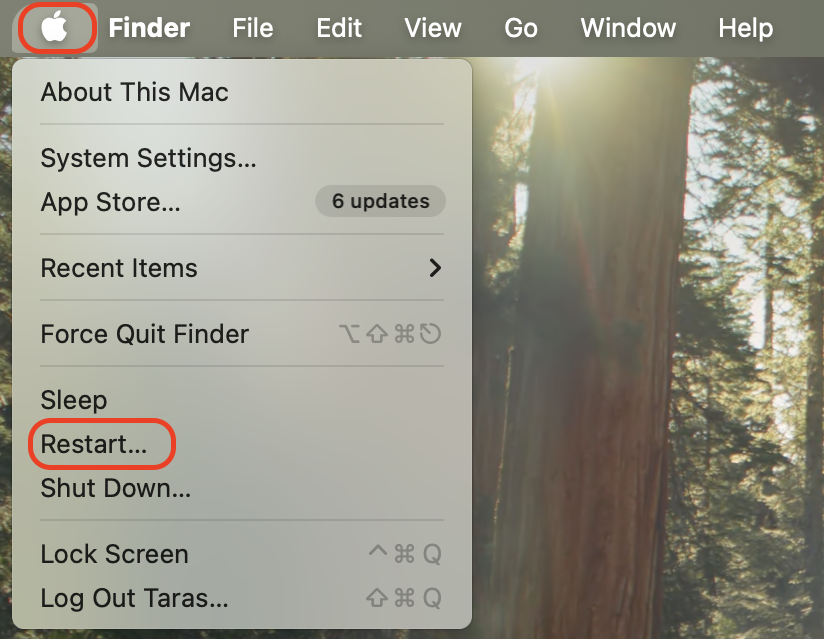
Click the Apple menu, then select Restart.
Sign back in and watch for banners appearing.
Open the Apple menu and select Restart
9. Clear Slack cache
Cached data leaves badges stuck, and when you clear Slack cache you lose only seconds.
Flush Slack’s cached data this way:
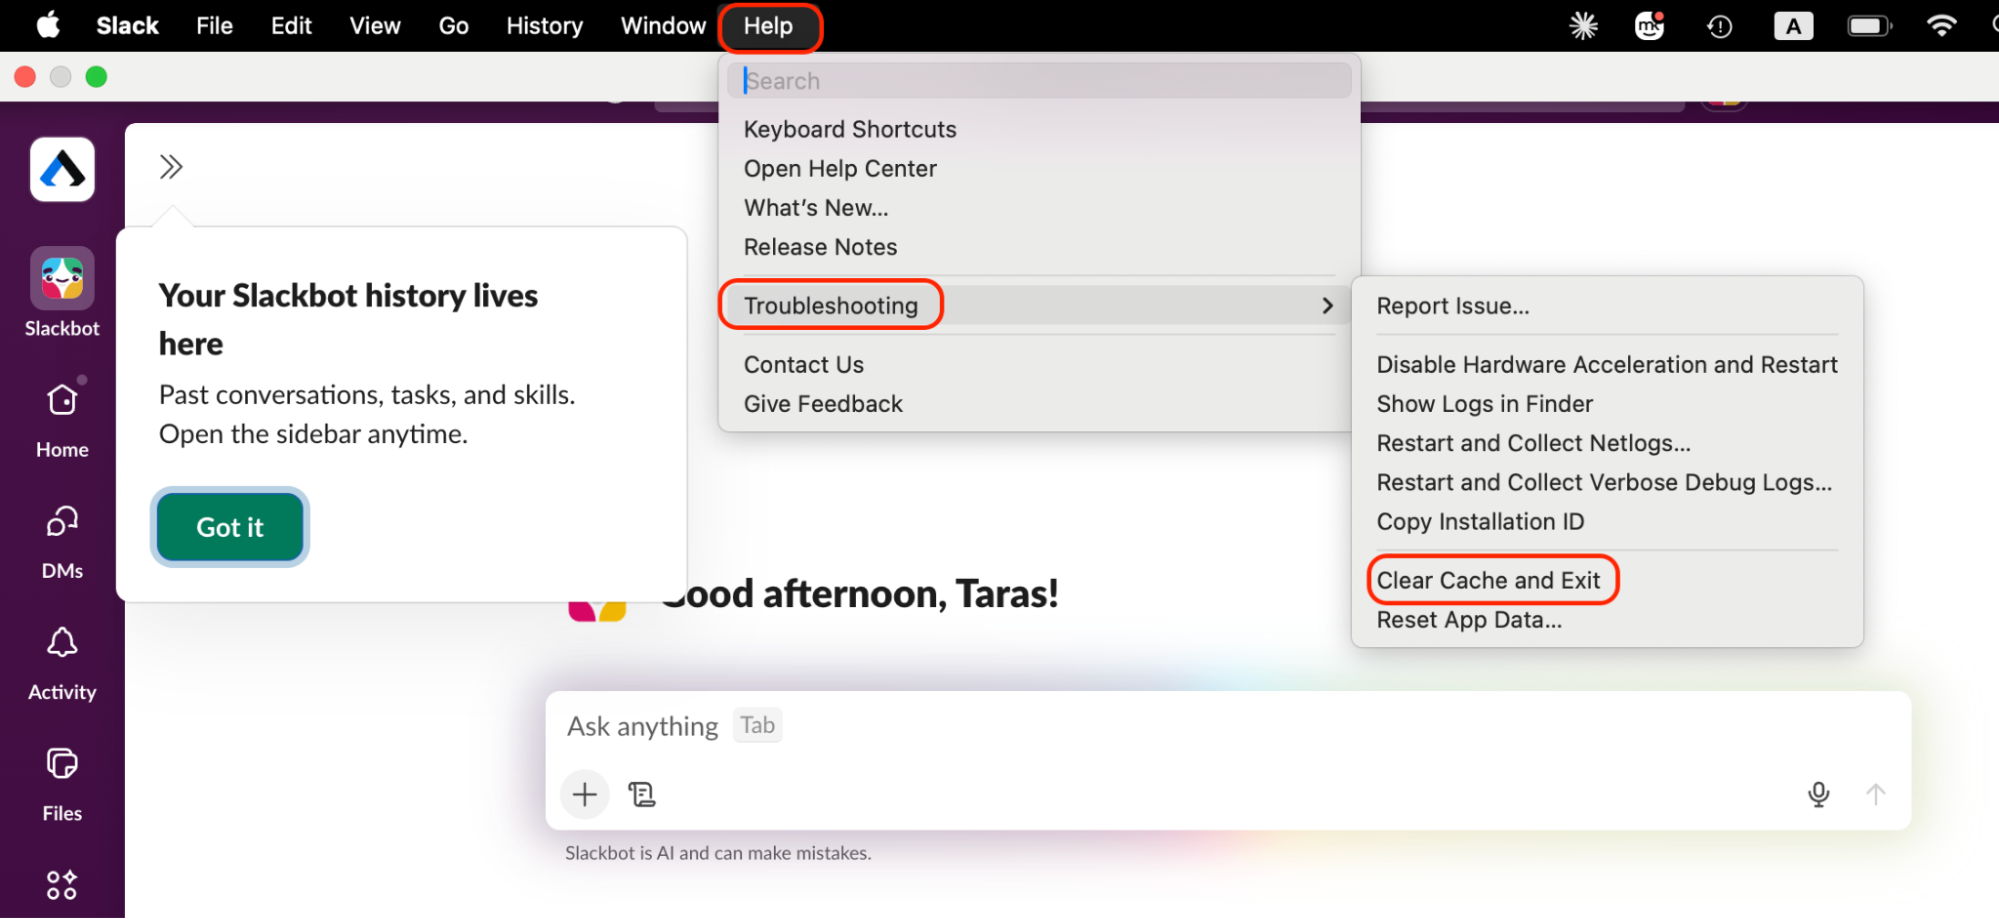
Open Slack, then click Help in the menu bar.
Select Troubleshooting.
Click Clear Cache and Restart.
Open Help in Slack, select Troubleshooting, then clear the cache
10. Update Slack and macOS
An old build on a new system reliably ends with Slack notifications stopped working on Mac. macOS 27 Golden Gate shipped in September 2026, so run a software update on both.
Bring both versions up to date:
Click Slack in the menu bar, then Check for Updates.
Click Restart to Apply Update.
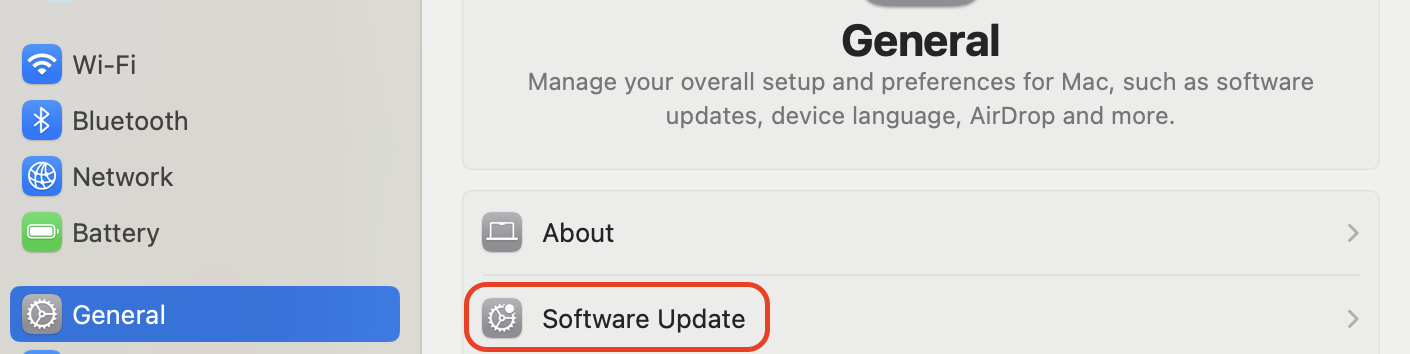
Open System Settings, click General, then Software Update.
Open Software Update in General settings
How to fix Slack notification sound not working on Mac?
Silent banners are a different puzzle. If you see an alert but hear nothing, suspect a muted output, the wrong device, or a sound not working fault.
1. Enable notification sounds in macOS
macOS controls the sound separately from the banner, so we check the system side first.
Switch the system sound back on:
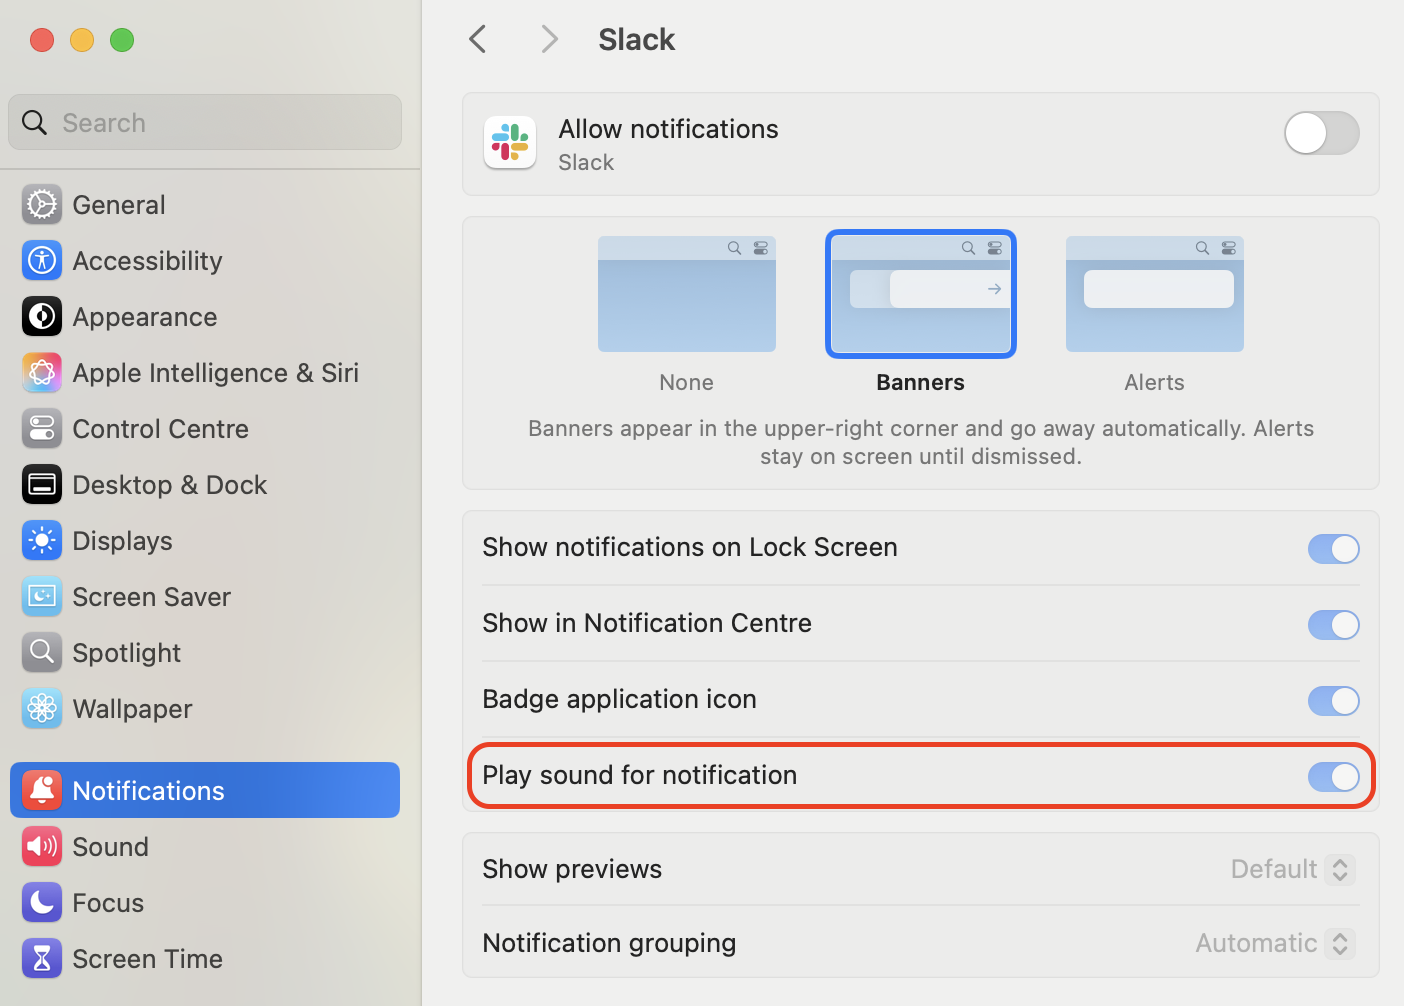
Open System Settings, then click Notifications.
Under Application Notifications, click Slack.
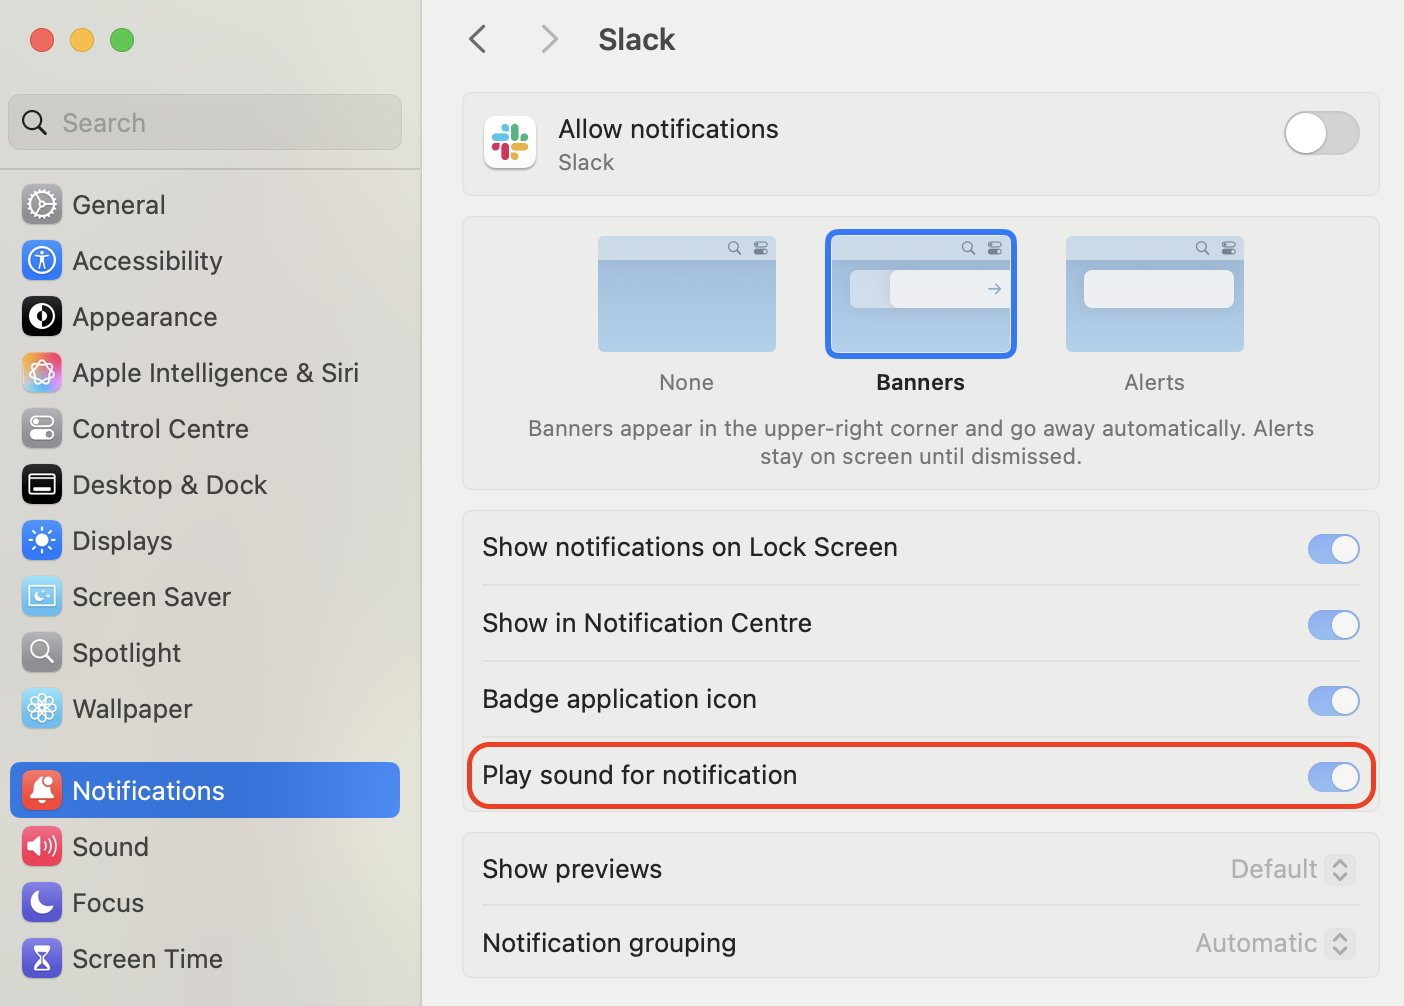
Turn on Play sound for notifications.
Turn on Play sound for notifications for Slack
2. Select notification sound in Slack
Slack keeps its own mute switch, and it overrides everything you just set in macOS.
Pick your alert sound inside Slack:
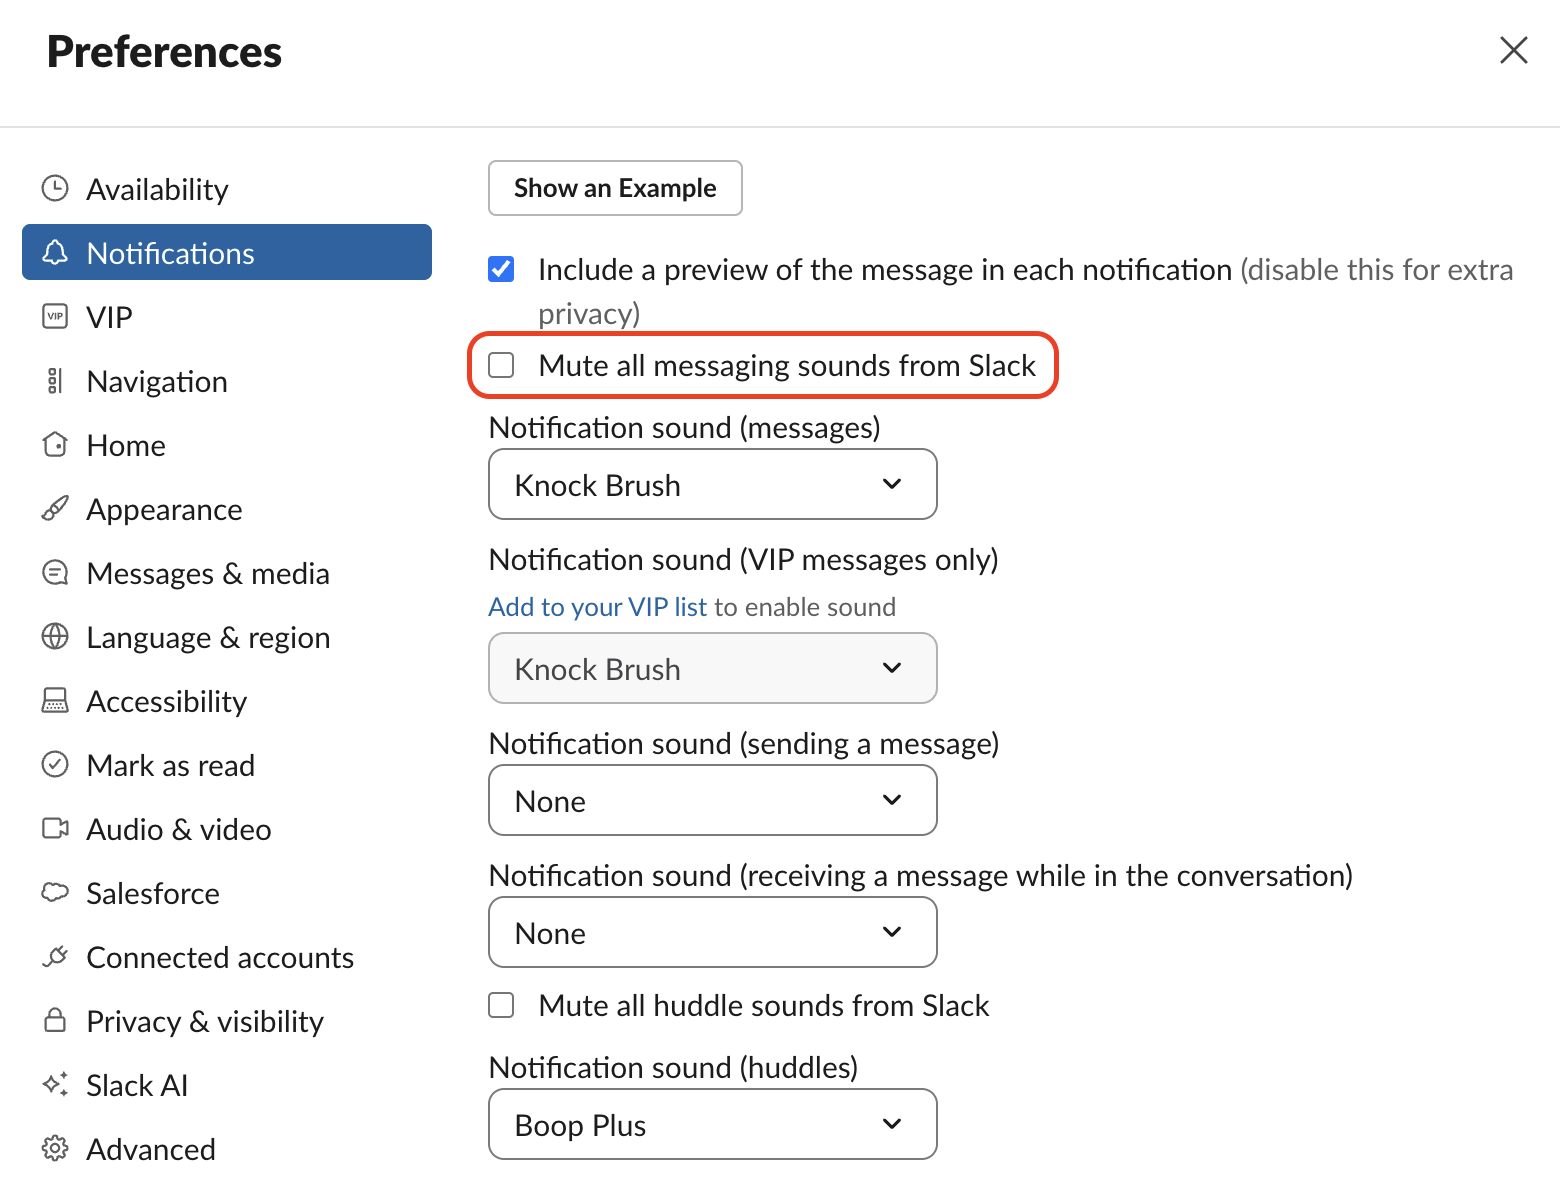
Open Preferences, then click Notifications.
Scroll to Sound & appearance and deselect Mute all sounds from Slack.
Choose a custom sound for each type, including huddles.
Scroll to Sound and appearance, then pick a sound
3. Check alert volume and mute settings
Alert volume sits relative to your output volume, so lowering music lowers your alerts too.
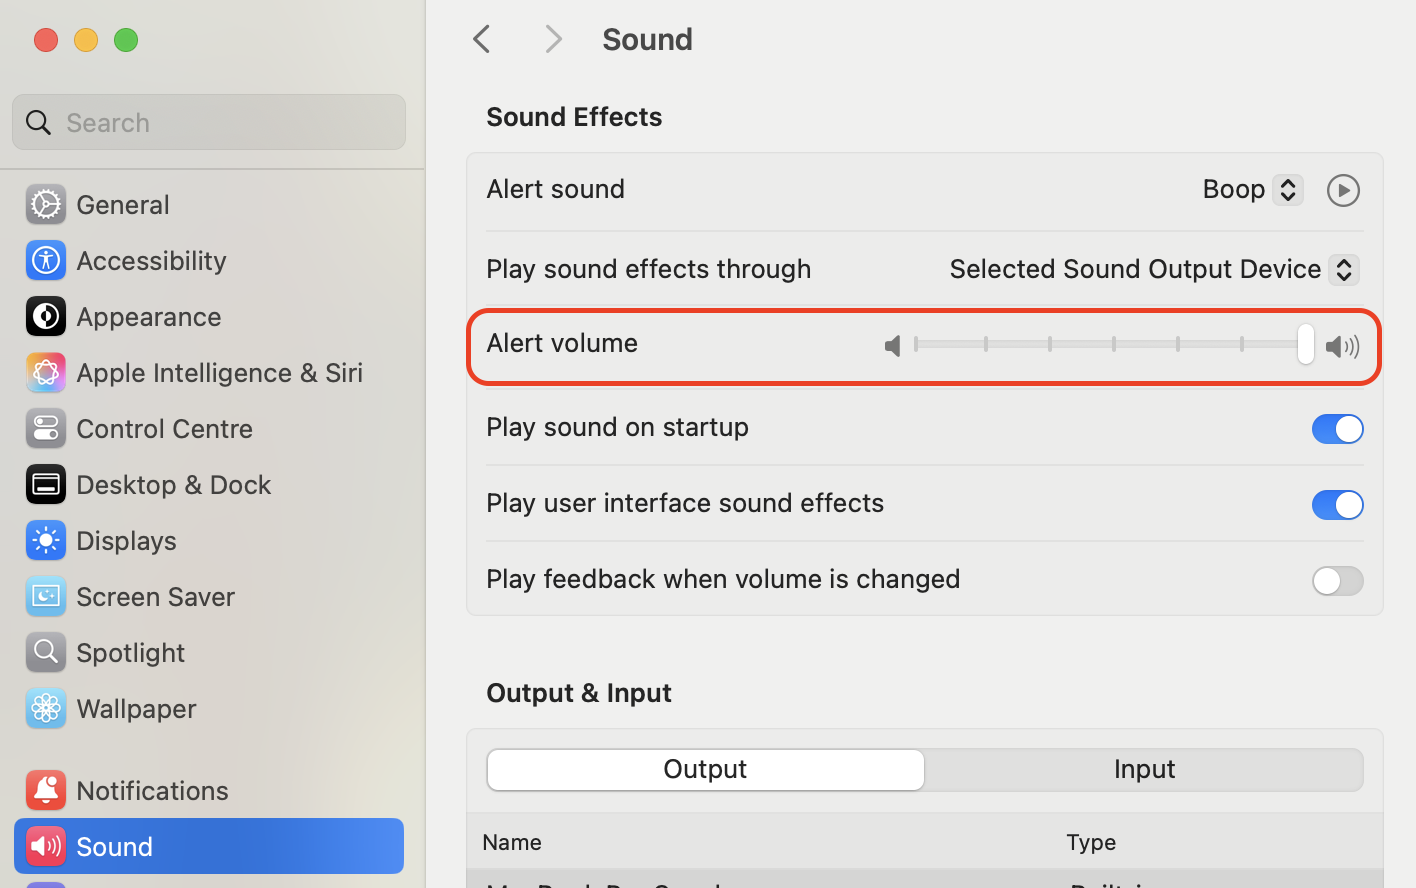
Bring the alert volume back up:
Open System Settings, then click Sound.
Drag the Alert volume slider up.
Deselect the Mute checkbox under Output volume.
Drag the Alert volume slider up and deselect Mute
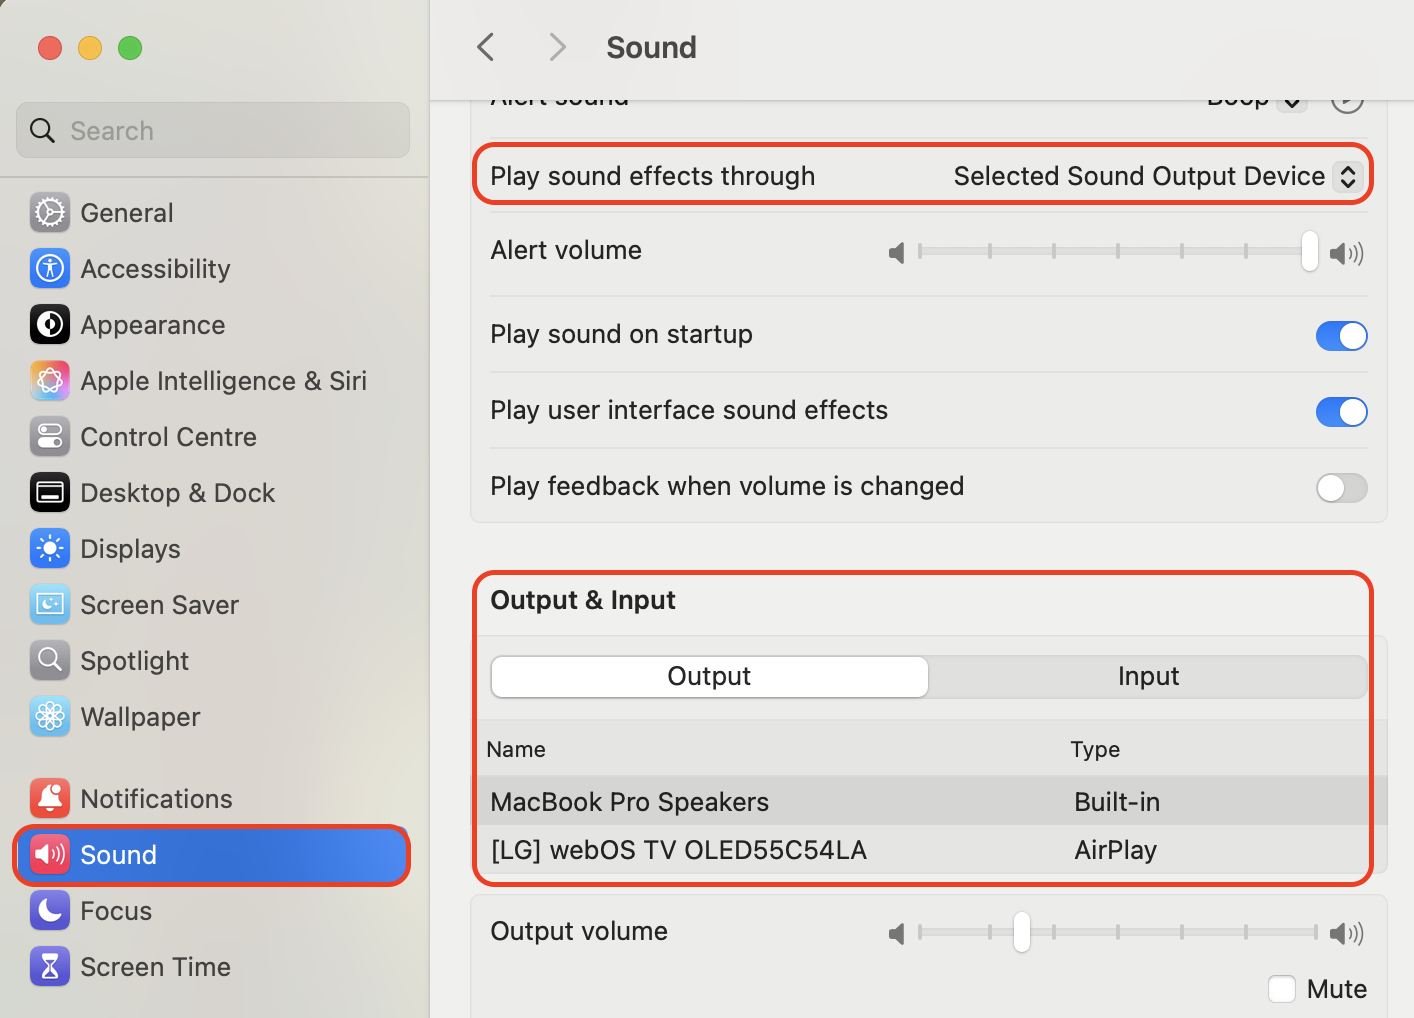
4. Select correct audio output
Our team finds most silent alerts land on headphones or a dock, not your speakers.
Send the sound to the right device:
Under Output, select the device you’re listening through.
Open Play sound effects through and pick the same device.
Disconnect idle Bluetooth headphones that keep taking sounds automatically.
Select the device you are listening through under Output
Conclusion
In almost every case we handle, Slack notifications not working on Mac is a layer, not a fault. Check macOS permissions first, then Slack’s workspace, channel, Focus, and sound settings.
Prefer to hand it over? MacKeeper’s Premium Services put a tech expert on it while you work. MacKeeper offers memory optimization, so one app keeps your Mac quick. Download MacKeeper and get your alerts moving again.
We respect your privacy and
use cookies
for the best site experience.
Privacy Preferences Center
We use cookies along with other tools to give you the best possible experience while using the
MacKeeper website. Cookies are small text files that help the website load faster. The cookies we
use don’t contain any type of personal data meaning they never store information such as your
location, email address, or IP address.
Help us improve how you interact with our website by accepting the use of cookies. You can change
your privacy settings whenever you like.
Manage consent
All cookies
These cookies are strictly necessary for enabling basic website functionality (including page
navigation, form submission, language detection, post commenting), downloading and purchasing
software. The website might malfunction without these cookies.