Is the sentineld process on Mac pushing your CPU through the roof? It’s usually tied to SentinelOne security scans, real-time threat monitoring, or background file checks. MacKeeper’s Memory Cleaner frees up memory by quitting useless processes, so your Mac feels quick and responsive again.
Think of sentineld as a quiet security guard that never clocks out. It’s a background security component used by SentinelOne for threat detection, behavioral monitoring, and file scanning. It runs continuously to help protect your system from harmful files and suspicious activity.
Because it works around the clock, you’ll sometimes notice it in Activity Monitor. That’s normal—it’s part of how your security features keep an eye on things. If you’d like to understand more about how MacBook security features work day-to-day, it helps to know what each tool does in the background.
What can trigger high CPU usage from sentineld on Mac?
A few everyday situations can make the sentineld process work harder than usual. When it scans a lot of data at once, you’ll see its status shift to a busy state and CPU usage climb. This is true on any Mac, whether it’s a modern MacBook or an older Macintosh. Here are the most common triggers behind Mac sentineld high CPU:
An initial full-disk scan after the agent is first installed
Active malware scans checking files in the background
Software installations that create or change many files
Lots of file changes happening at the same time
Strict policy settings that scan more often
Conflicts with other security tools running alongside it
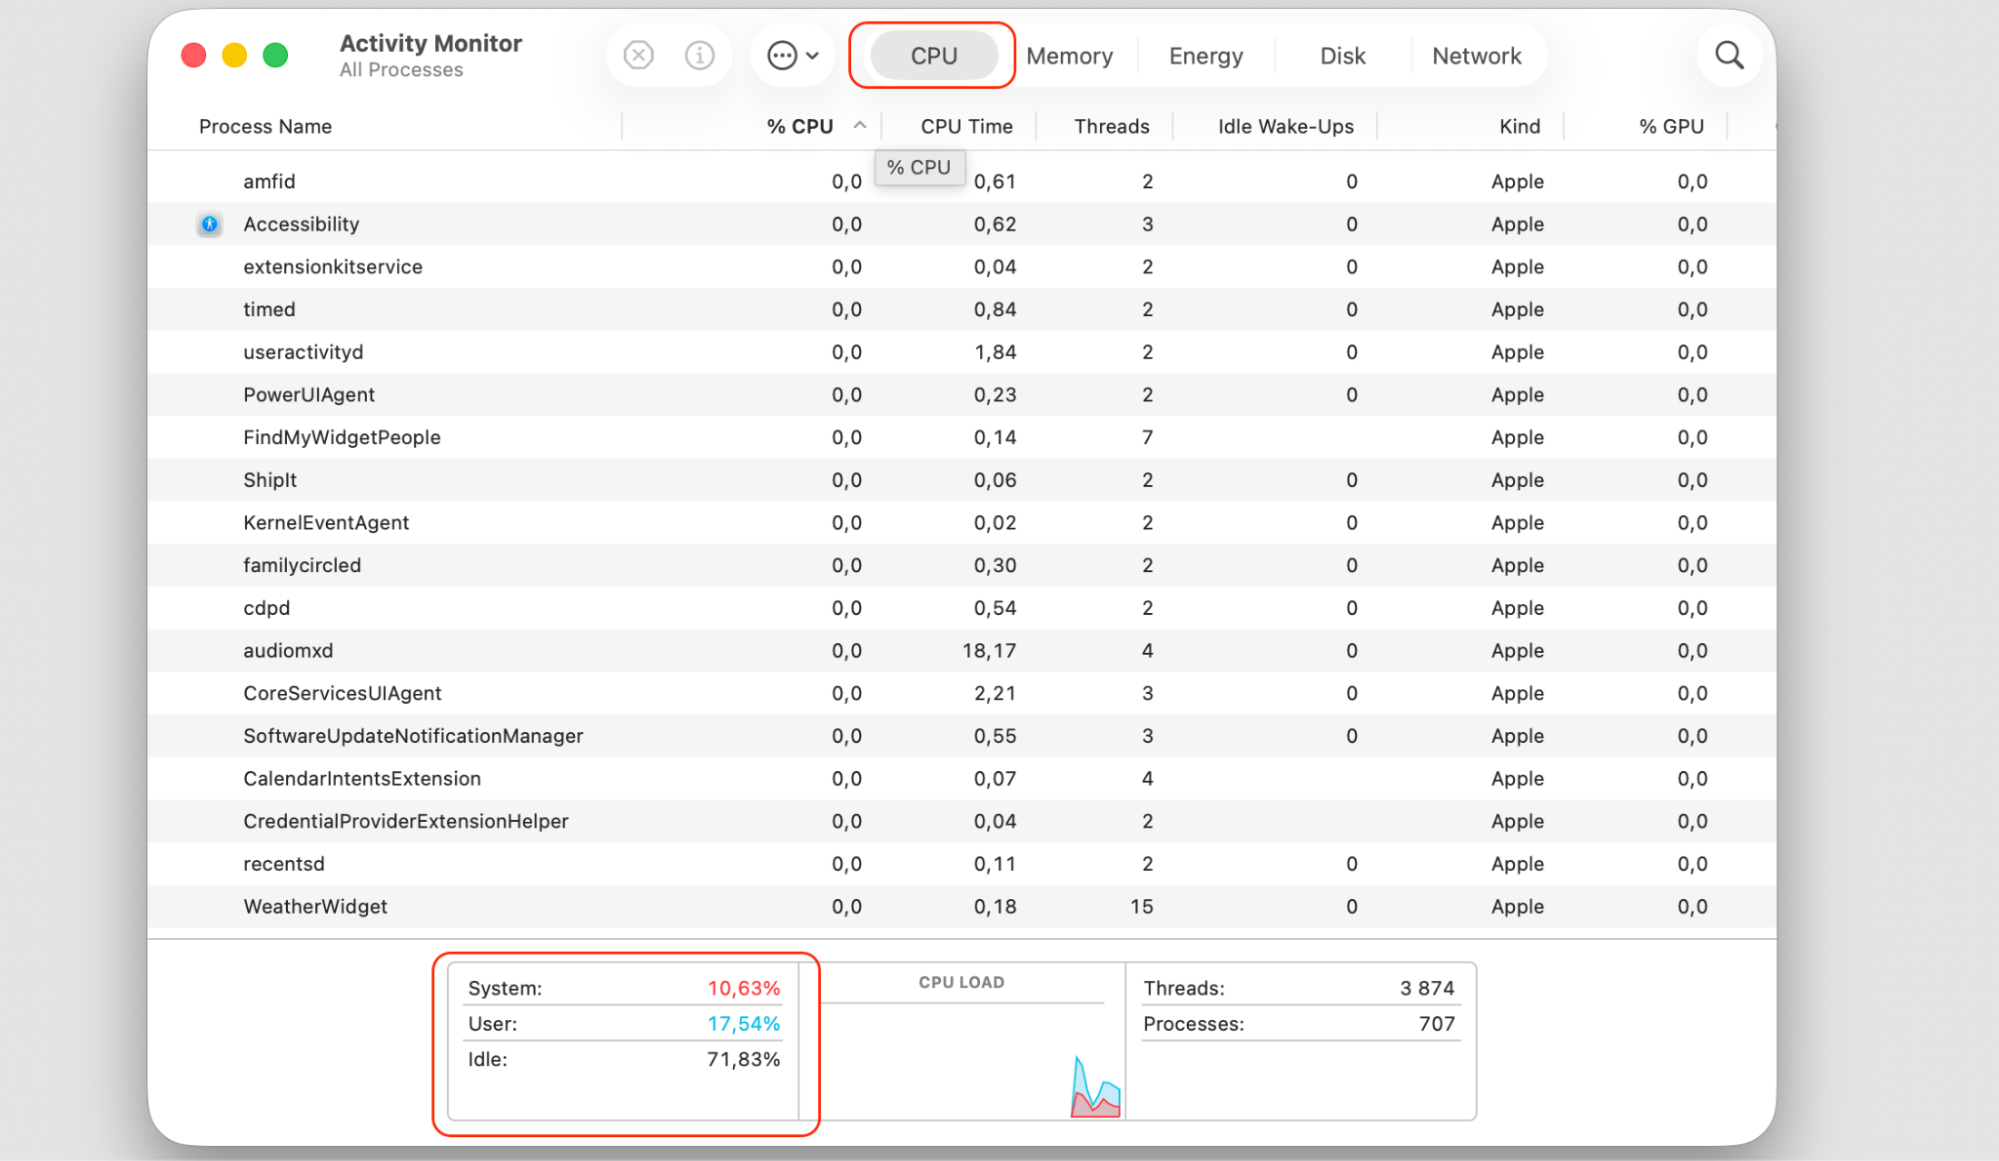
Spikes can also show up right after you start your Mac or finish a system update. If you want to check Mac system performance while this happens, a quick look at CPU activity tells you whether sentineld is the busy one.
A note from our experts:
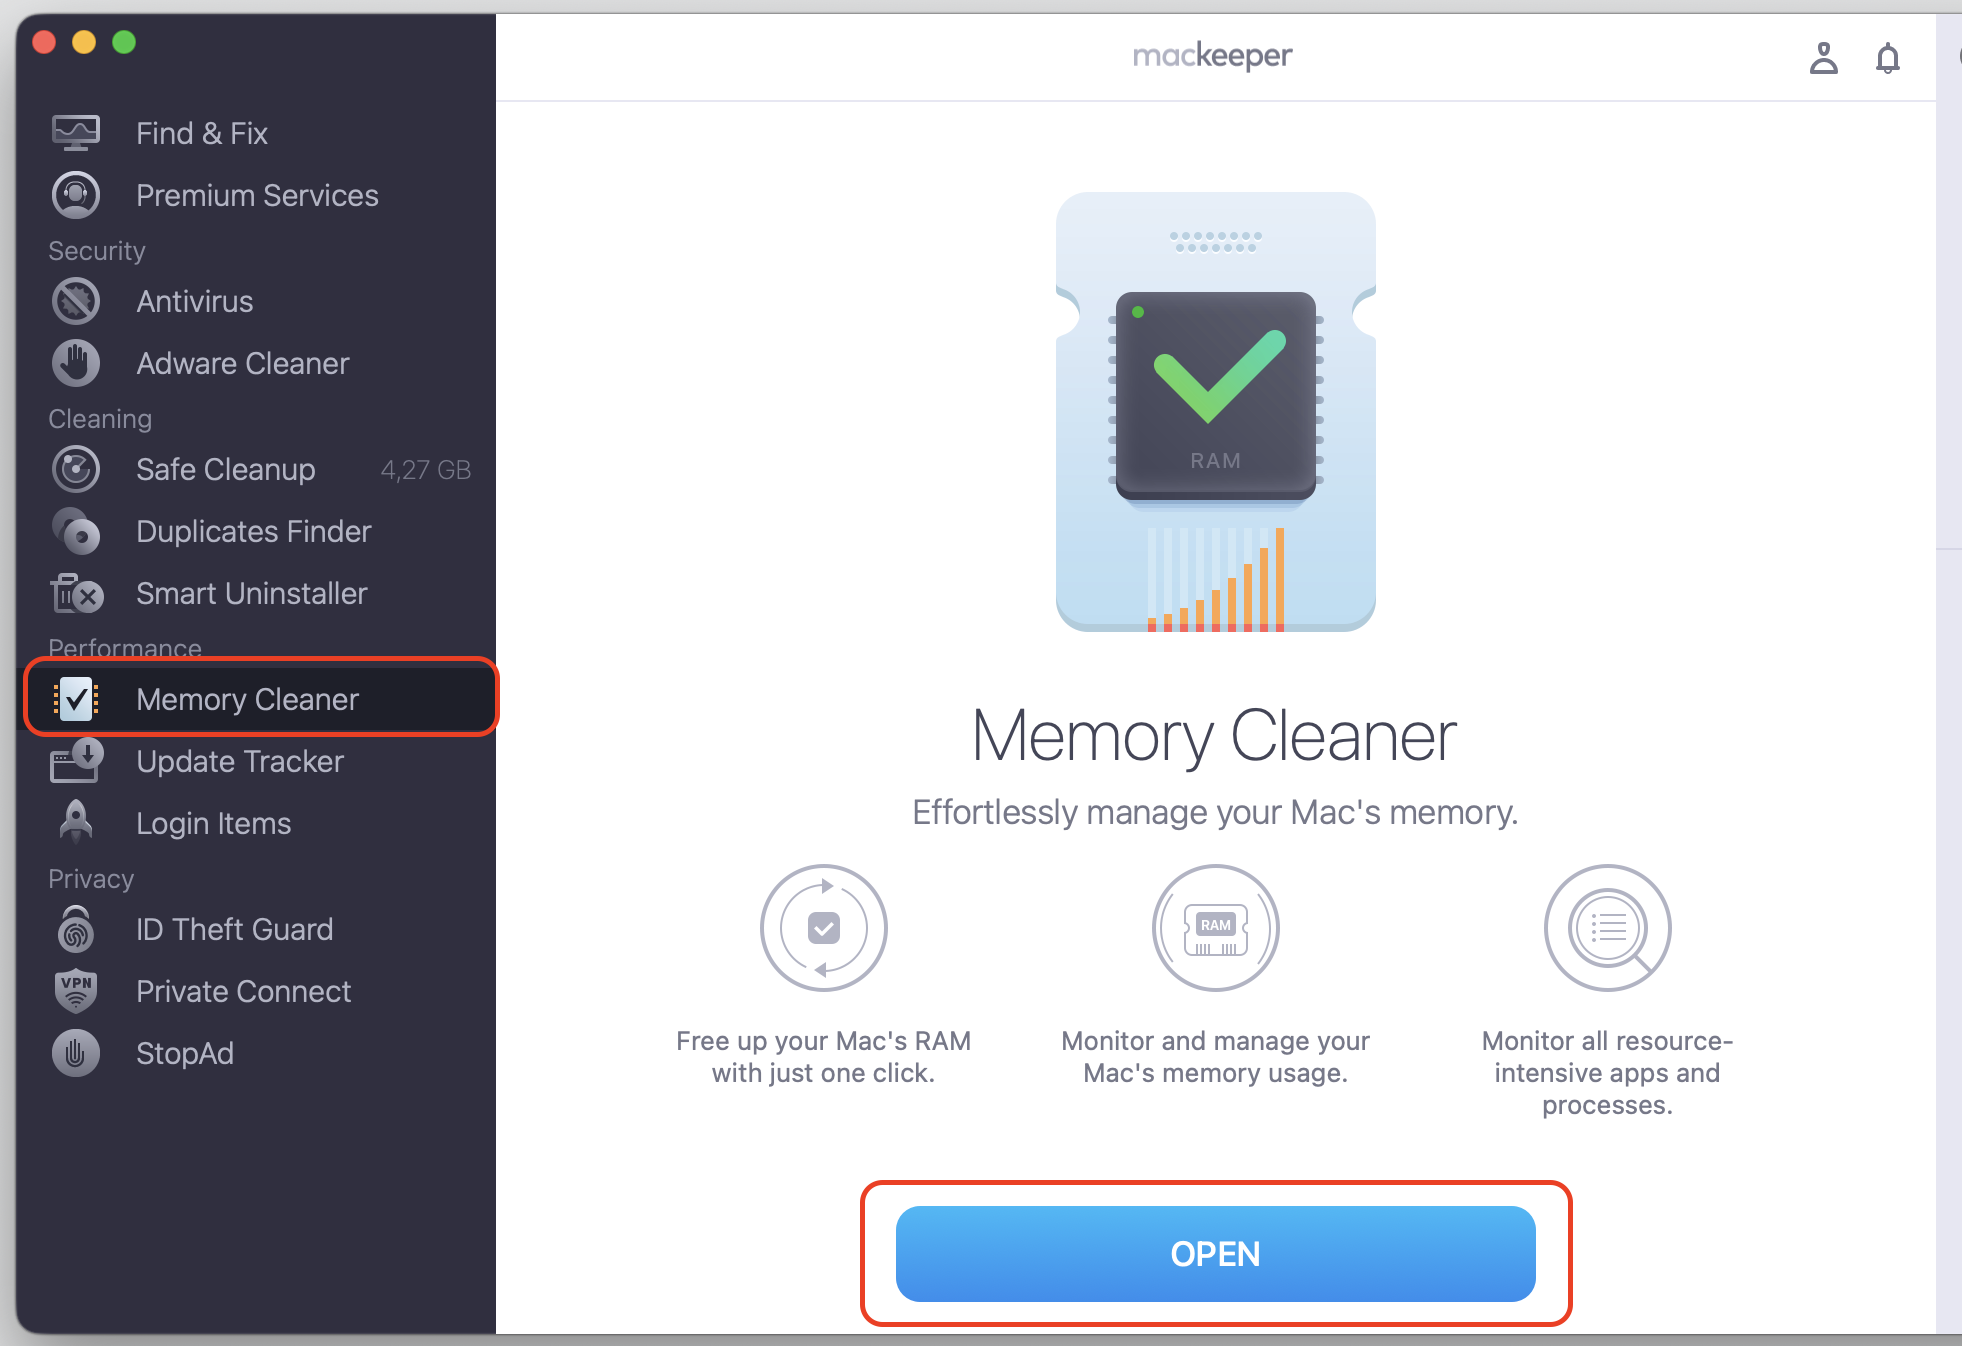
If you’re concerned about your Mac using too much CPU and running slowly, there’s a way to make it more efficient. Use MacKeeper’s Memory Cleaner to get more control over your Mac processes running in the background and regain better computer performance. Here’s how:
Download MacKeeper on your computer. After that, install and launch the app.
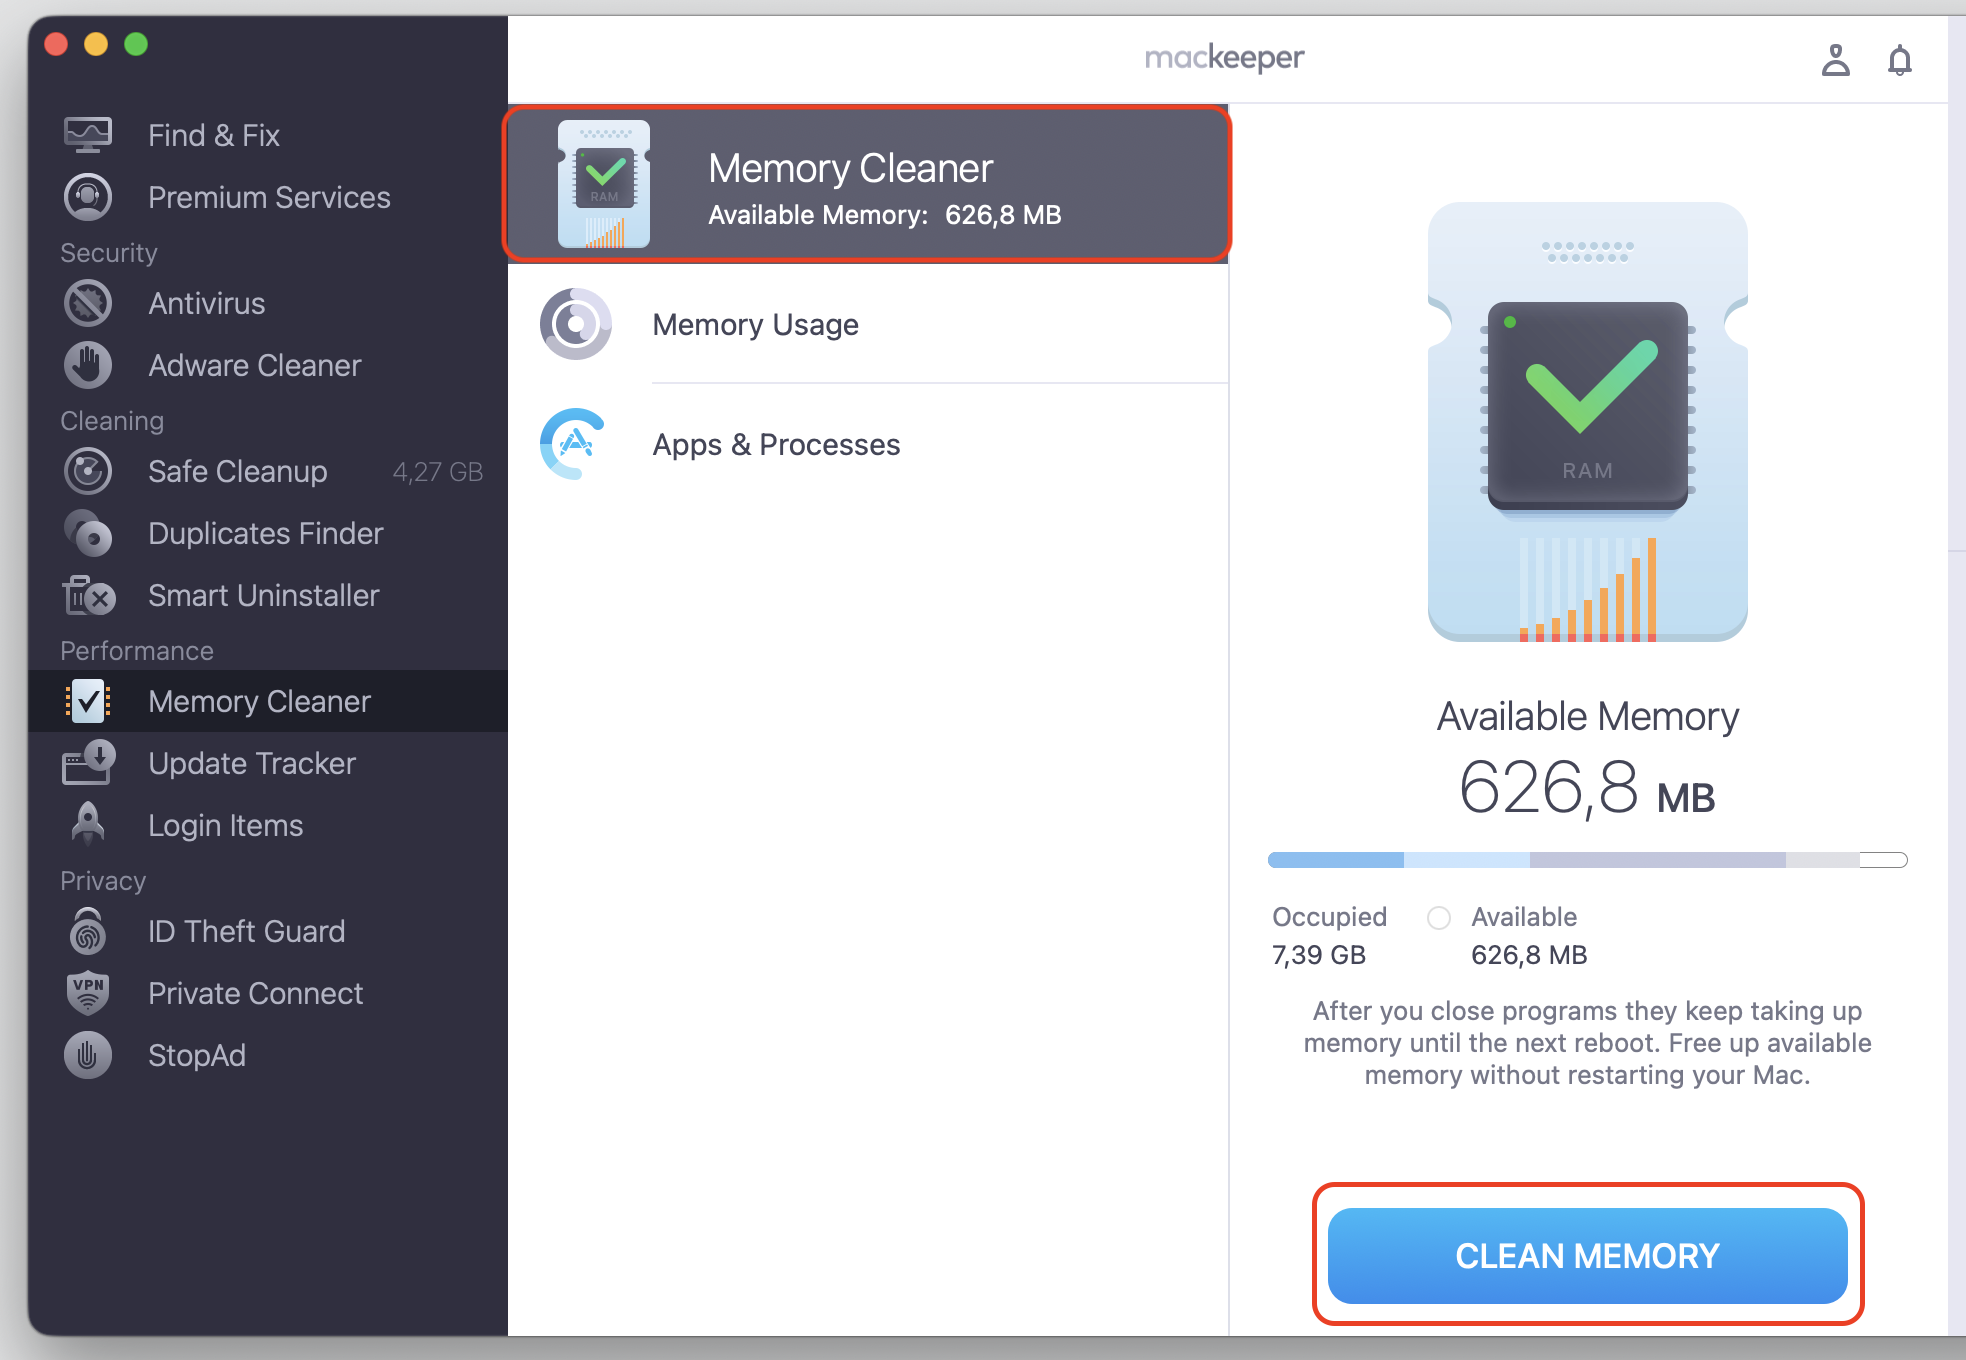
Find and select Memory Cleaner, then click Open.
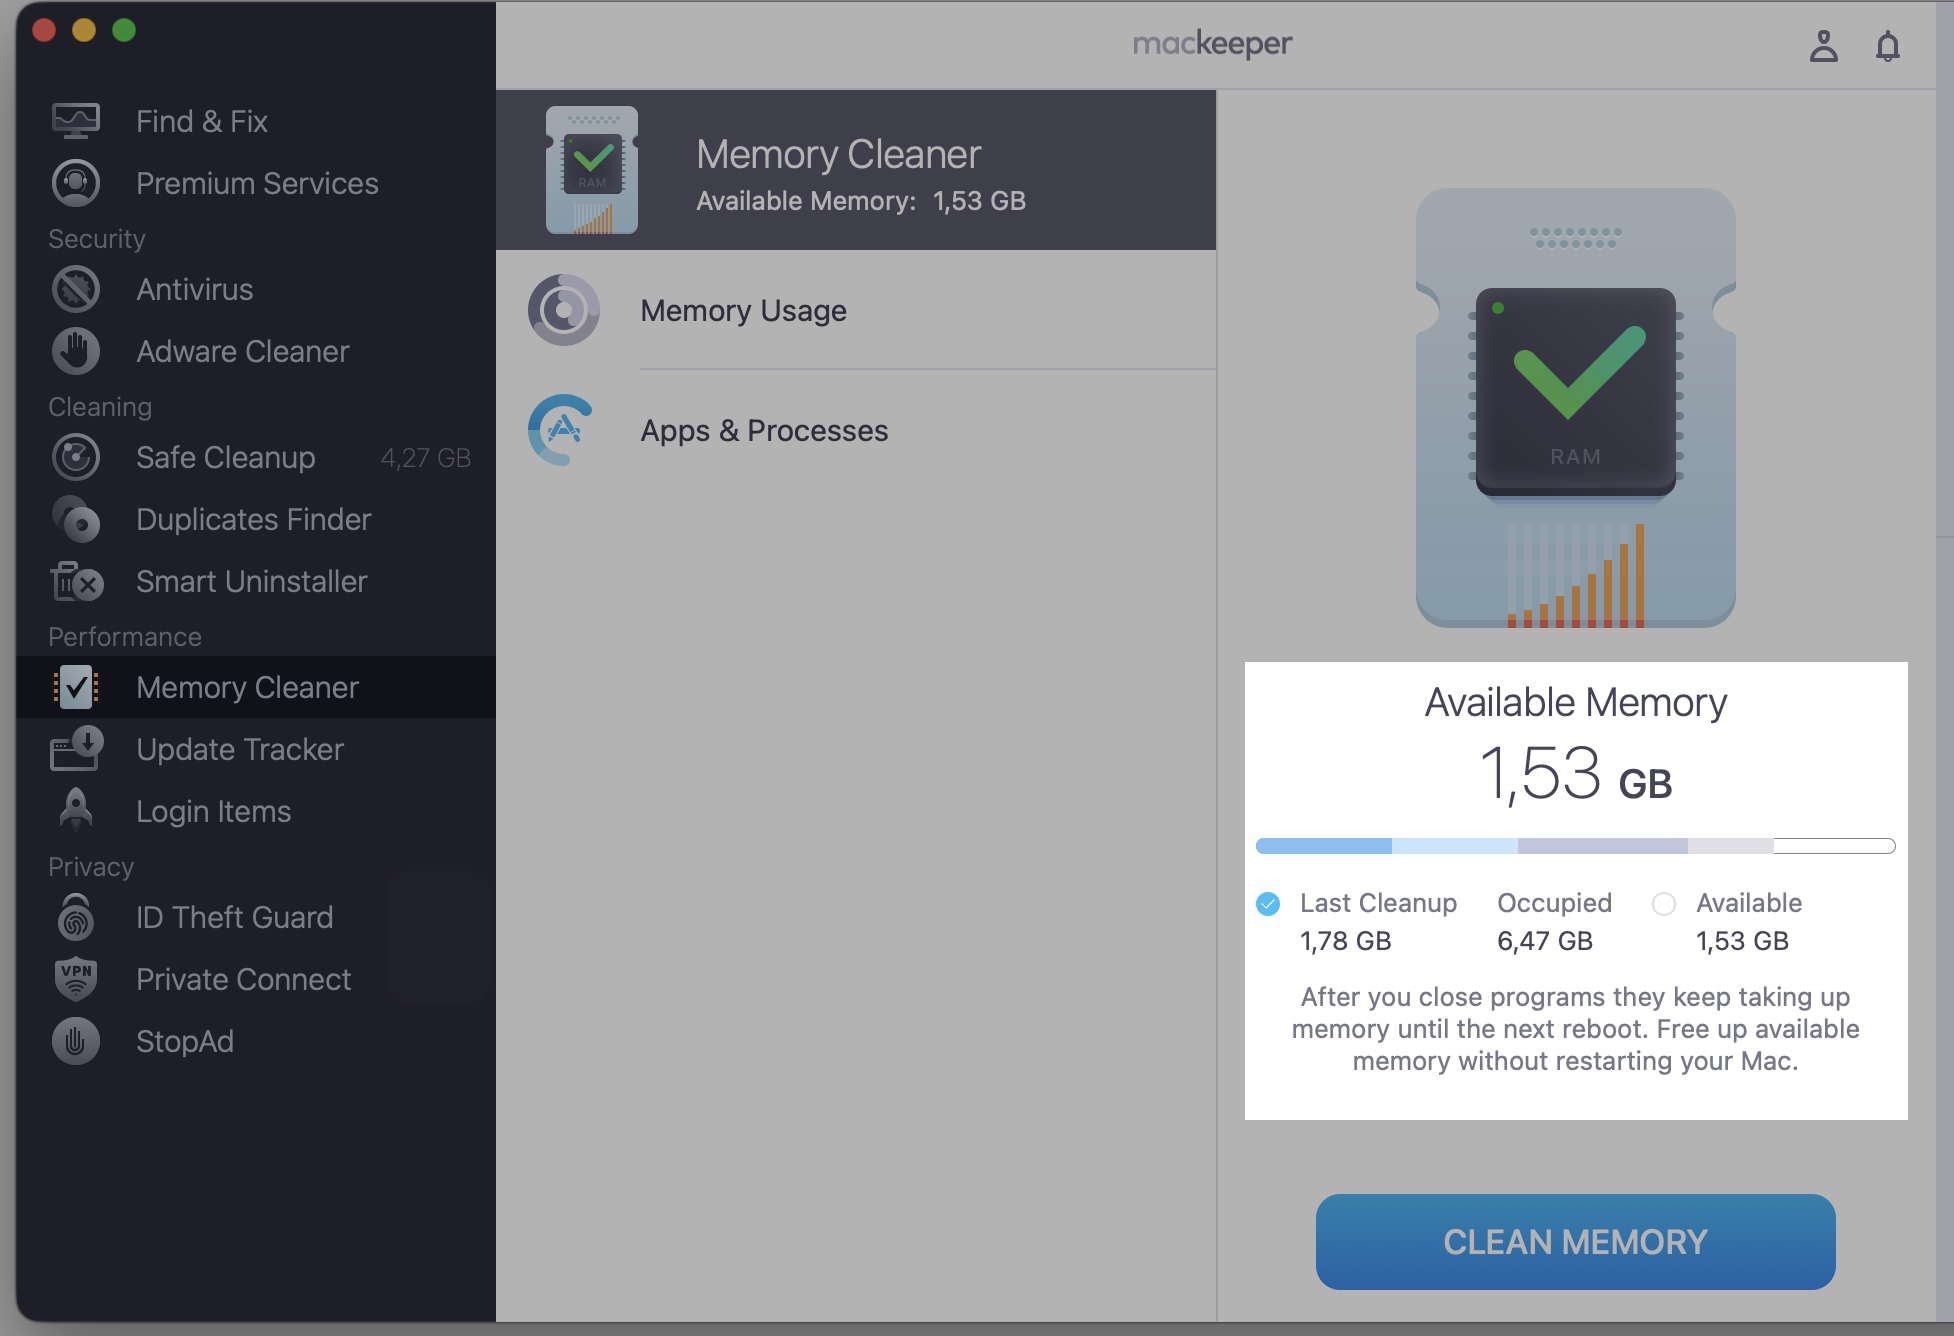
Check the memory usage report and choose Clean Memory.
See how much available memory your laptop has now.
Step 1. Go to MacKeeper > Memory Cleaner > Select OpenStep 2. Select Memory Cleaner Section, then click Clean MemoryStep 3. Check the result
When sentineld CPU spikes are considered normal?
Not every spike is a worry. Temporary high usage is often expected, and it usually settles on its own. We’d call it normal in these moments:
During the first installation, while the agent gets set up
When baseline scans review your files for the first time
After large software deployments add many new files
When you’re creating or modifying a lot of files at once
In each case, the OSX CPU load tends to drop back down once the scan finishes. A short, busy period is simply sentineld doing its job.
How can sentinel high CPU impact Mac performance?
When the load sticks around for a long time, you’ll start to feel it. Sustained CPU activity asks a lot of your hardware, and that shows up in a few familiar ways:
Louder fan noise as your Mac tries to cool down
Faster battery drain on a MacBook
Extra heat—your Mac may feel warm to the touch
Slower overall performance and lag when opening apps
If you notice your MacBook heating up alongside a noisy fan, the sentineld CPU activity could be part of the cause. The good news—once the scan wraps up, things usually cool off.
How to reduce sentineld high CPU on Mac?
Most fixes are simple. They usually involve waiting for scans to finish, reducing what triggers a scan, or reviewing SentinelOne settings. Read through our seven methods below, and start with the first one—it solves the issue for most people.
1. Wait for the initial scan to complete
First-time scans naturally use more resources because sentineld is checking every file for the first time. In our experience, it settles down once that baseline scan is done. Give it a little time, and here’s what we suggest:
Leave your Mac on and plugged in for a while.
Let the running scan finish without interrupting it.
Recheck CPU usage afterward to confirm it has dropped.
Review CPU usage
2. Restart your Mac to clear temporary process issues
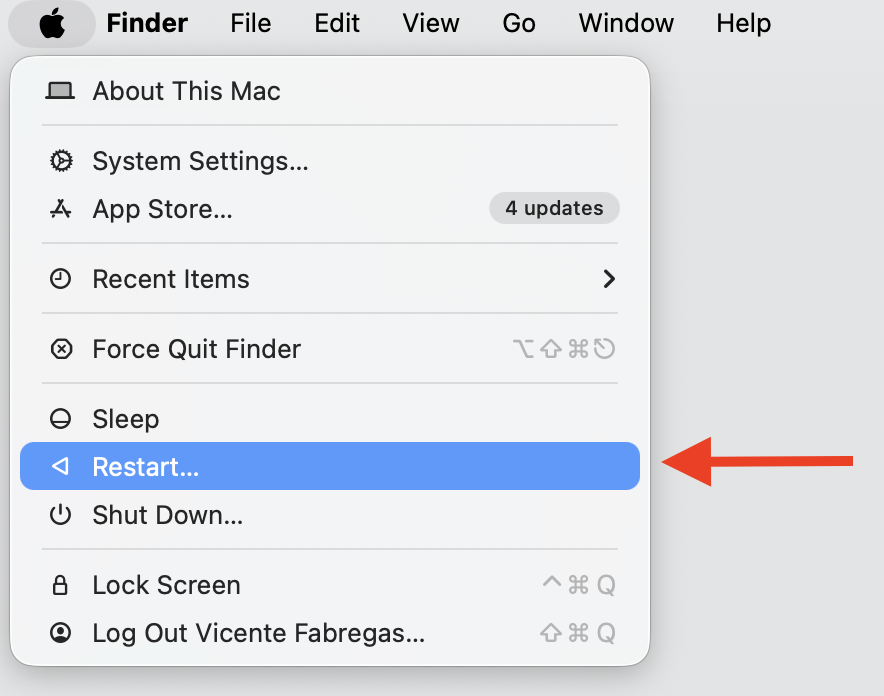
Sometimes a scan gets stuck or loops in the background. A restart clears those temporary process hiccups and gives sentineld a clean start. We’ll show you how to restart MacBook the simple way. Just follow these steps:
Click the Apple menu in the top-left corner.
Select Restart…
Confirm by clicking Restart again.
Click the Apple menu and select Restart
3. Check if software installation or deployment is running
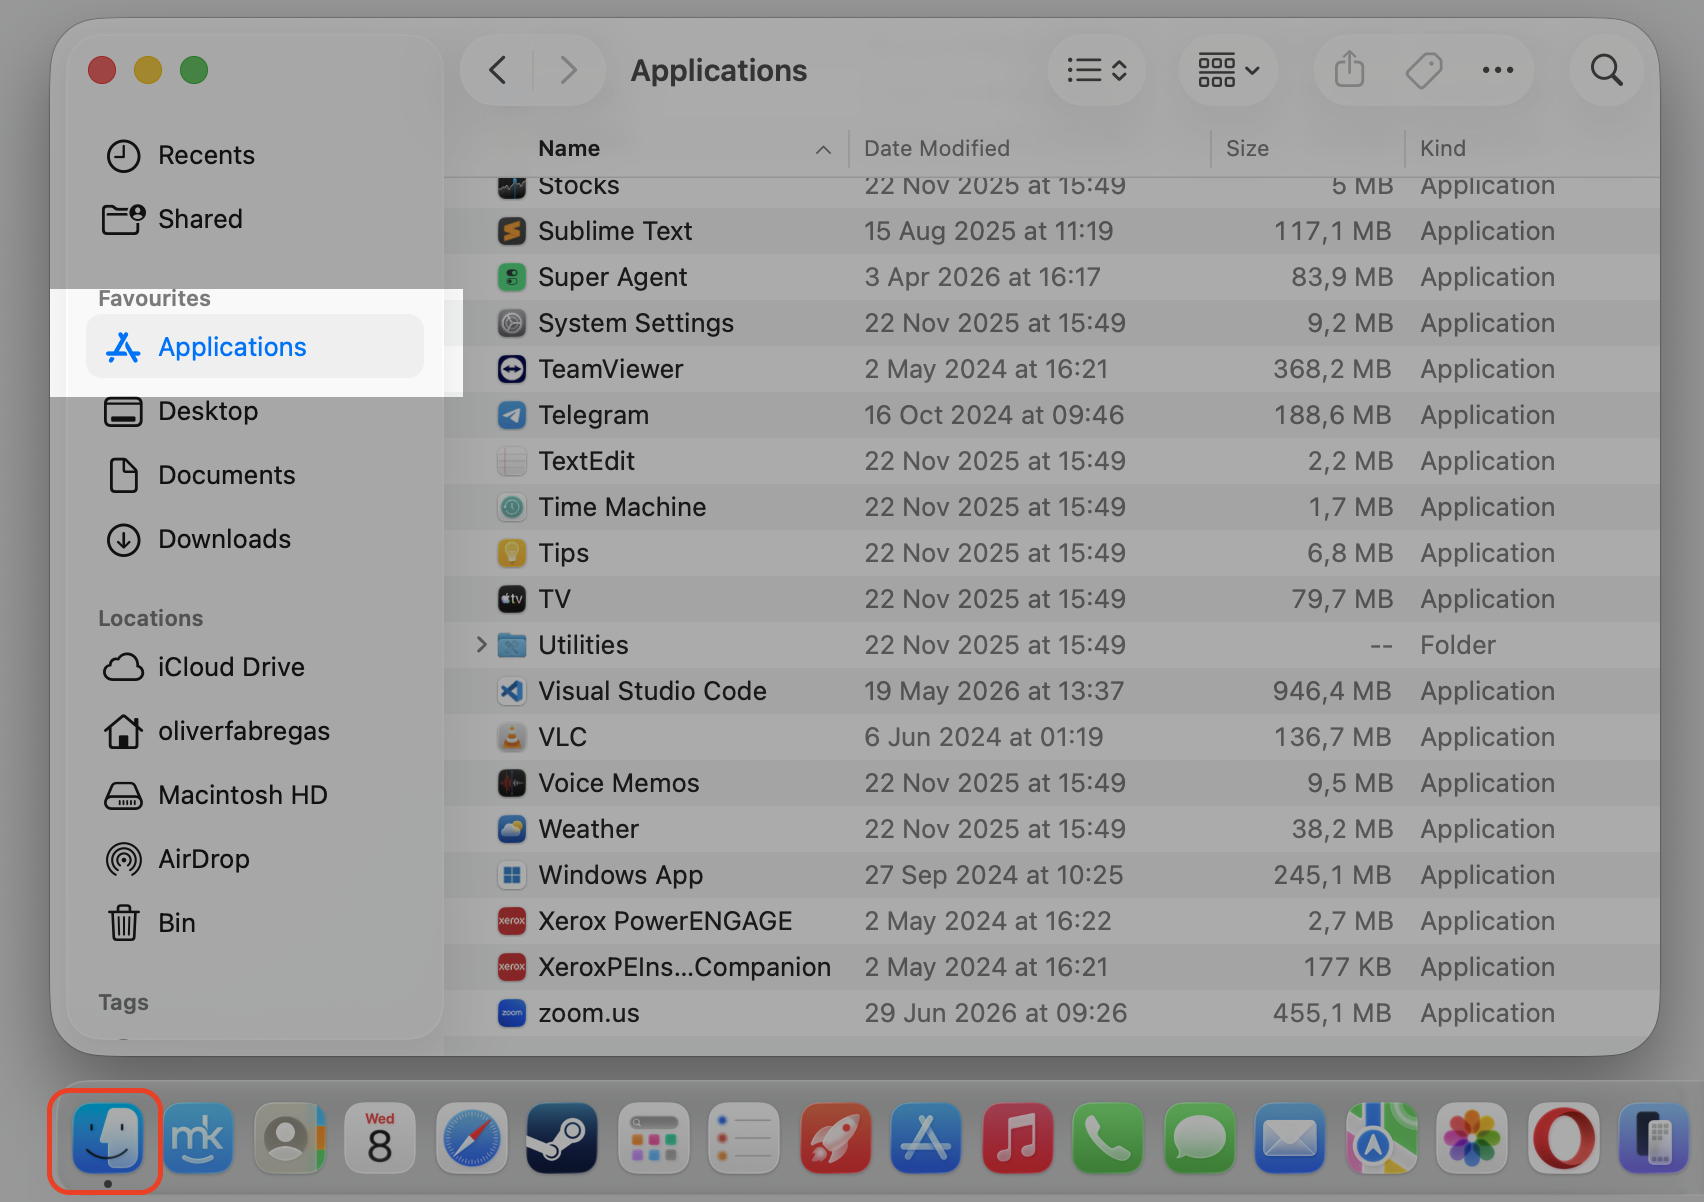
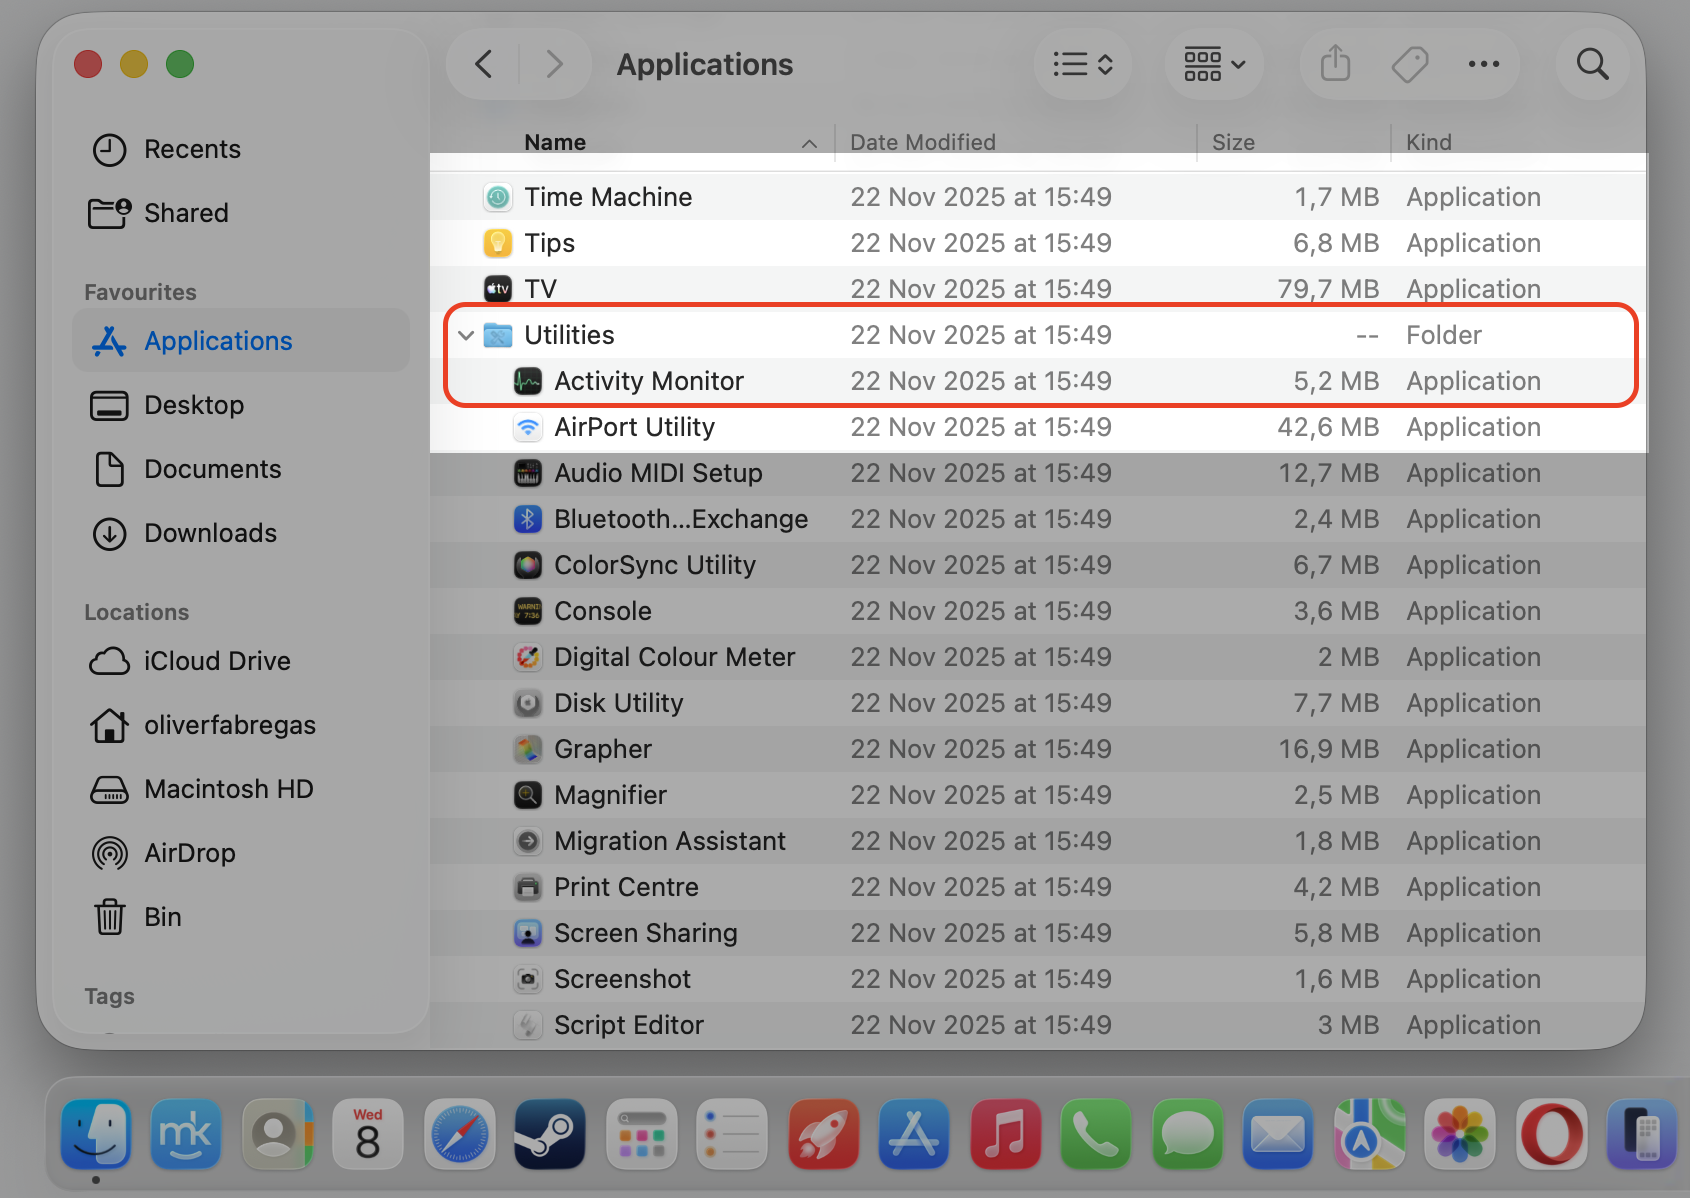
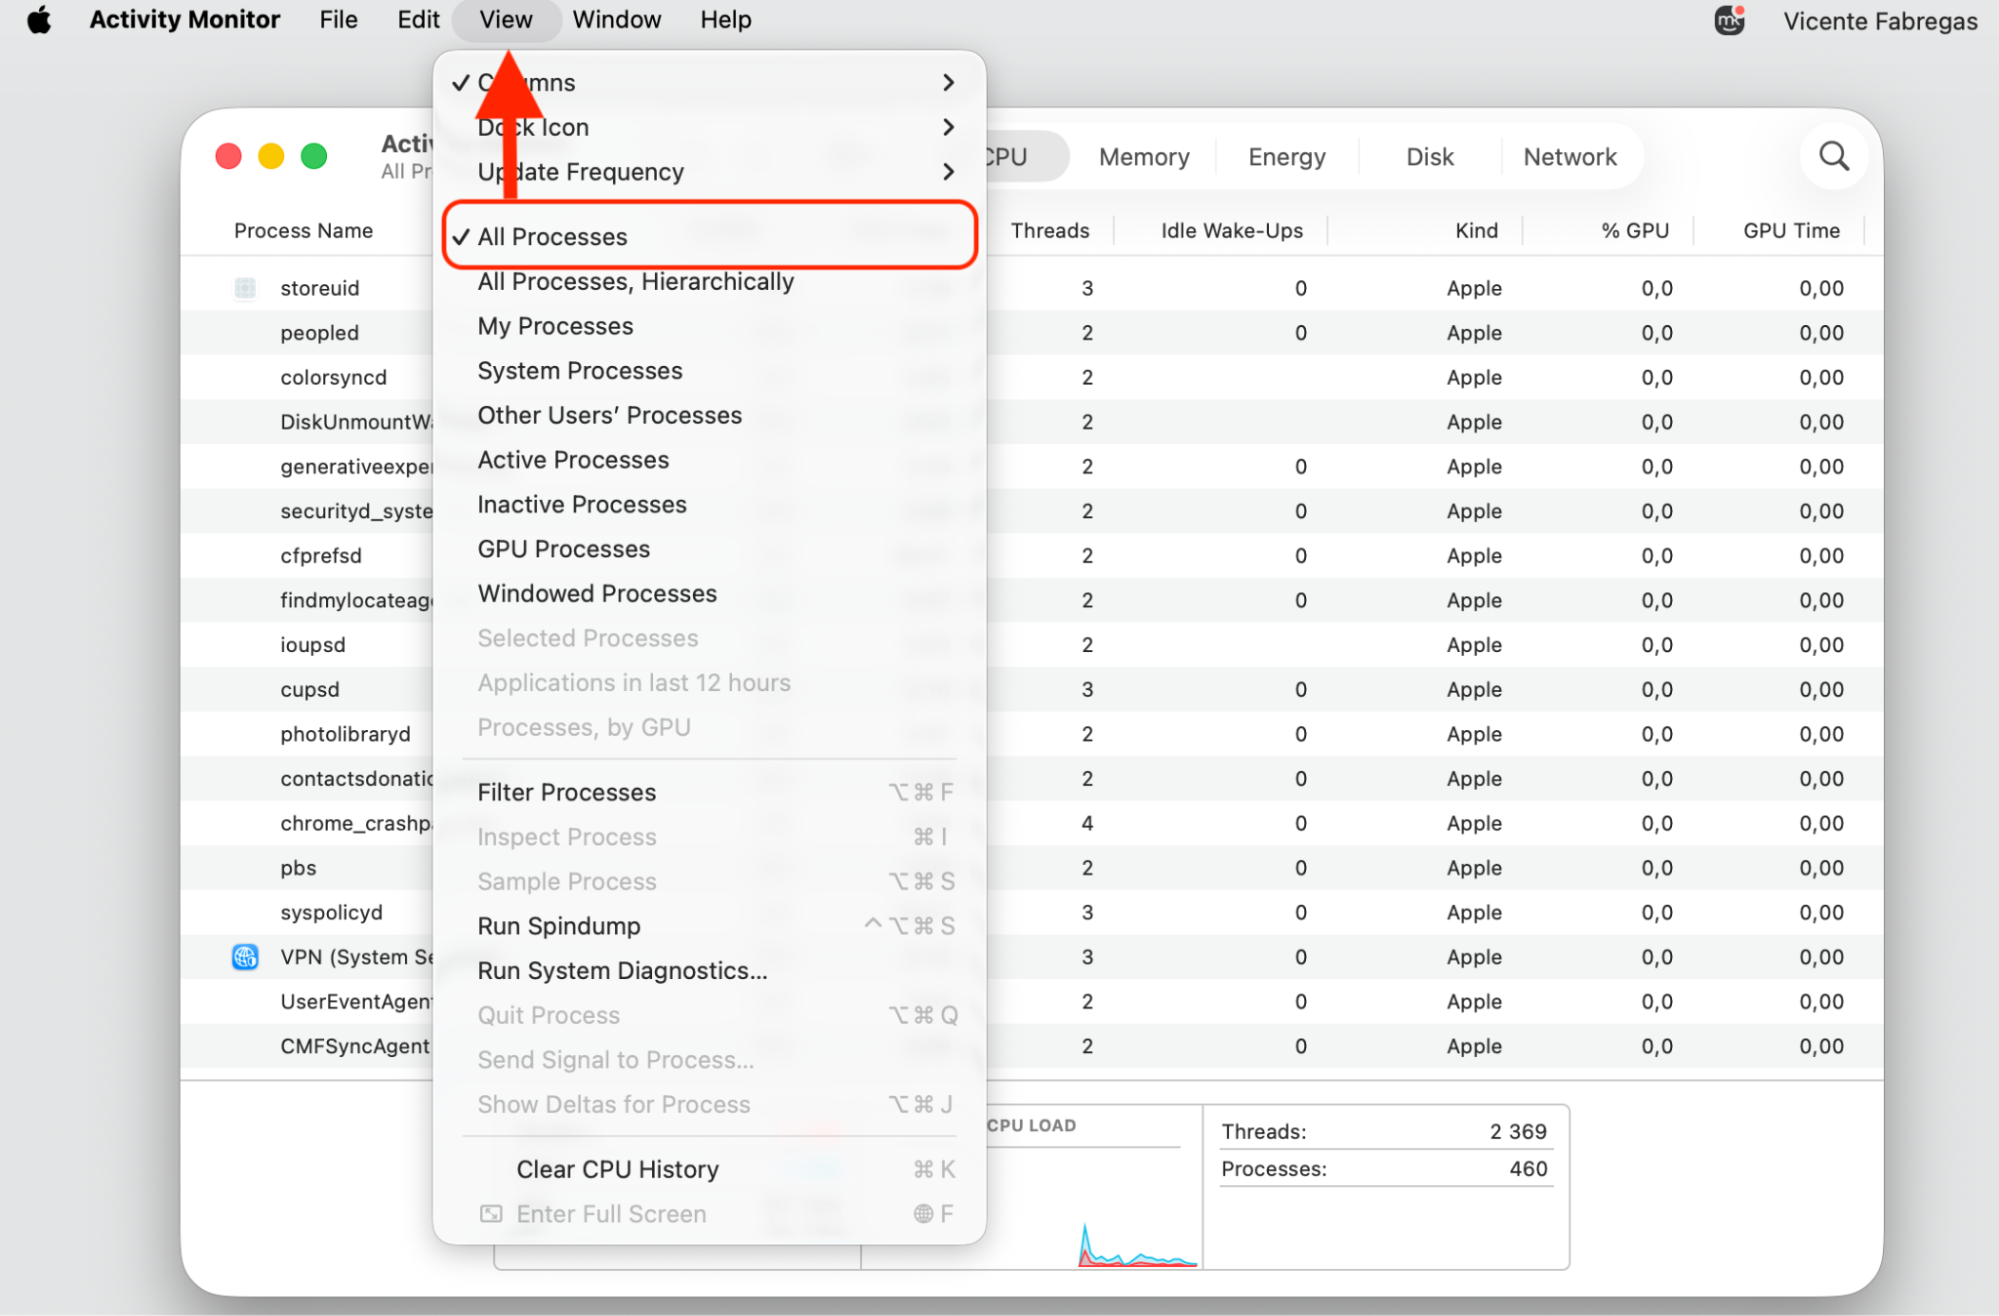
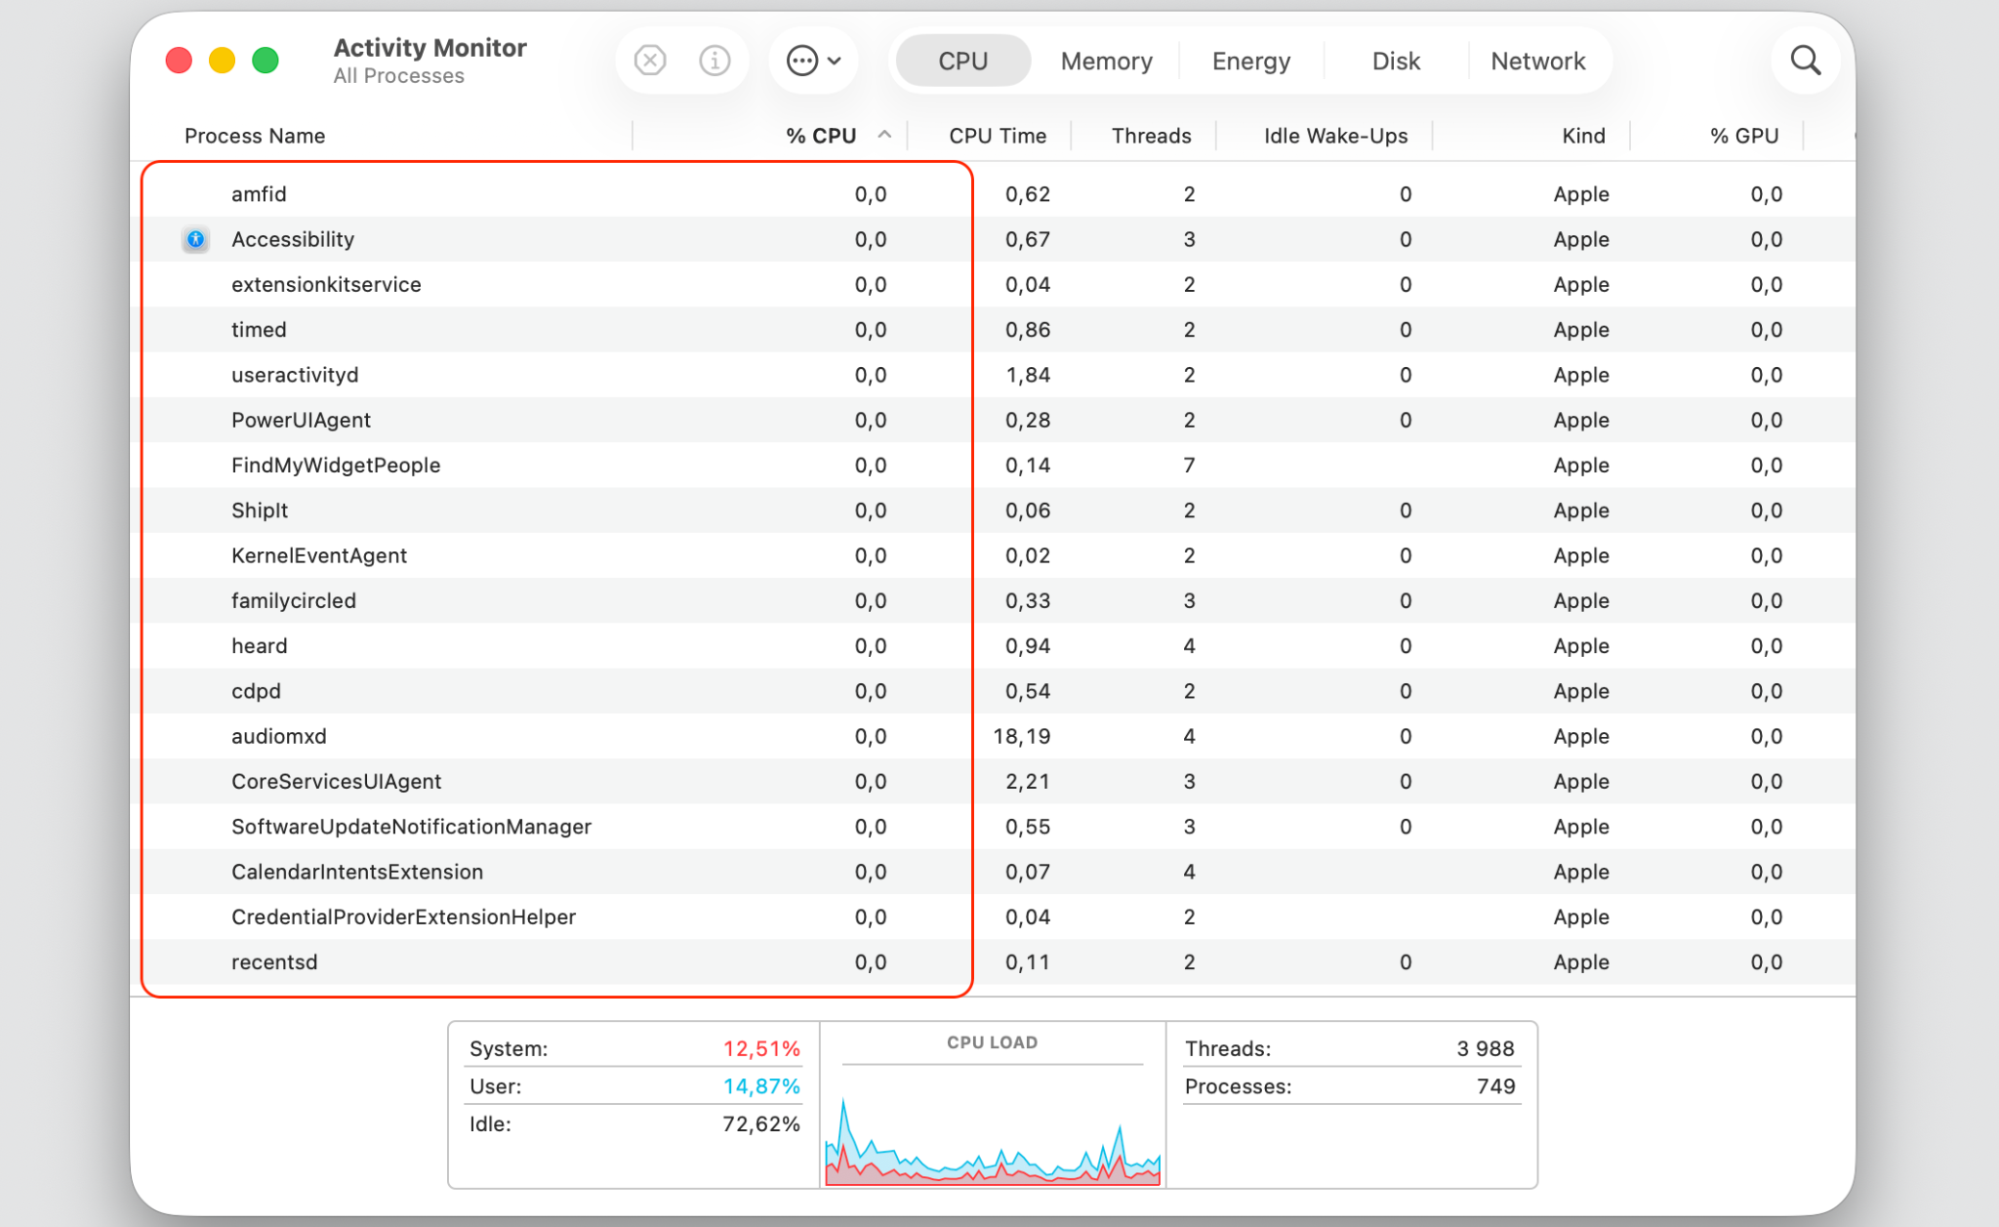
Security agents often scan many new or changed files during an install, which keeps sentineld busy. To see what’s happening, the Mac task manager, also known as Activity Monitor, gives you a clear view. Here’s how to check:
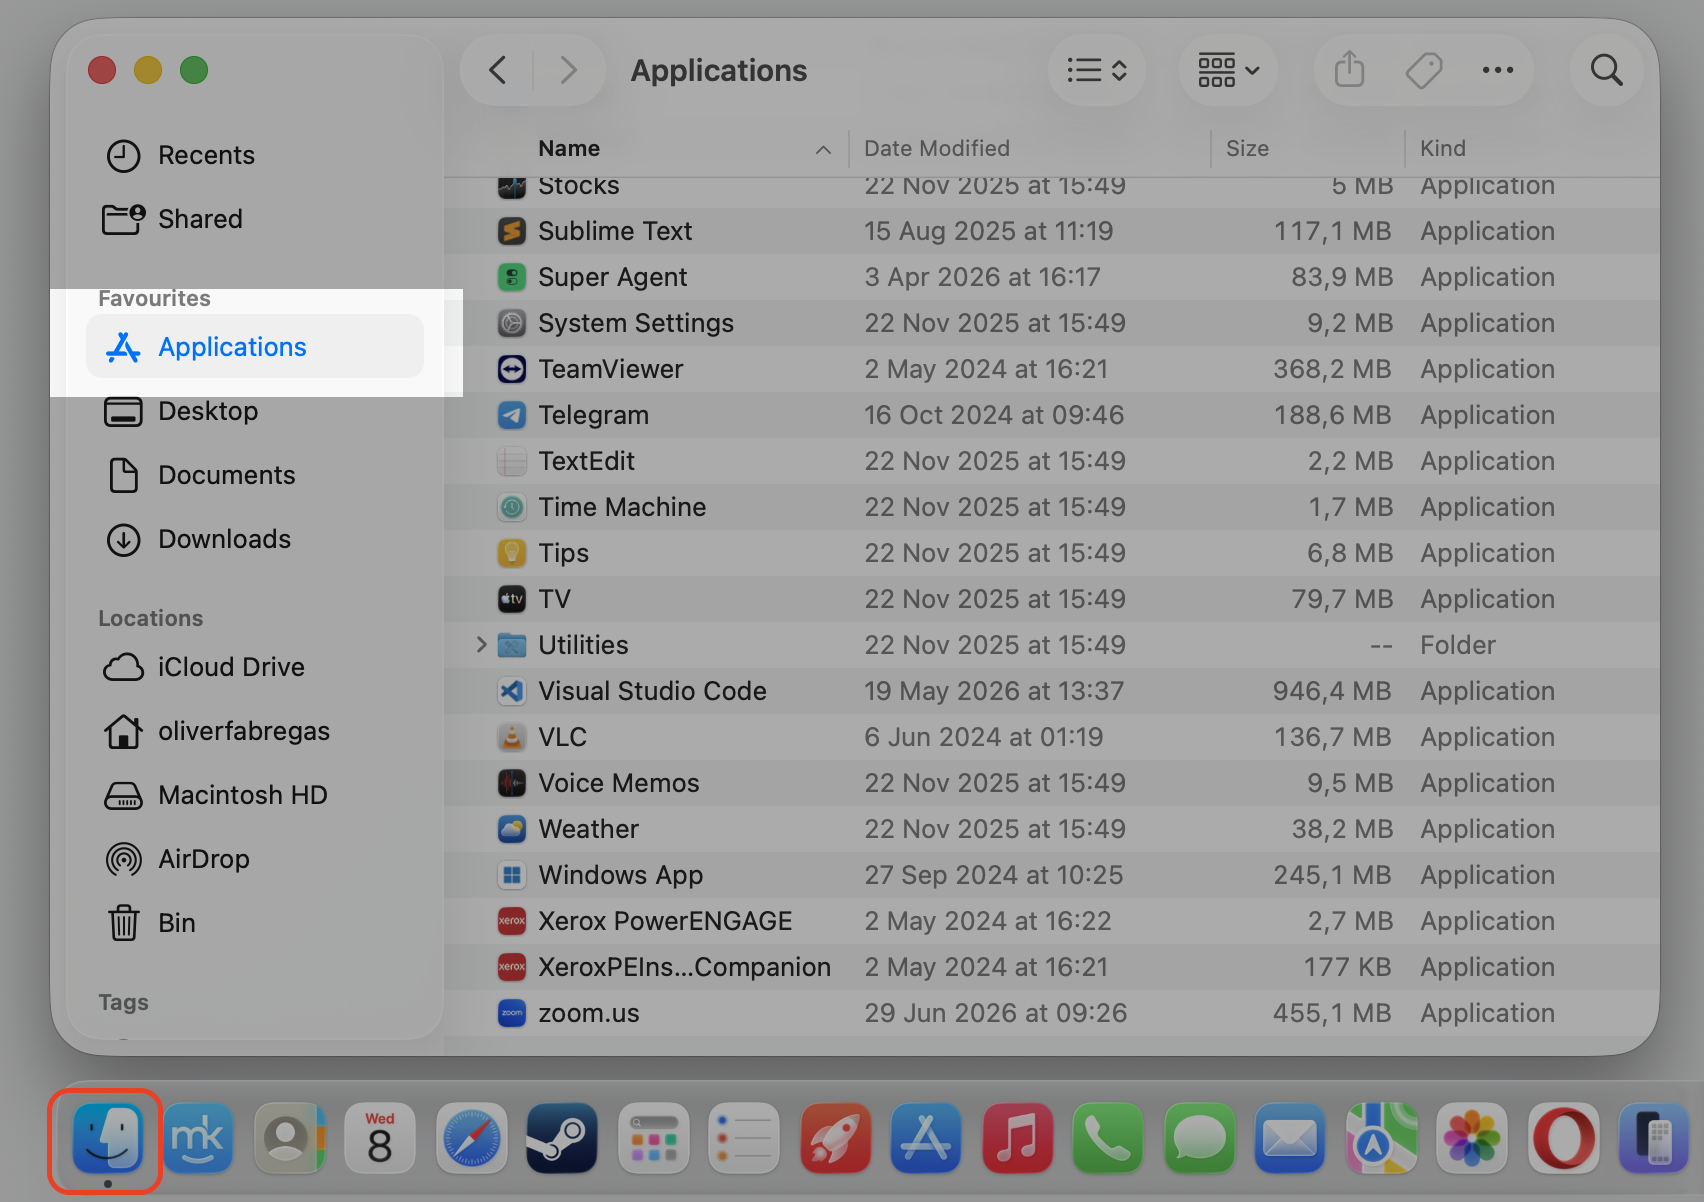
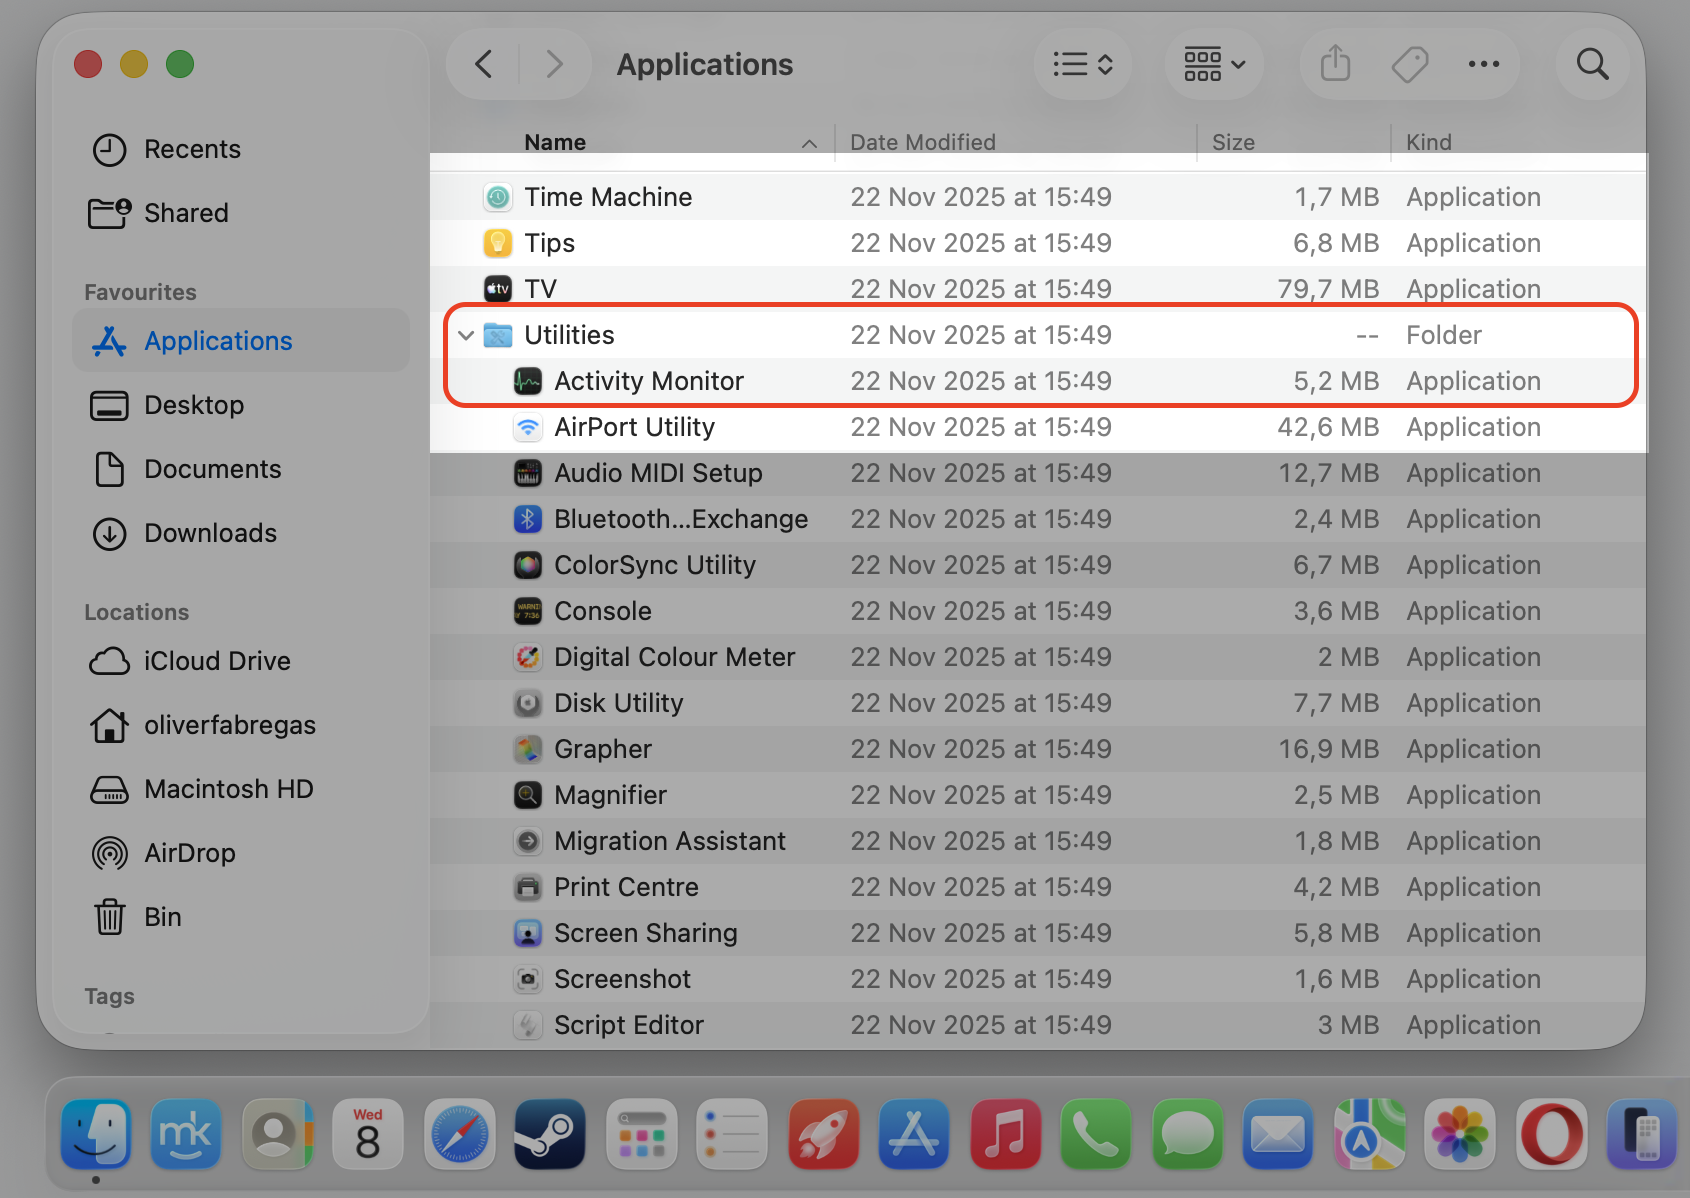
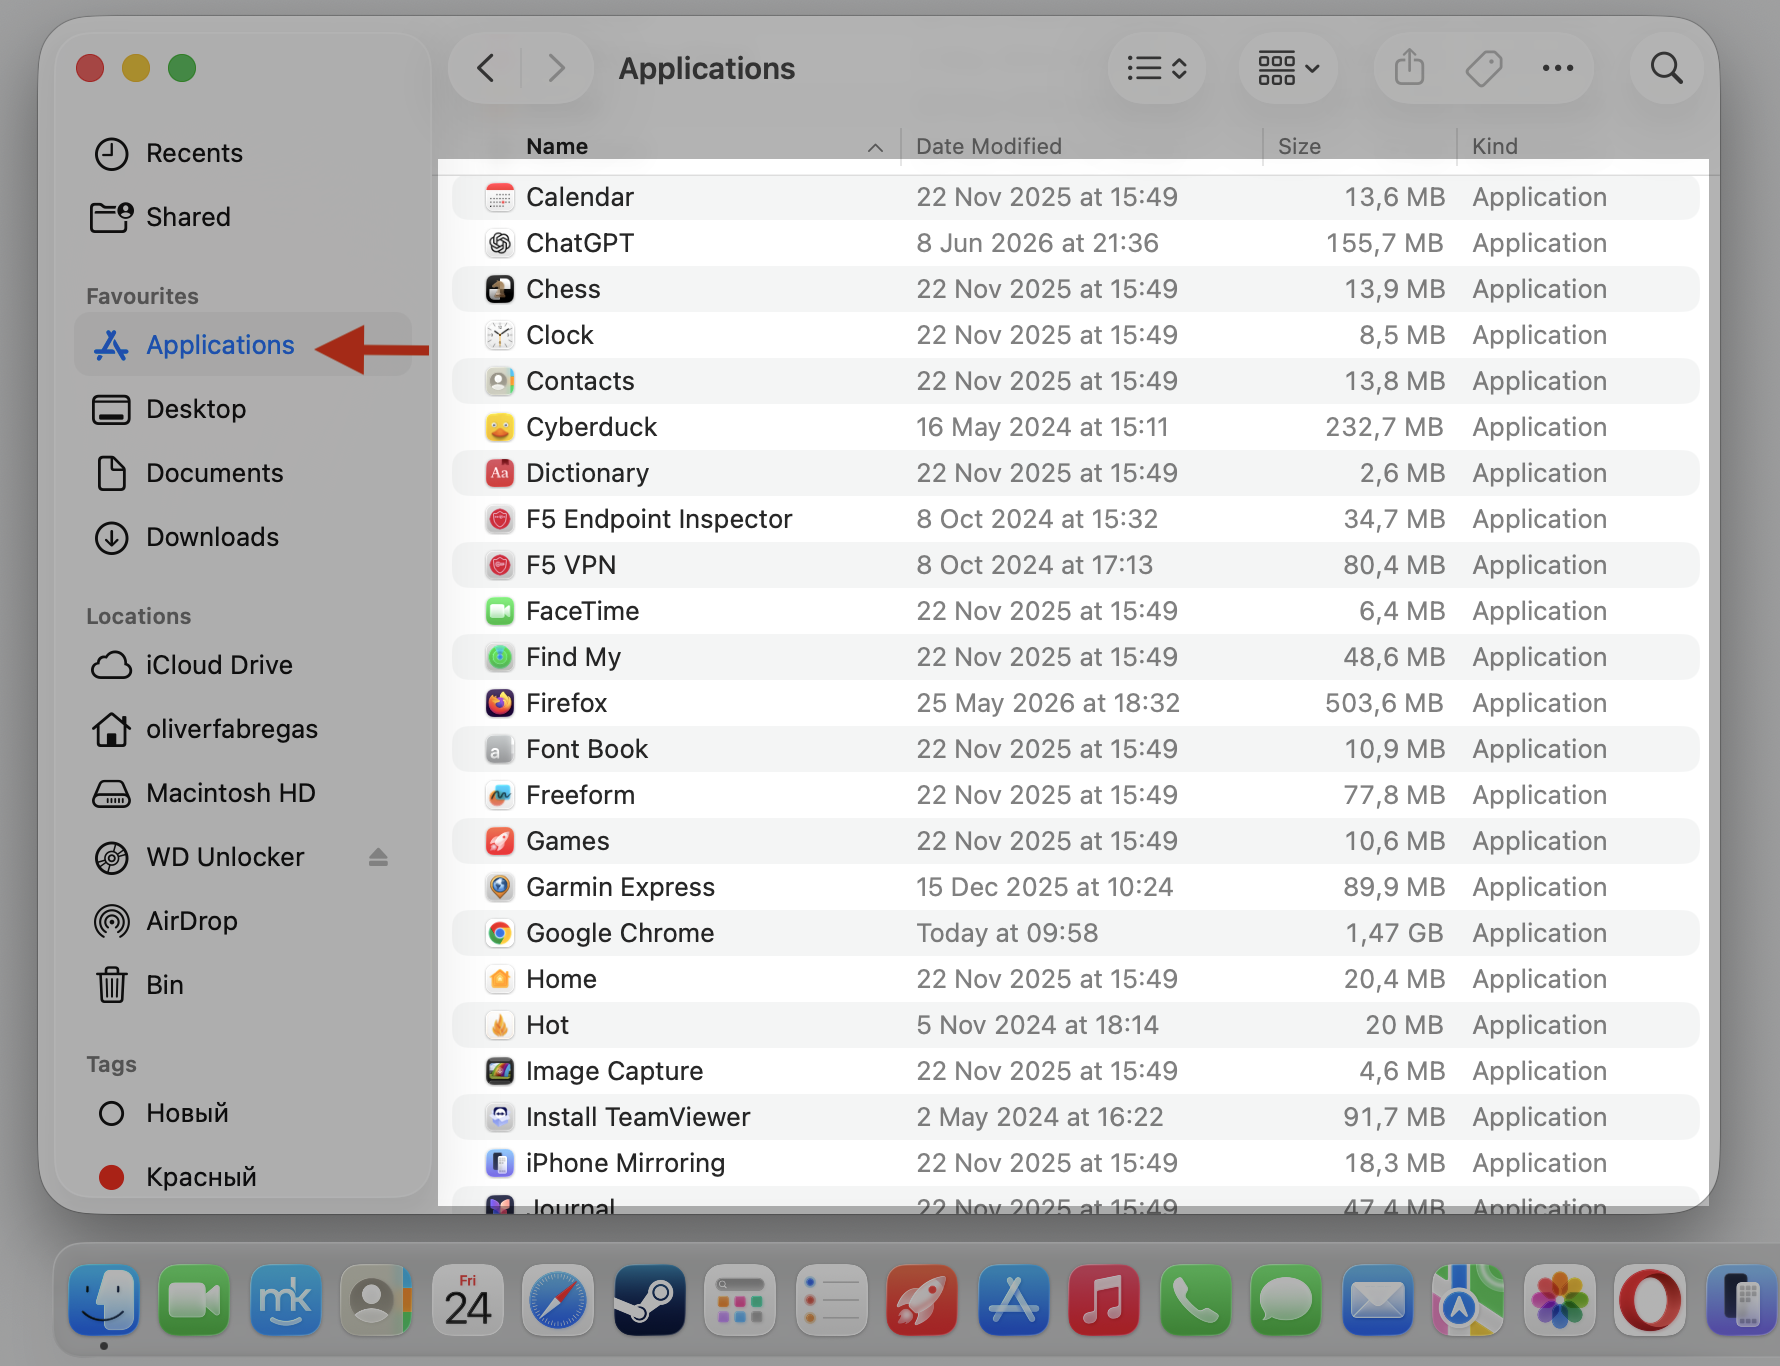
Open Activity Monitor from your Applications folder.
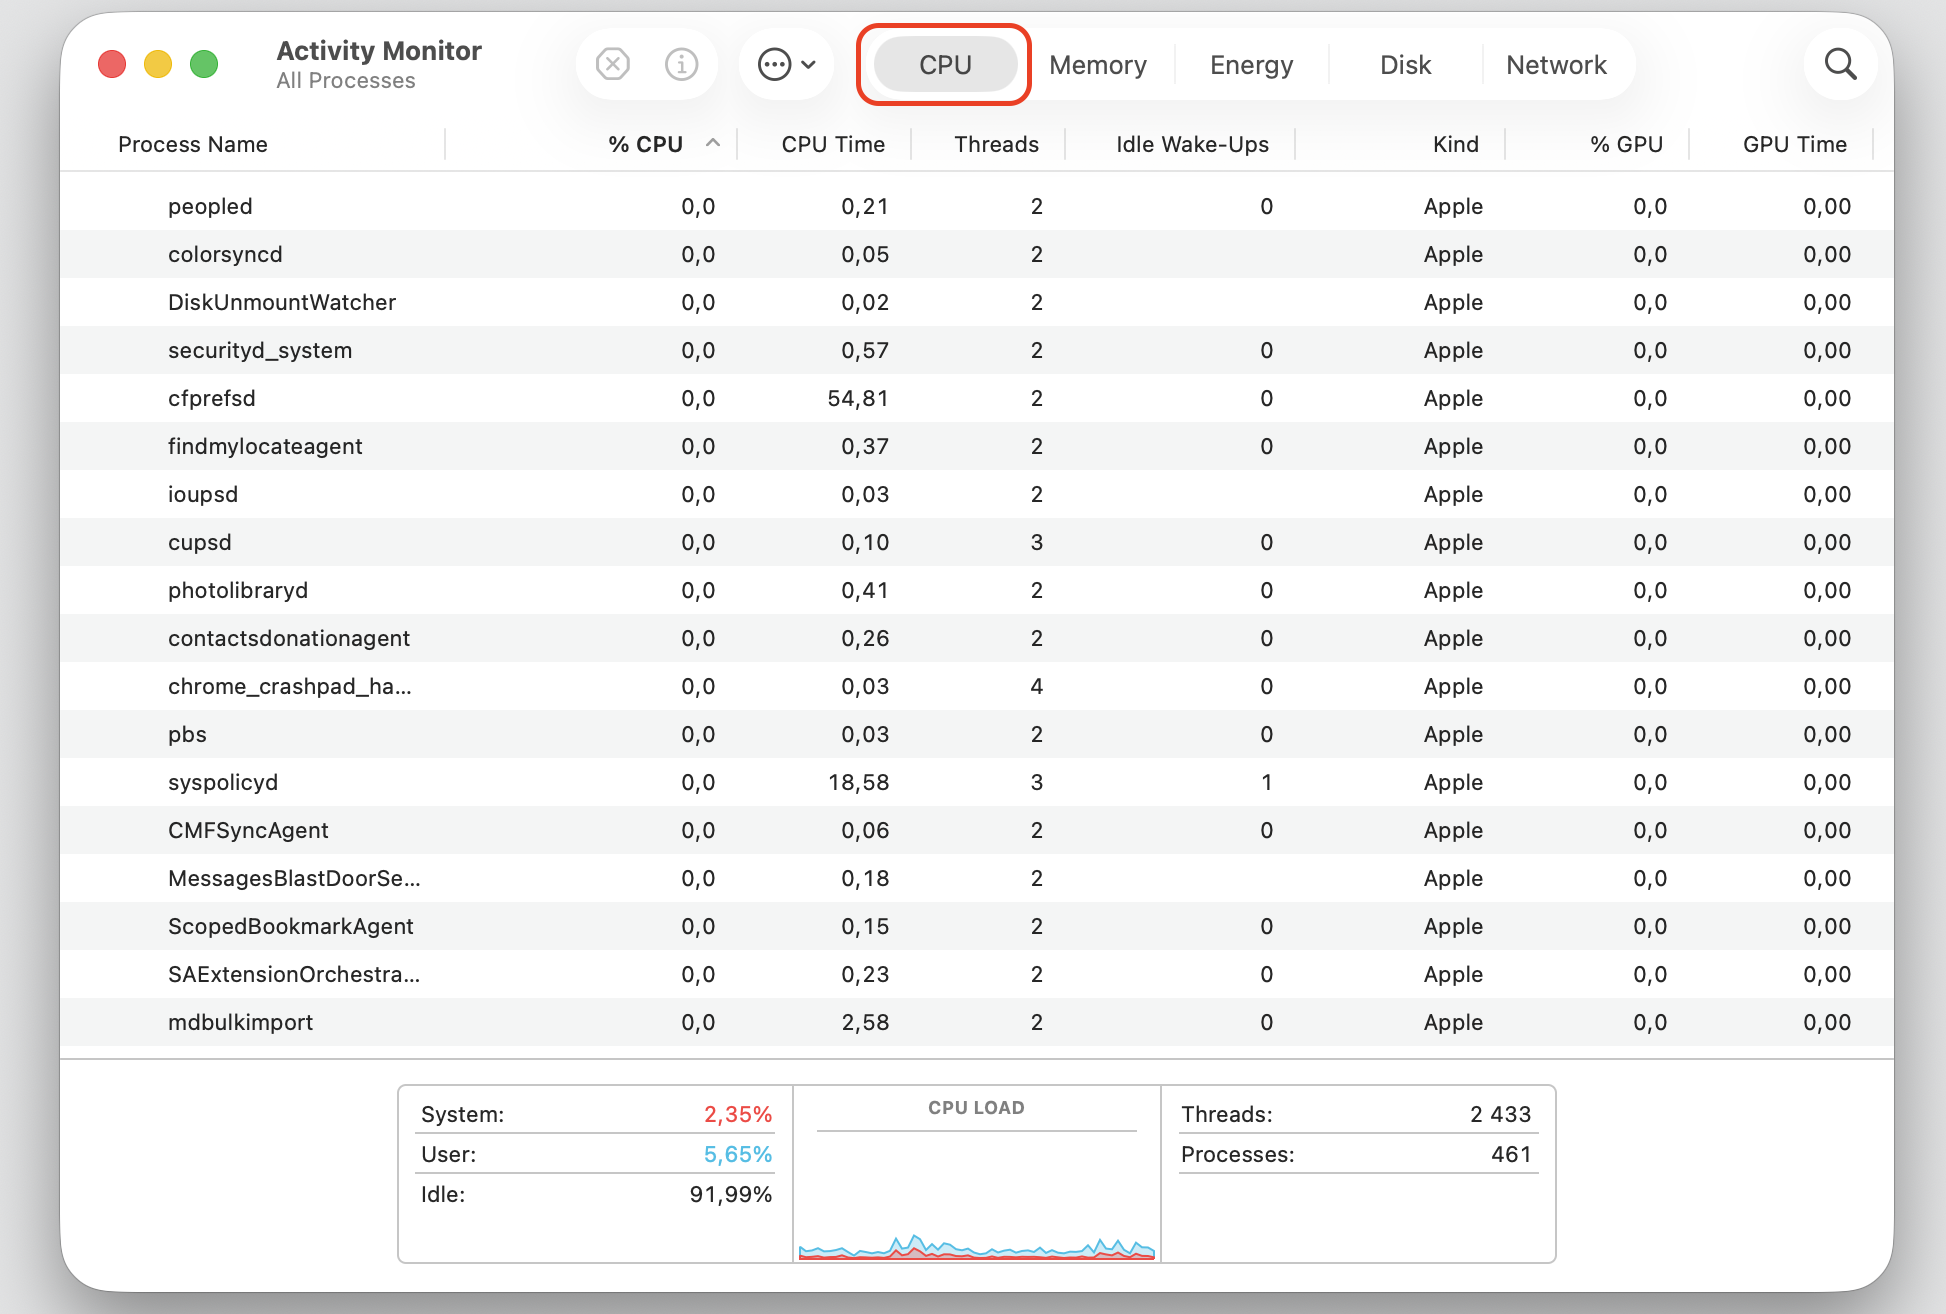
Click the CPU tab to see active processes.
Look for installers or updaters running in the background.
Let any active installation finish before judging CPU usage.
Step 1. Go to Finder > ApplicationsStep 2. Expand the Utility folder and select Activity Monitor appStep 3. Select CPU TabStep 4. Select View > All ProcessesStep 5. Look for installers or updaters running in the background
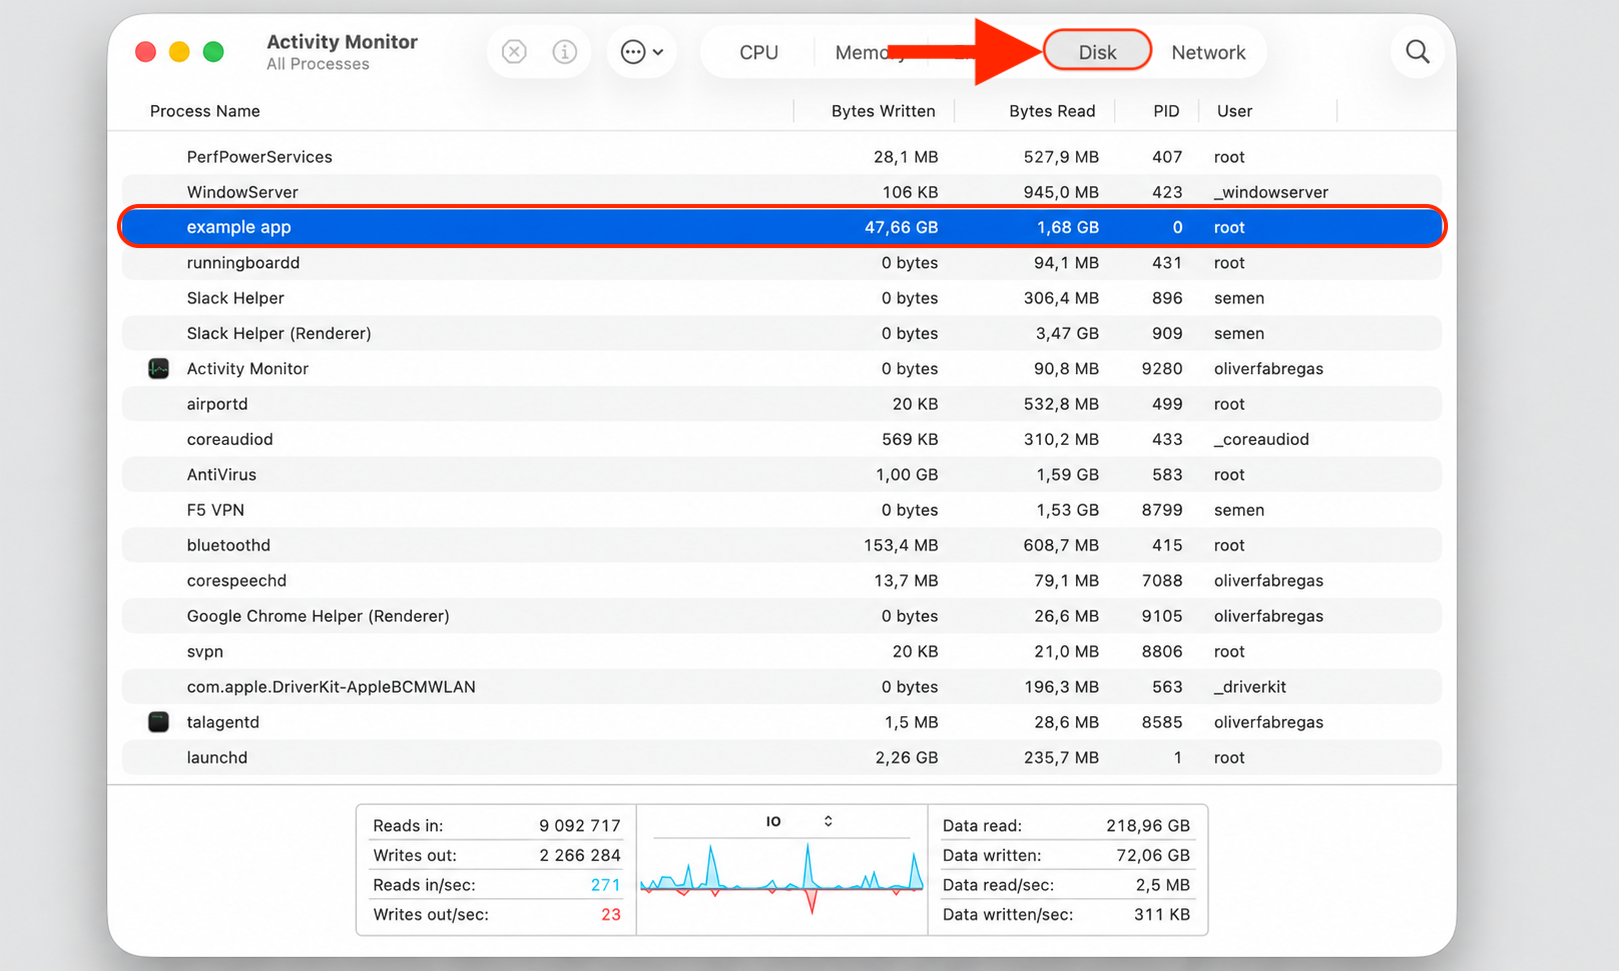
4. Close unnecessary apps creating heavy disk activity
Apps that write lots of files—like downloads, backups, or large exports—give sentineld more to scan. When you turn off programs running in the background, you ease that scanning load. Just do the following:
Open Activity Monitor and sort by Disk activity.
Find apps writing or reading many files at once.
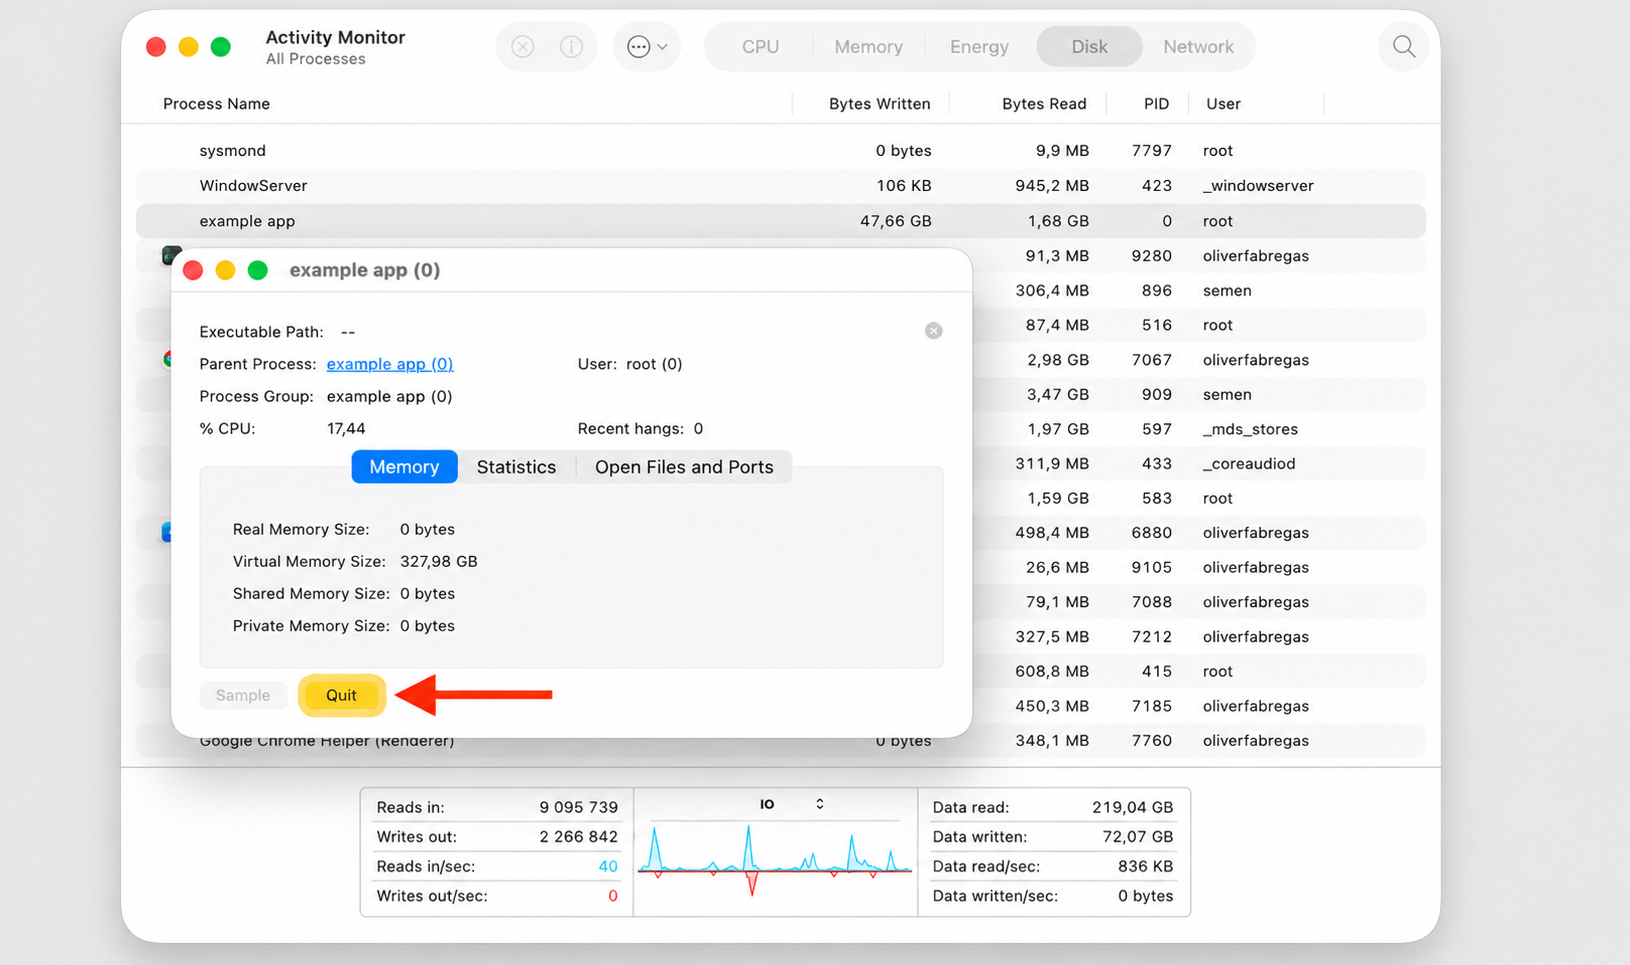
Select the app, then click the Stop (X) button.
Confirm with Quit to close it safely.
Step 1. Go to Finder > ApplicationsStep 2. Expand the Utility folder and select Activity Monitor appStep 3. Go to Disk Section and double-click on the app you need to quitStep 4. Confirm your action with the Quit button
5. Update SentinelOne agent and macOS
Newer versions often run more smoothly and play nicer with macOS. Keeping both current is one of the easiest wins. First, Ask your IT admin or check SentinelOne for the latest agent version, then do the following:
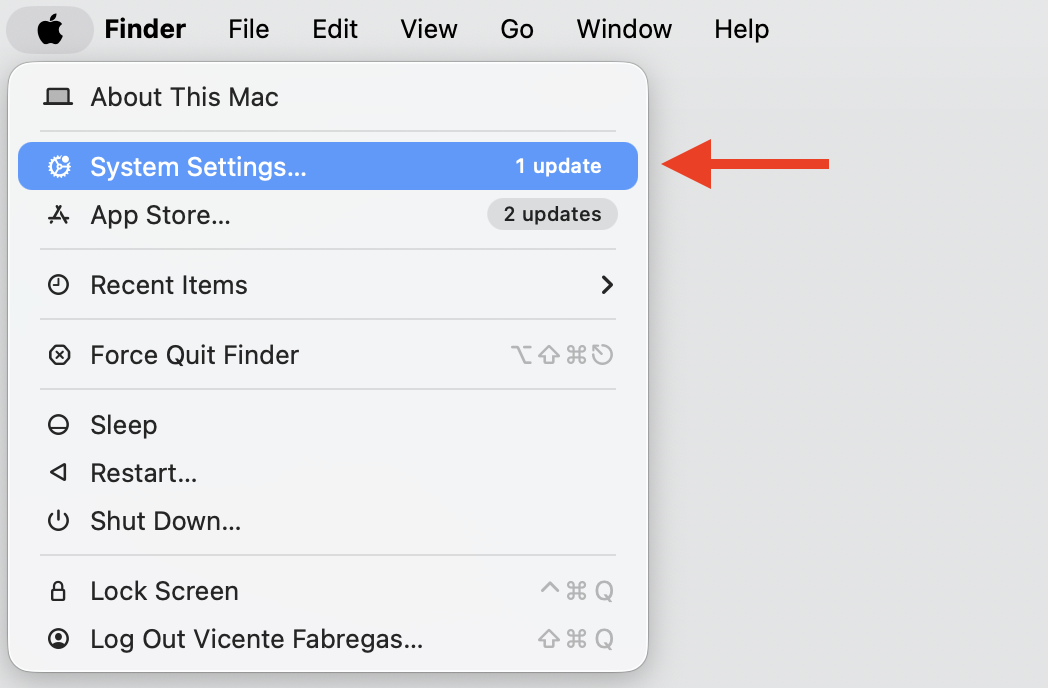
Open the Apple menu and choose System Settings.
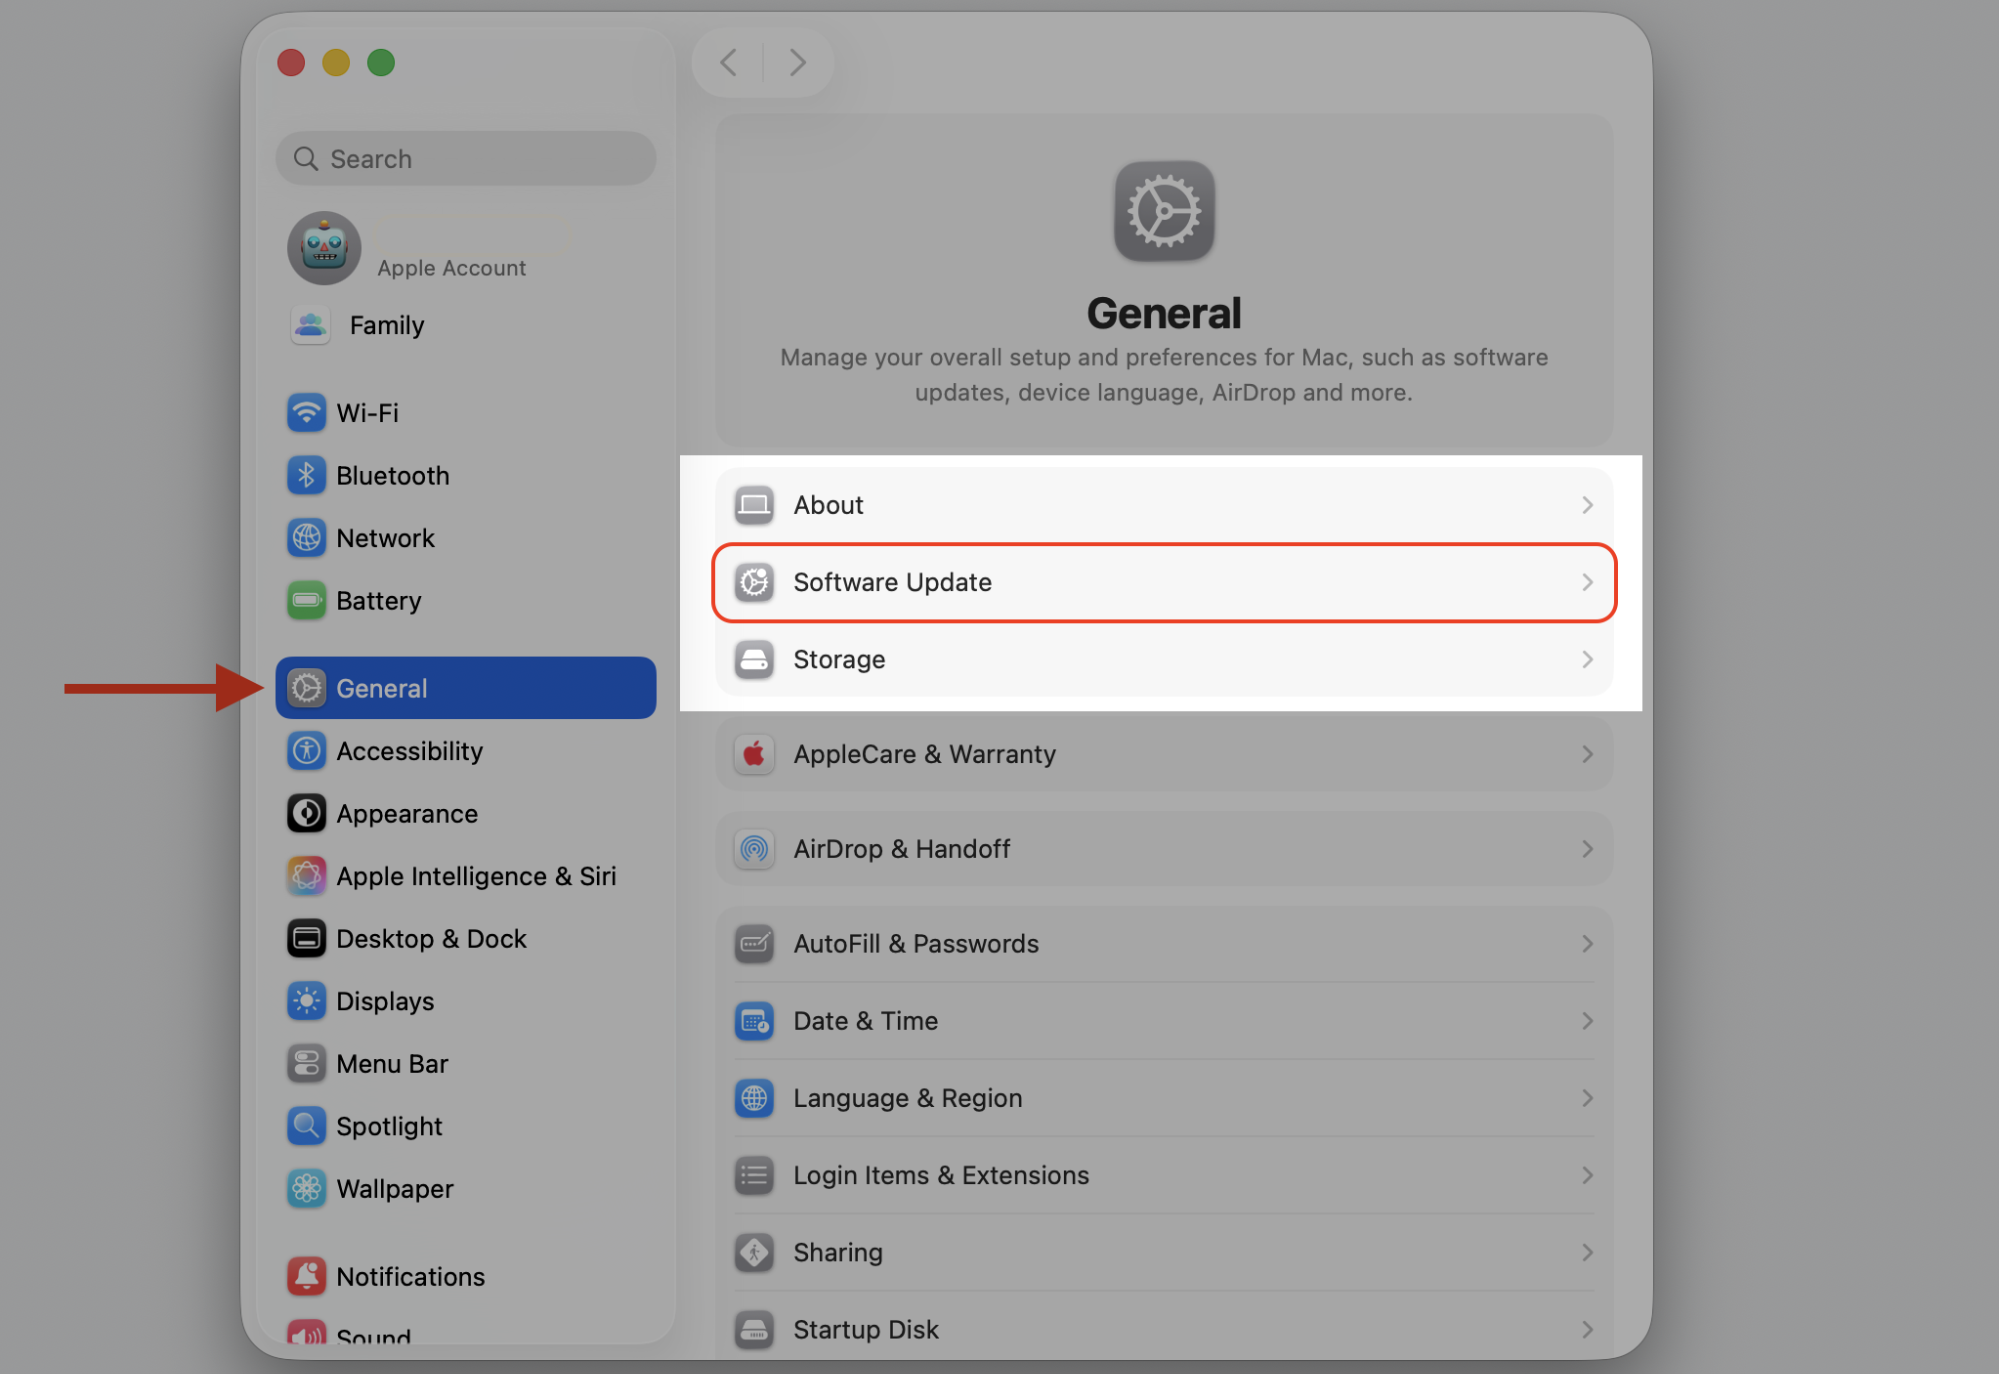
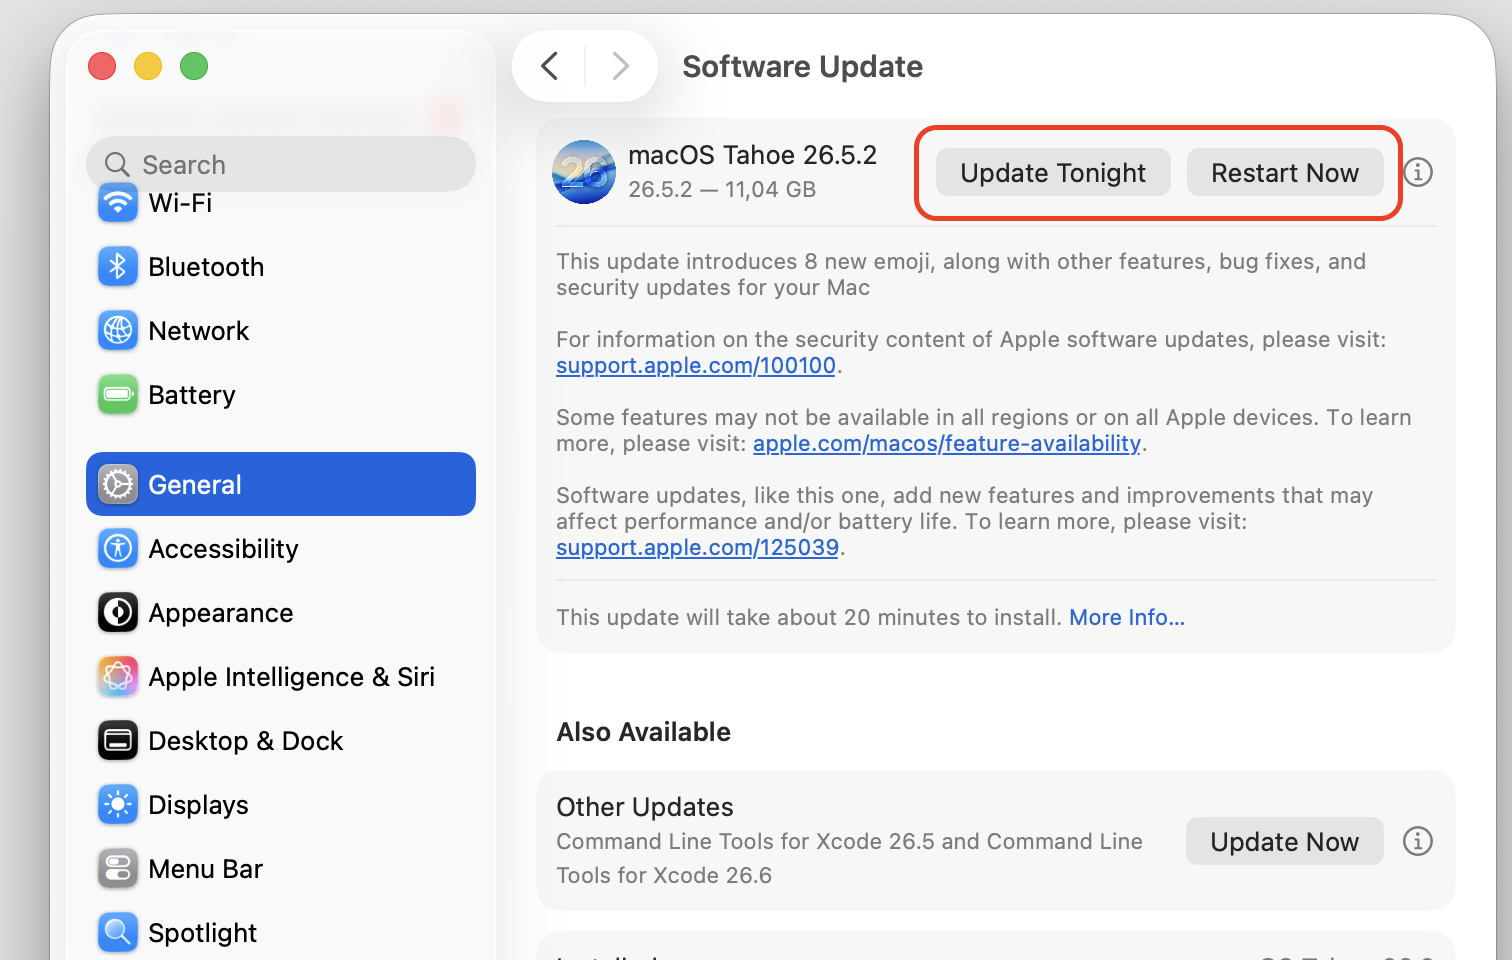
Go to General > Software Update.
Install any available updates and restart if asked.
Step 1. Go to Apple logo > System SettingsStep 2. Go to General › Software UpdateStep 3. Install an update and restart your Mac
Running more than one antivirus or monitoring tool can create conflicts, and they may end up scanning the same files twice. That doubles the work for your CPU. Let’s run a quick review together:
List the security apps installed on your Mac.
Keep one trusted tool and quit any duplicates so they’re fully closed.
Recheck CPU usage to see if sentineld calms down.
Go to Finder > Applications and list the security apps installed on your Mac
7. Ask your IT admin to review scan policies
On managed devices, scan behavior is set by policy, so you may not be able to change it yourself. Your IT admin can adjust it for you. We recommend asking them to do the following:
Review the scan schedule and frequency.
Add exclusions for heavy, trusted workloads.
Adjust policy settings for your specific apps.
If sentineld CPU usage never goes down?
If the high load just won’t settle, it’s time to dig a little deeper. A steady, unchanging spike usually points to a setting or a recent change rather than a normal scan. Here’s what we’d look at next:
Check in with your IT support team for managed devices.
Review recent installs that may have triggered ongoing scans.
Collect logs so support can see what sentineld is doing.
Reinstall the agent—only if your IT admin approves it.
Working through these one by one helps you find the cause without guesswork, and it keeps your Mac’s security intact along the way.
Conclusion
Mac sentineld high CPU is often normal security scanning—baseline checks, real-time monitoring, or file verification can briefly load the processor. If it settles after the scan, there’s usually nothing to worry about. If it lingers, the cause is often an active install, duplicate security tool, outdated version, or IT policy that needs admin review.
Keeping SentinelOne and macOS updated can also help. To keep your Mac feeling quick, MacKeeper’s Memory Cleaner frees up memory by quitting useless processes and stopping memory-draining apps—a simple way to stay responsive.
We respect your privacy and
use cookies
for the best site experience.
Privacy Preferences Center
We use cookies along with other tools to give you the best possible experience while using the
MacKeeper website. Cookies are small text files that help the website load faster. The cookies we
use don’t contain any type of personal data meaning they never store information such as your
location, email address, or IP address.
Help us improve how you interact with our website by accepting the use of cookies. You can change
your privacy settings whenever you like.
Manage consent
All cookies
These cookies are strictly necessary for enabling basic website functionality (including page
navigation, form submission, language detection, post commenting), downloading and purchasing
software. The website might malfunction without these cookies.