Your Mac’s fan is spinning, everything feels sluggish, and Activity Monitor points to one culprit—installd high CPU usage. MacKeeper’s Memory Cleaner will help you reclaim memory fast—just give it a try and free up your Mac.
The installd process is a daemon—a background process that runs silently on your Mac. You can spot daemons by the “d” at the end of their name.
Installd is part of Apple’s PackageKit framework, the built-in macOS system for managing app installations, updates, and removals. Every time you download something from the App Store, install a macOS update, or delete an app, installd does the work in the background.
It compiles a list of the software on your Macintosh, compares each version to Apple’s servers, and pulls down anything that’s outdated. That’s why installd often runs automatically—even when you haven’t opened the App Store.
How to fix installd high CPU on Mac?
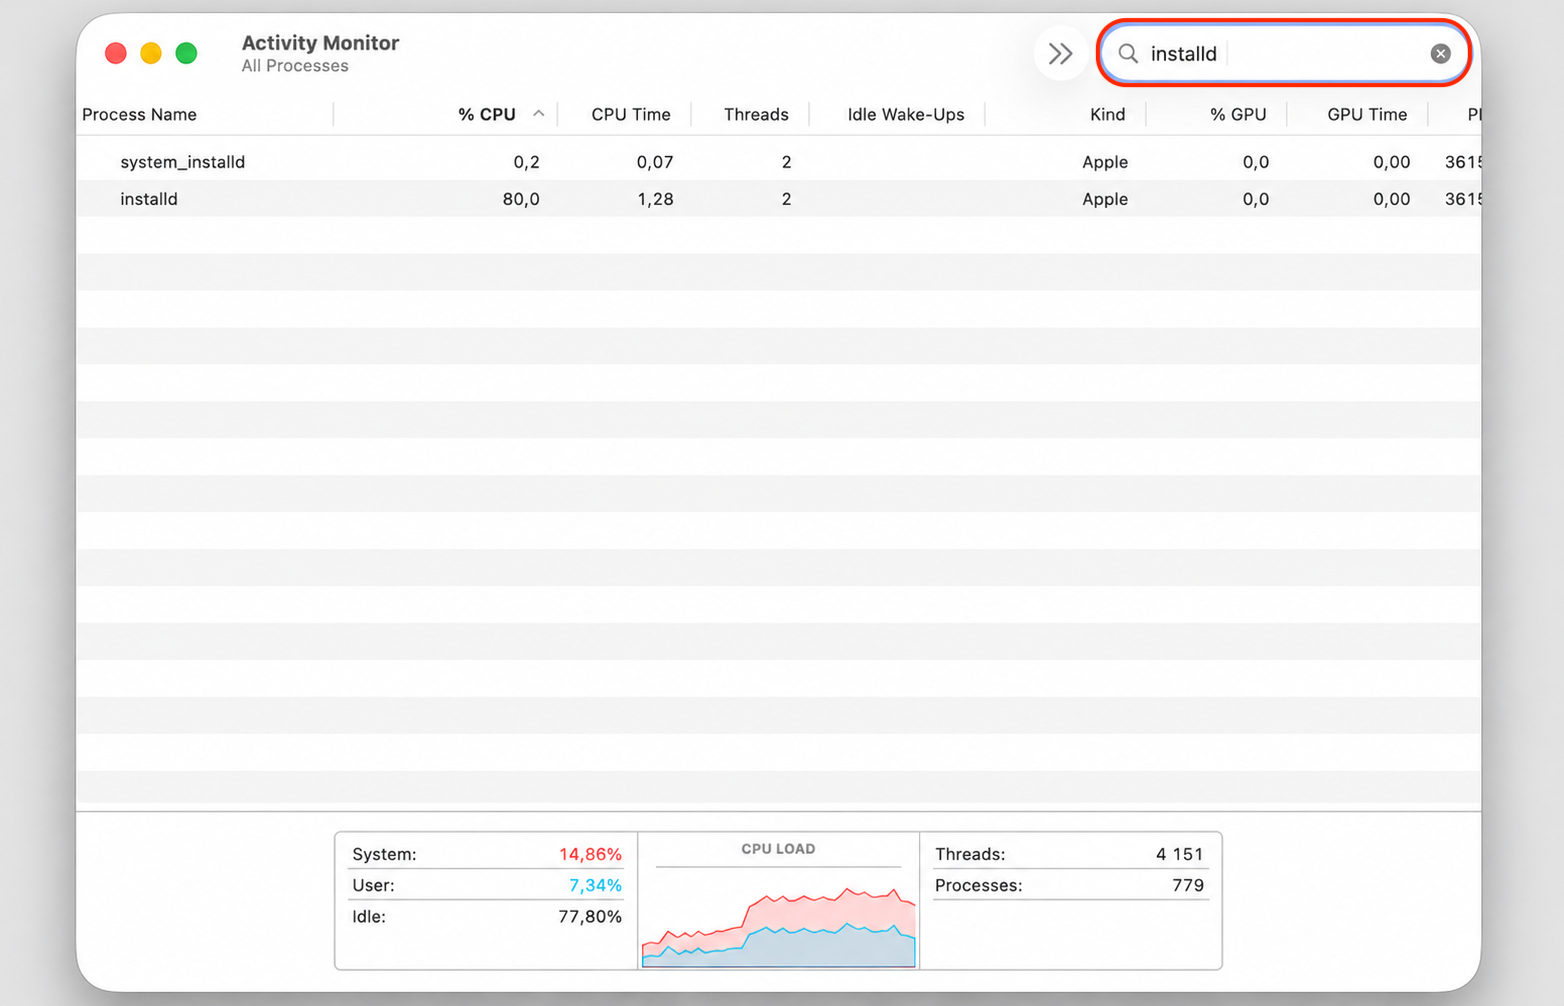
First, see how much CPU is being used on your Mac. Once you’ve confirmed installd is the issue, work through our solutions described below in order.
A note from our experts:
Deciphering the root of the installd high CPU on Mac can sometimes be tiresome. We completely understand your frustration and, with that in mind, are always ready to lend you a helping hand through our professional support. Contact MacKeeper’s Premium Services, and one of our agents will guide you through the whole troubleshooting process.
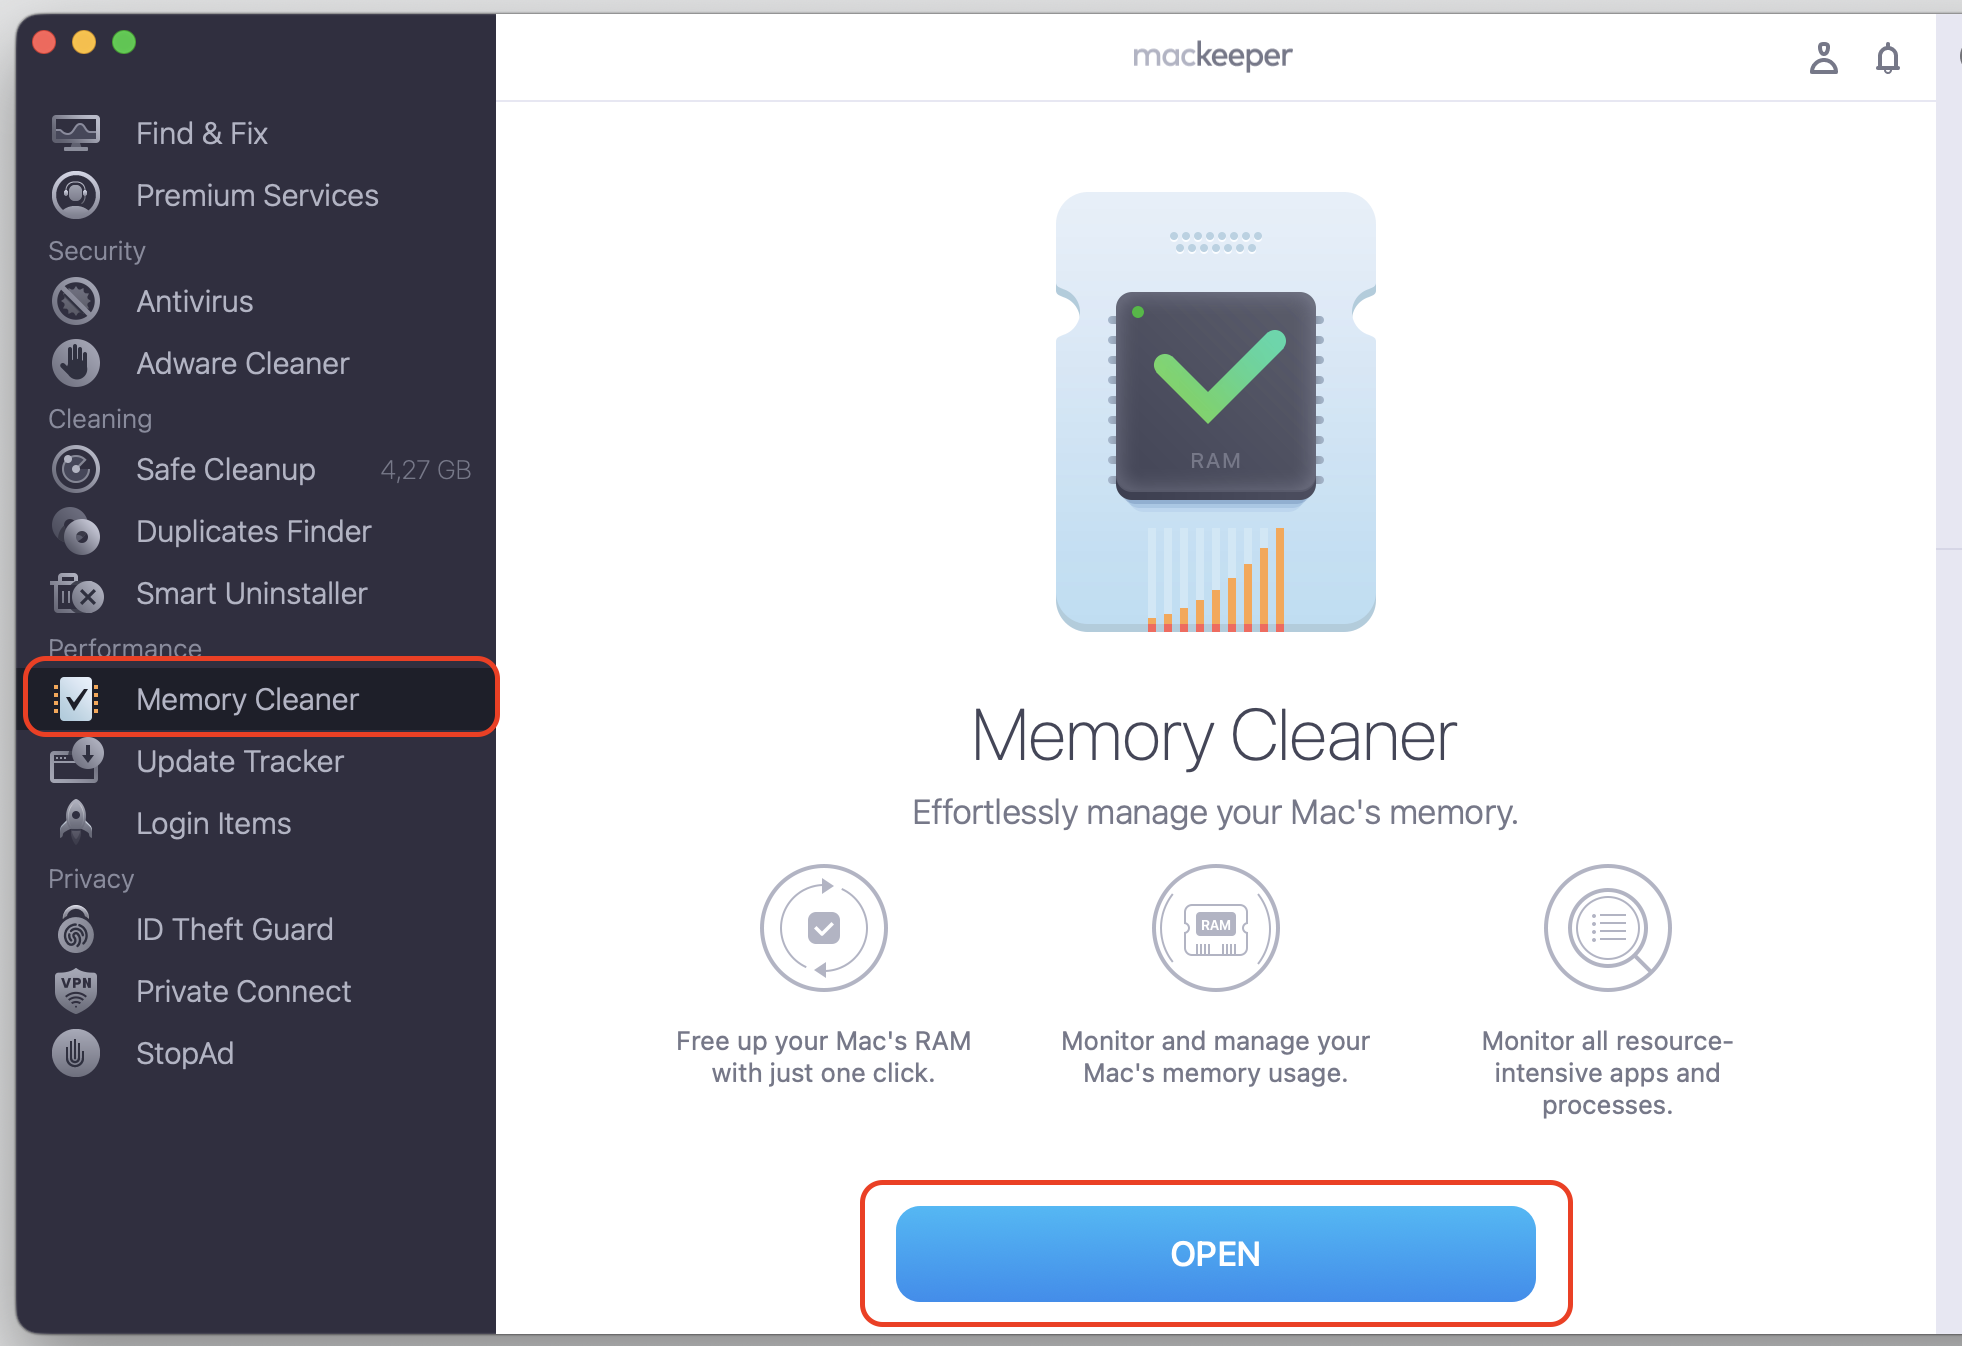
Follow these steps to use MacKeeper’s Memory Cleaner:
Open the app and find Memory Cleaner, then click Open.
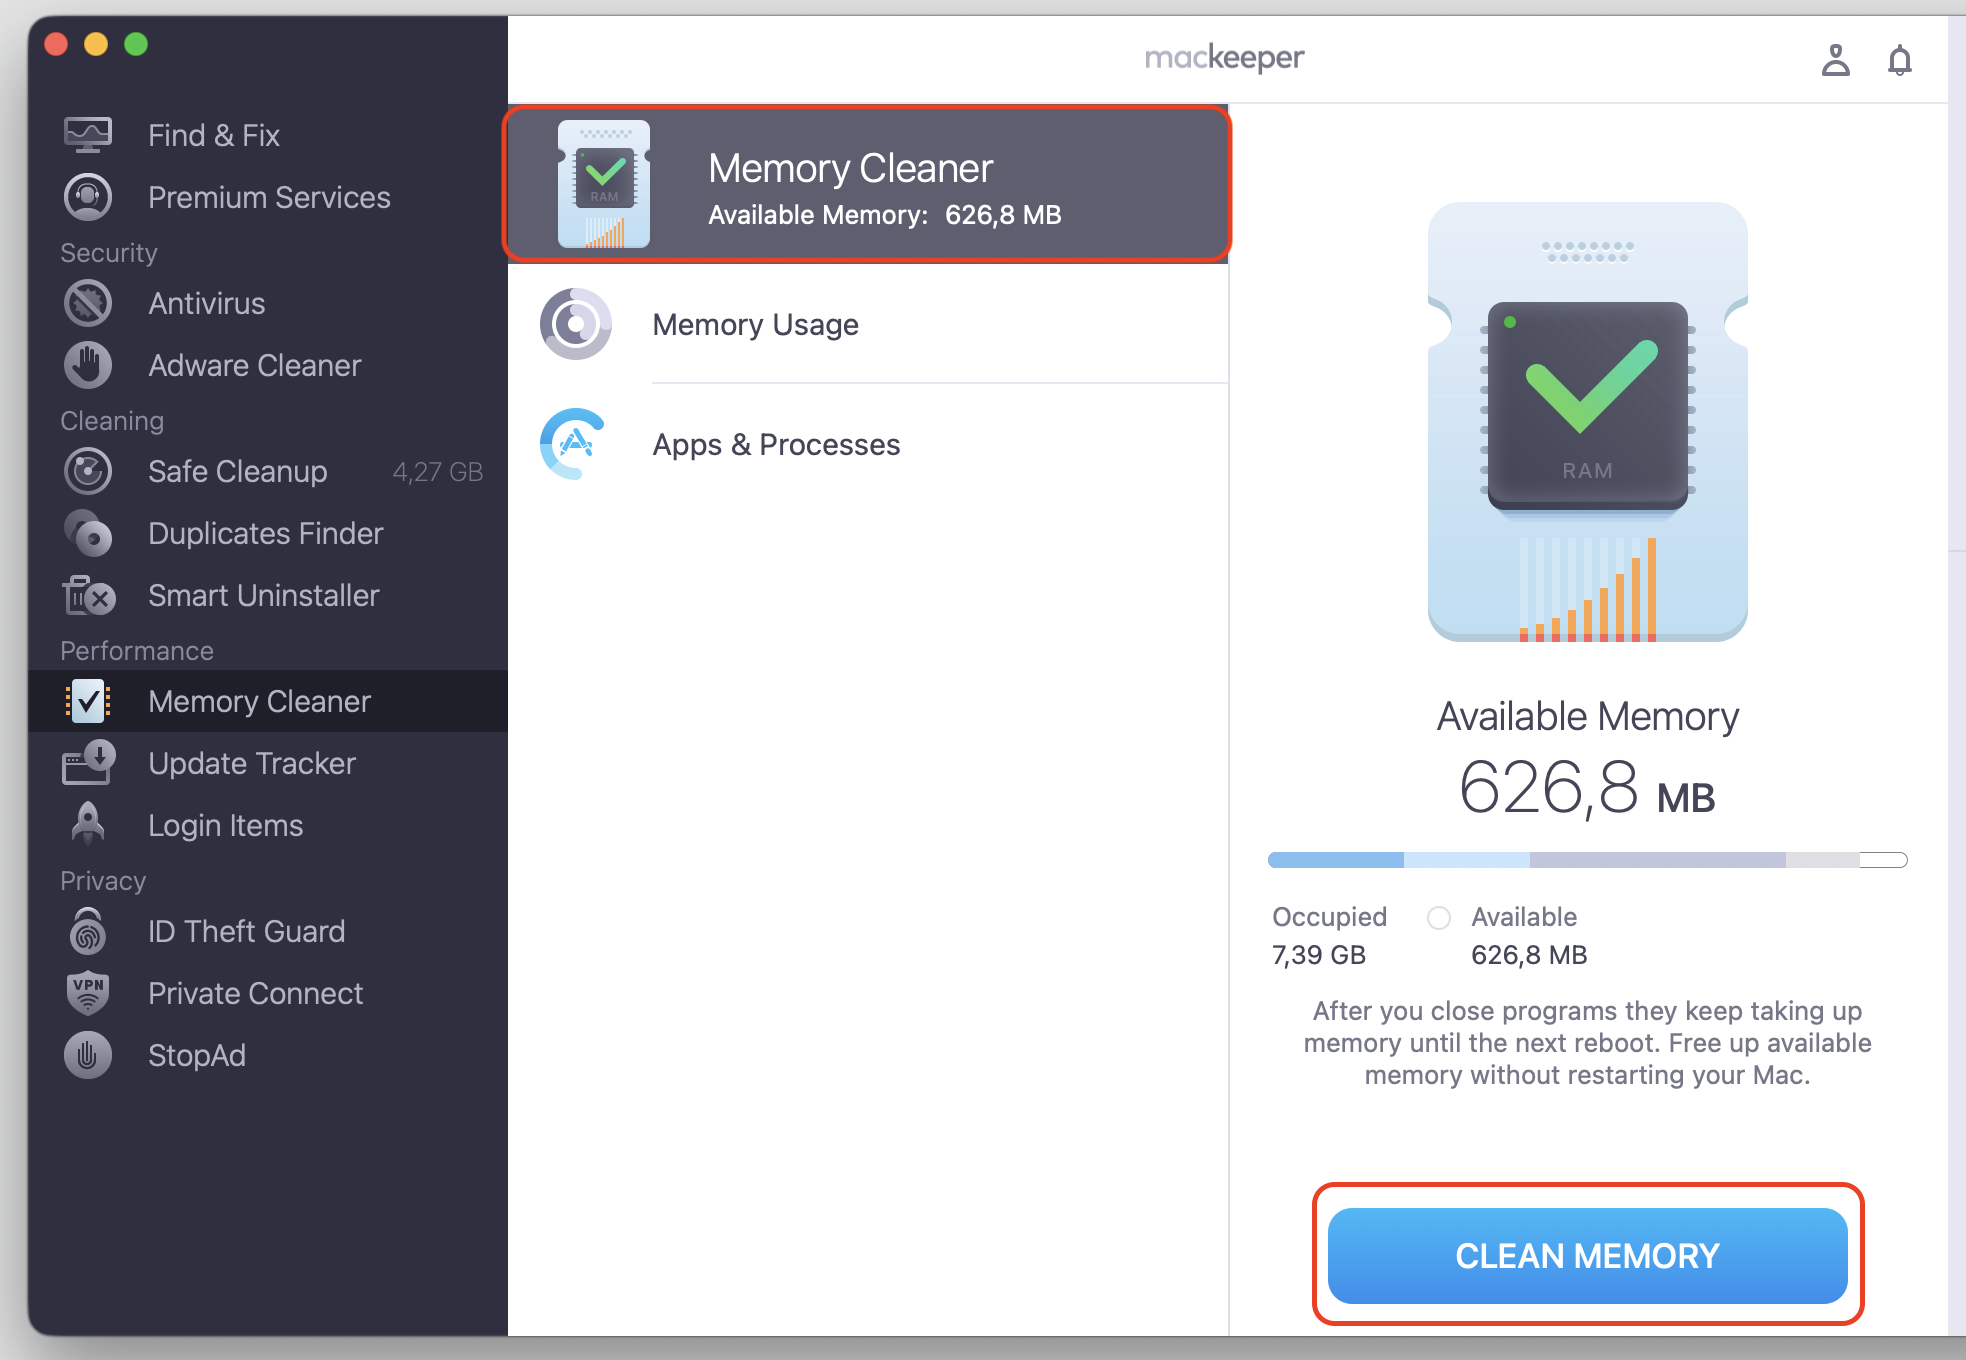
See the memory usage report by category, then click Clean Memory.
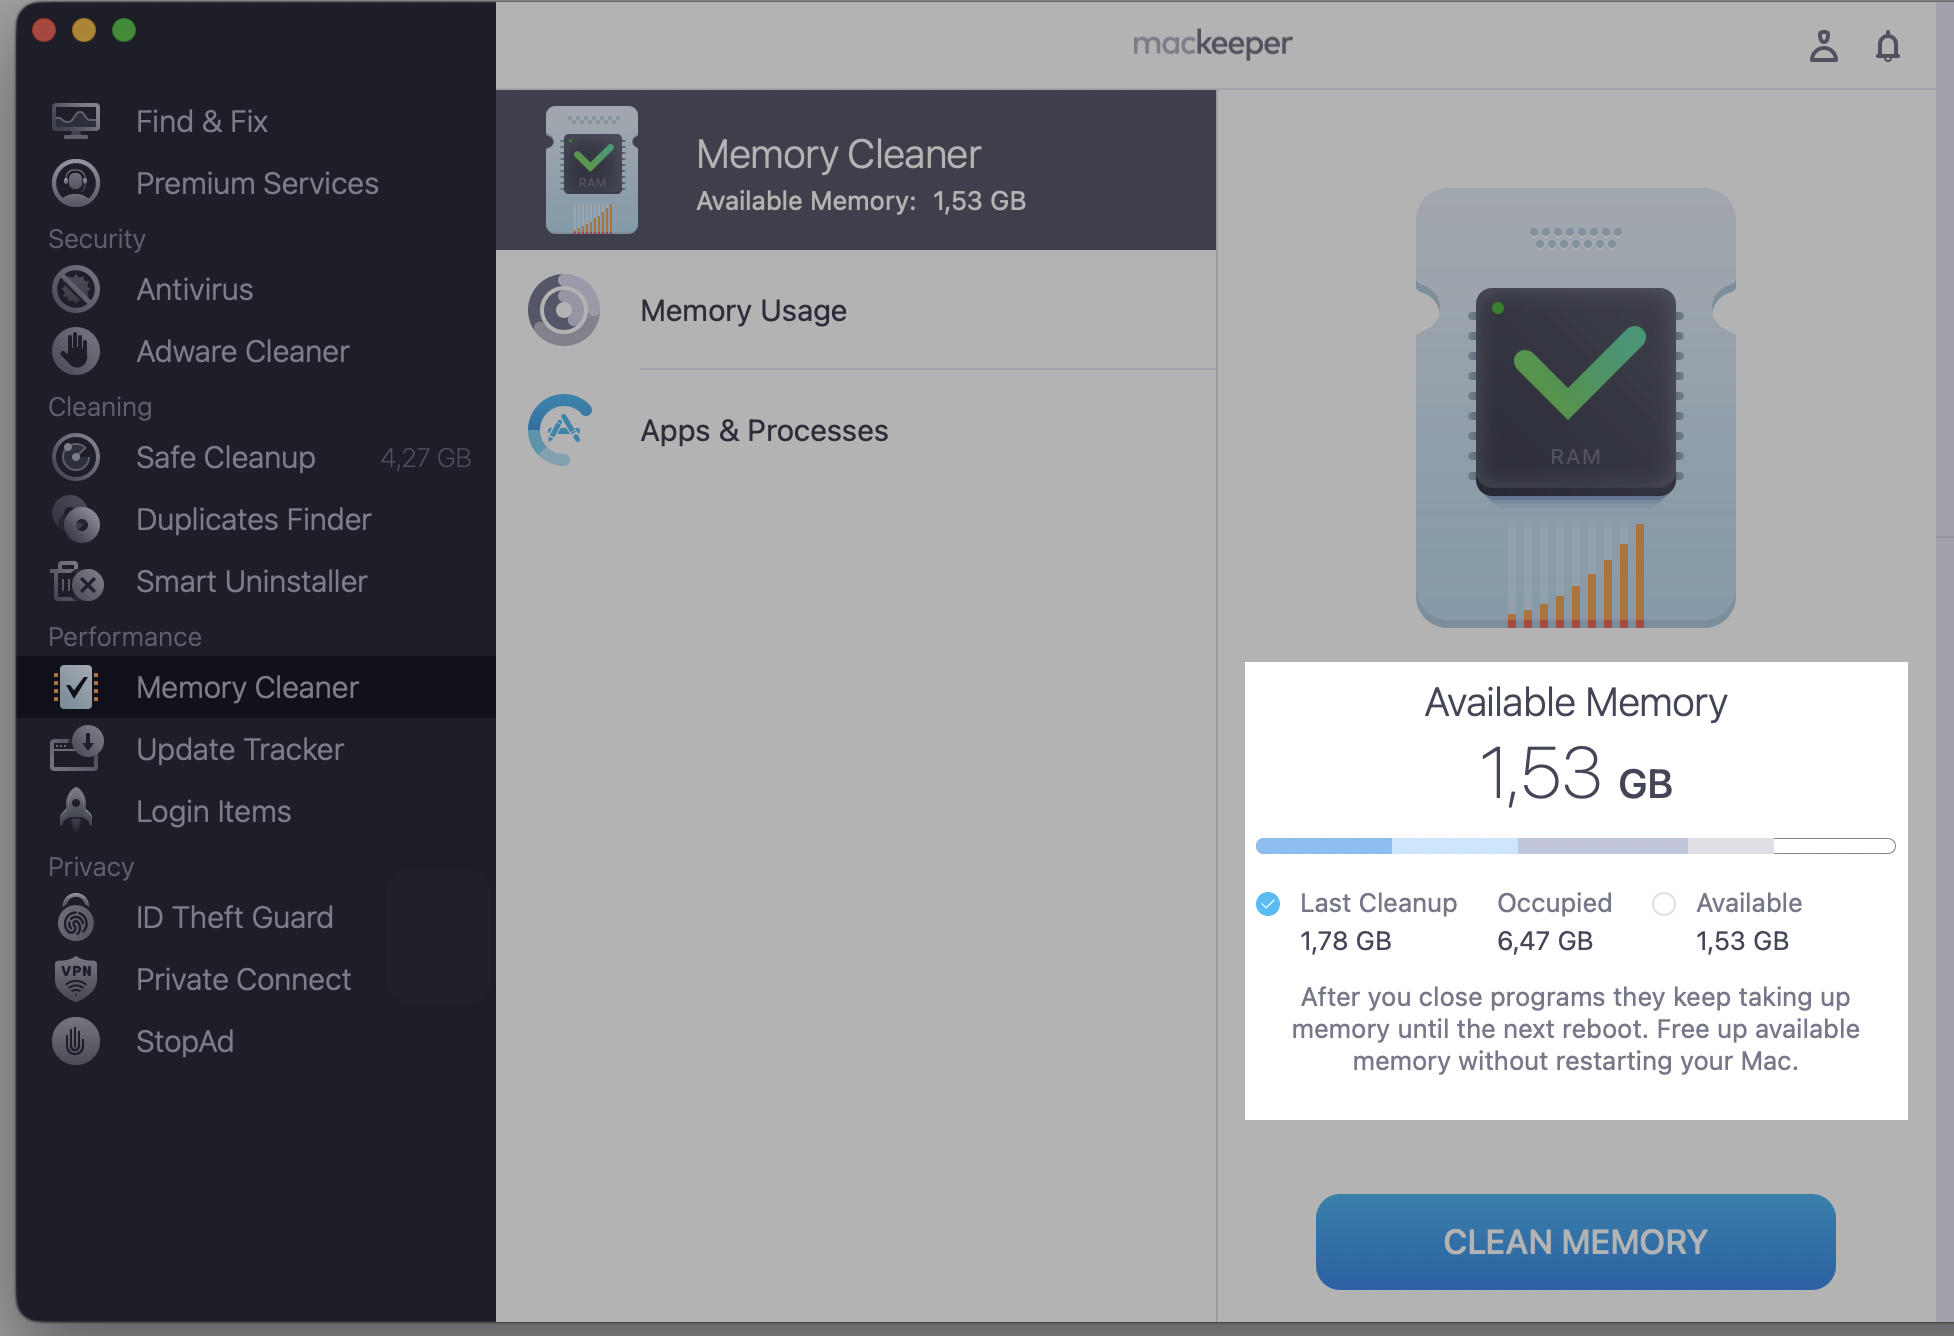
Recheck the available memory volume after the procedure.
Step 1. Go to MacKeeper > Memory Cleaner > select OpenStep 2. Select Memory Cleaner section, then click Clean MemoryStep 3. Check the result
1. Check for active updates or installations
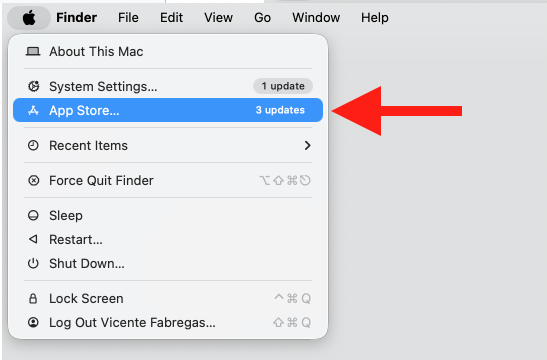
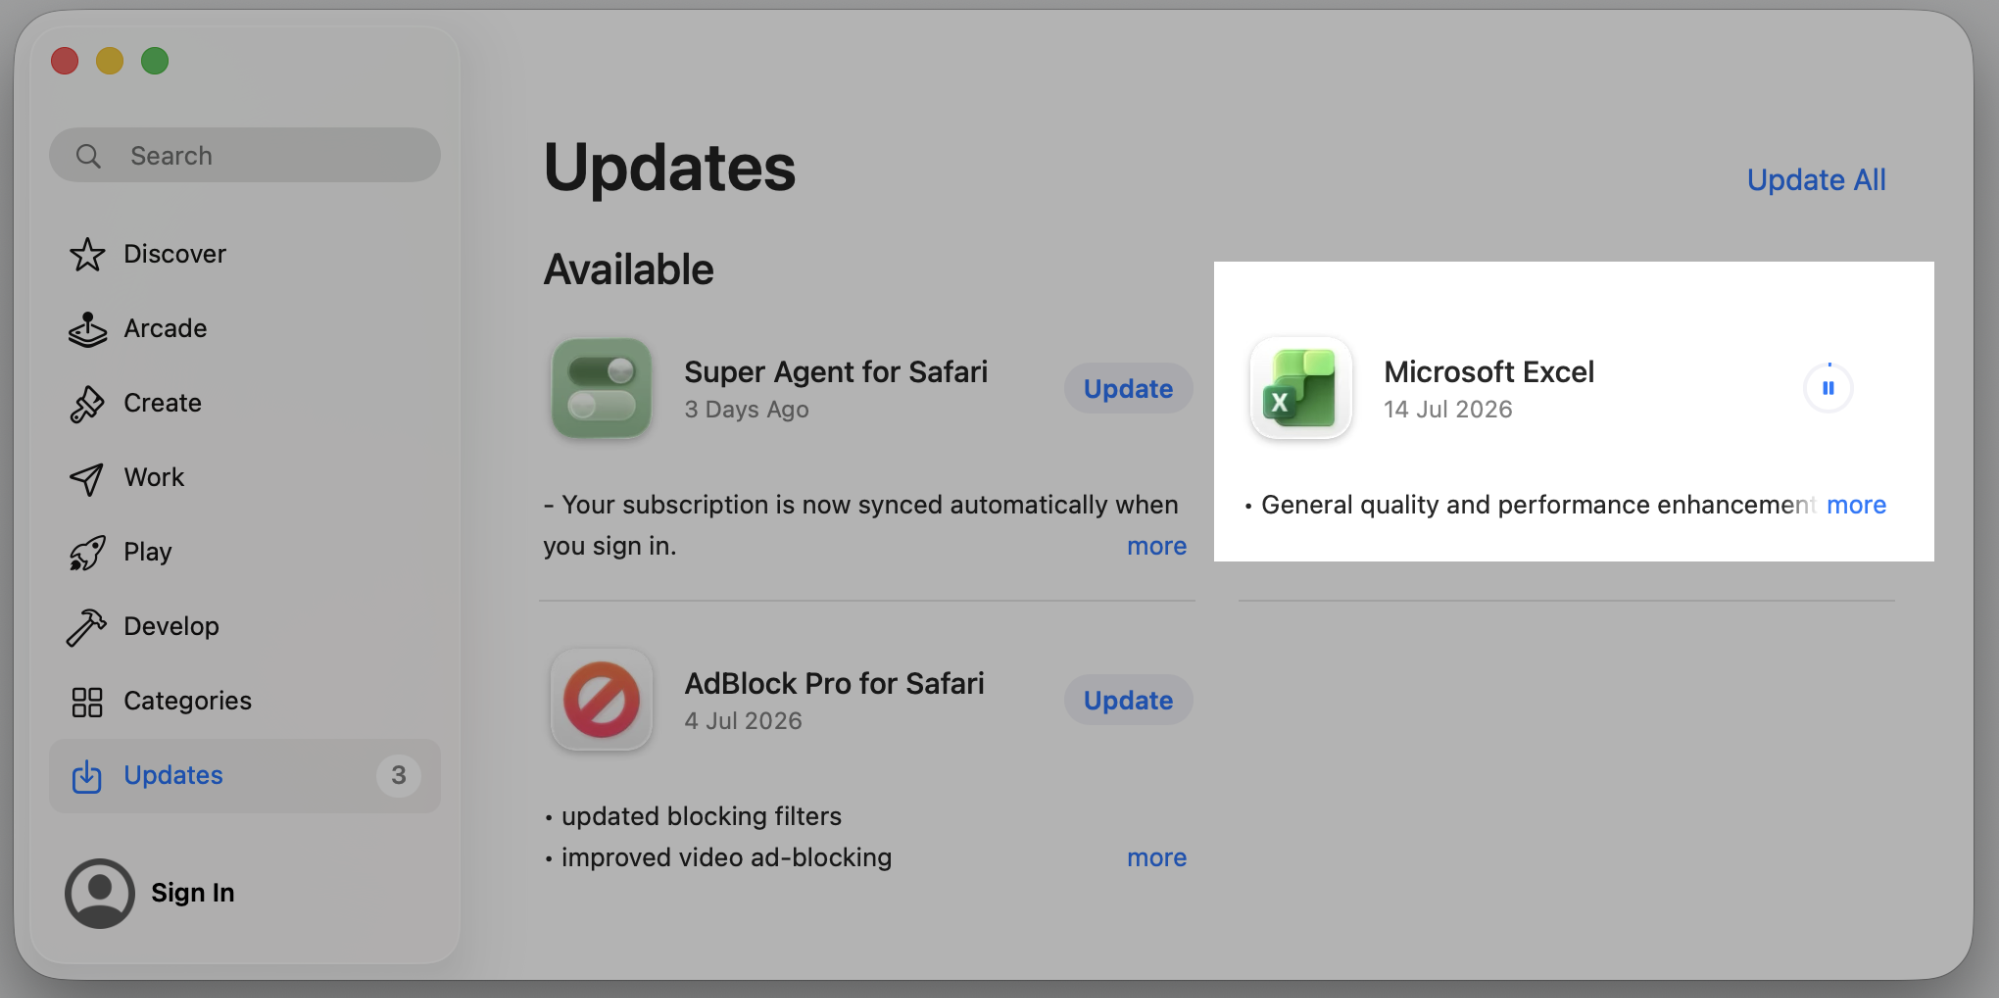
The most common reason for installd high CPU is an active update. Check your Mac’s resource monitor or the App Store to check the update status:
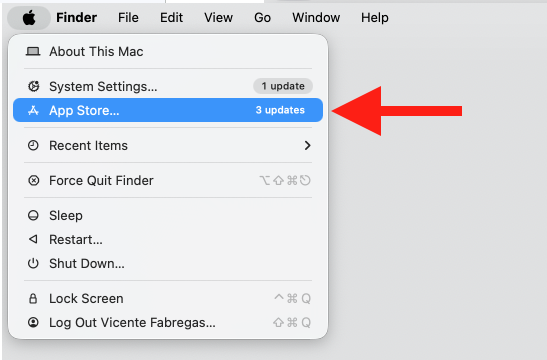
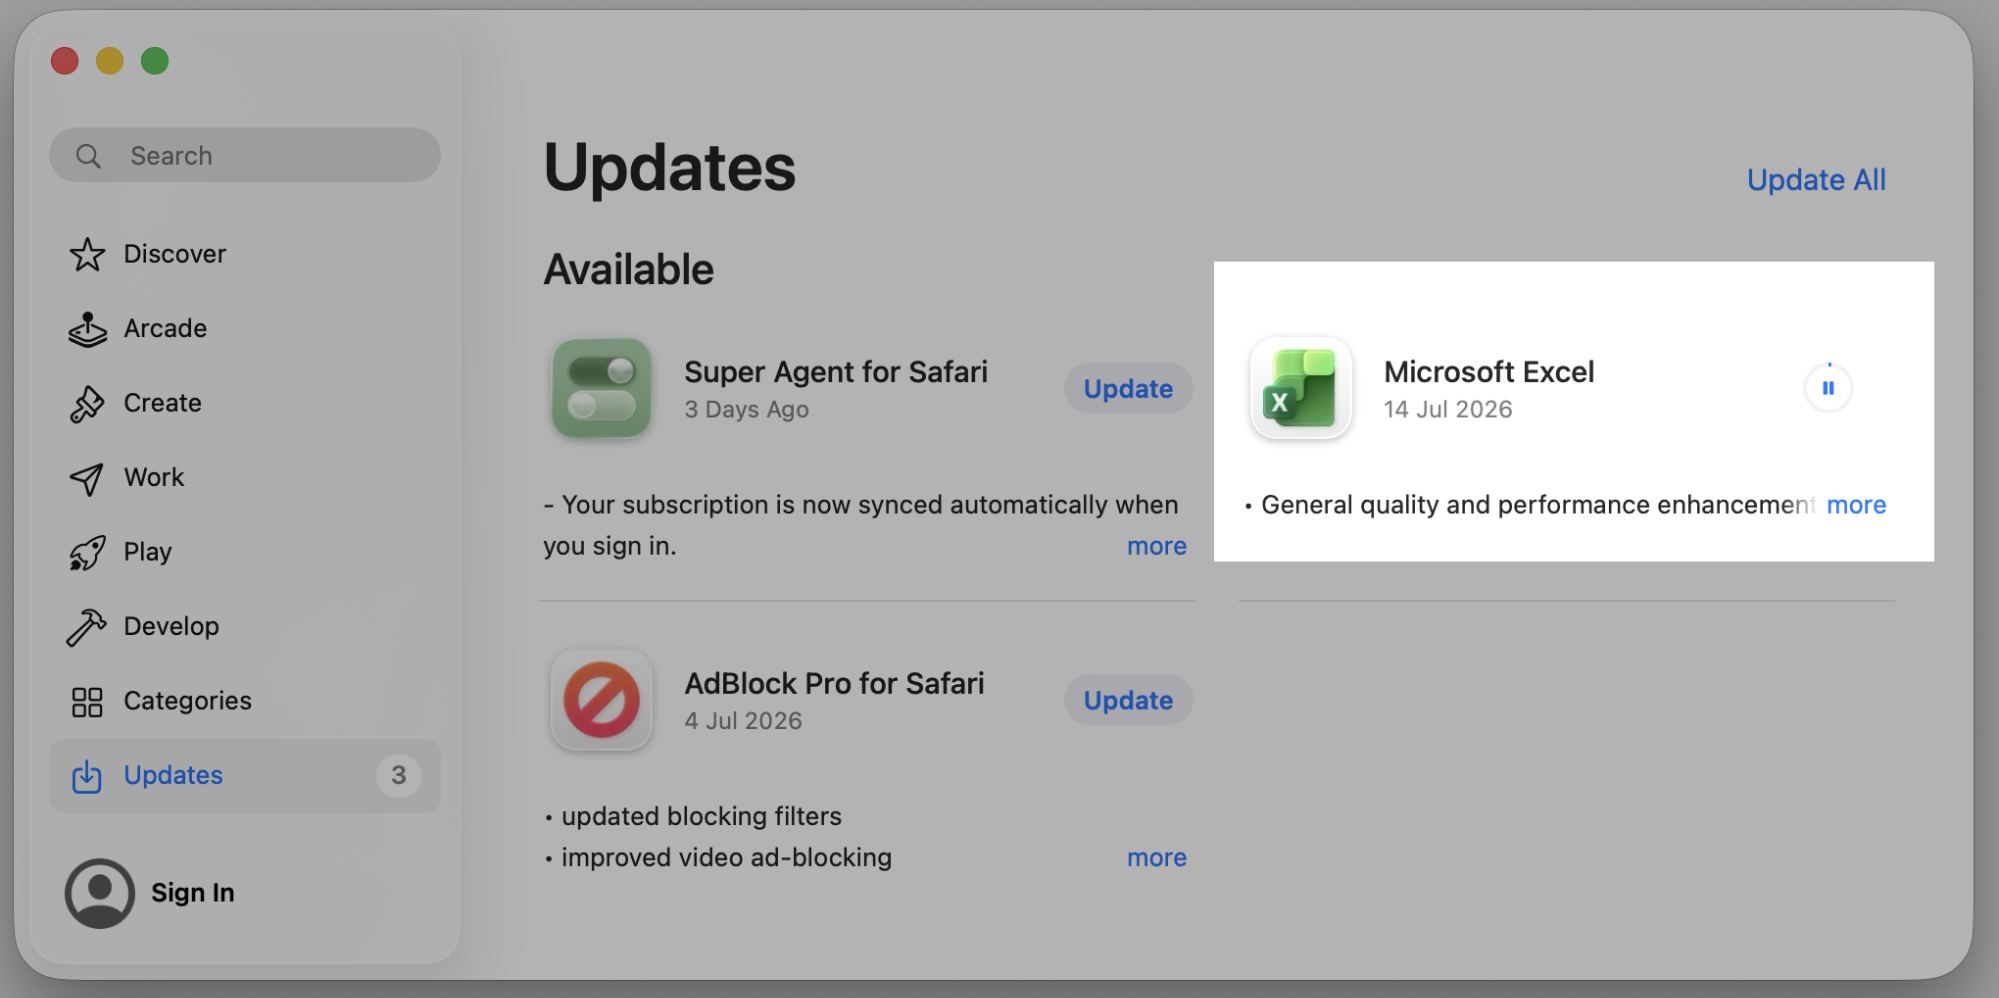
Open the App Store and click Updates in the sidebar.
Look for apps labeled Installing or Waiting.
If updates are running, let them finish before taking action.
Step 1. Go to Apple Logo > App StoreStep 2. Check for updating progress
2. Wait for the process to complete
From our practice, waiting is often the most effective fix. The installd process typically finishes within a few minutes. Even a large update—like the iWork suite—shouldn’t take more than ten minutes on a modern MacBook. However, we should also mention that if the app is currently running, And a few more hints from us here:
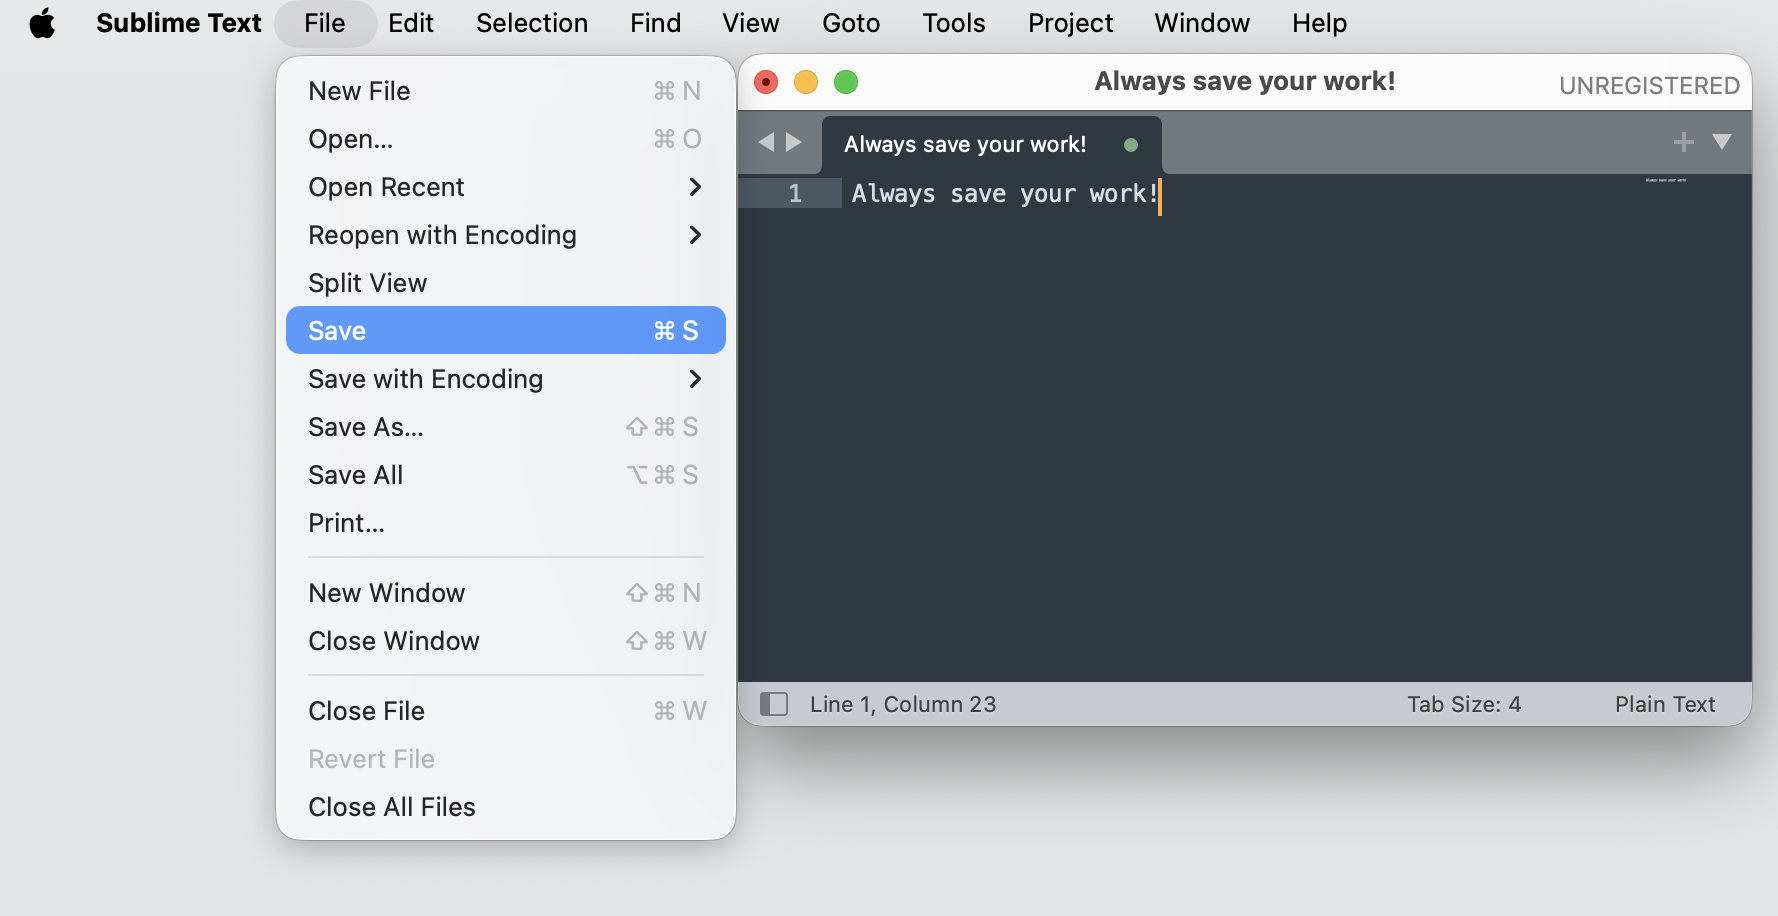
Save your work and monitor installd’s CPU percentage in Activity Monitor.
Avoid force-quitting while it’s actively installing—this may leave files incomplete.
Warning: If you’re using an app, a pop-up will always appear asking if there's an update available and if you want to update. The update process just won't start if the app is in use.
Step 1. Go to the file next to the app name and choose SaveStep 2. Check installd’s CPU percentage in Activity Monitor
3. Restart Mac
A restart can clear stuck background processes and reset update-related tasks. Here’s how we suggest proceeding with this task:
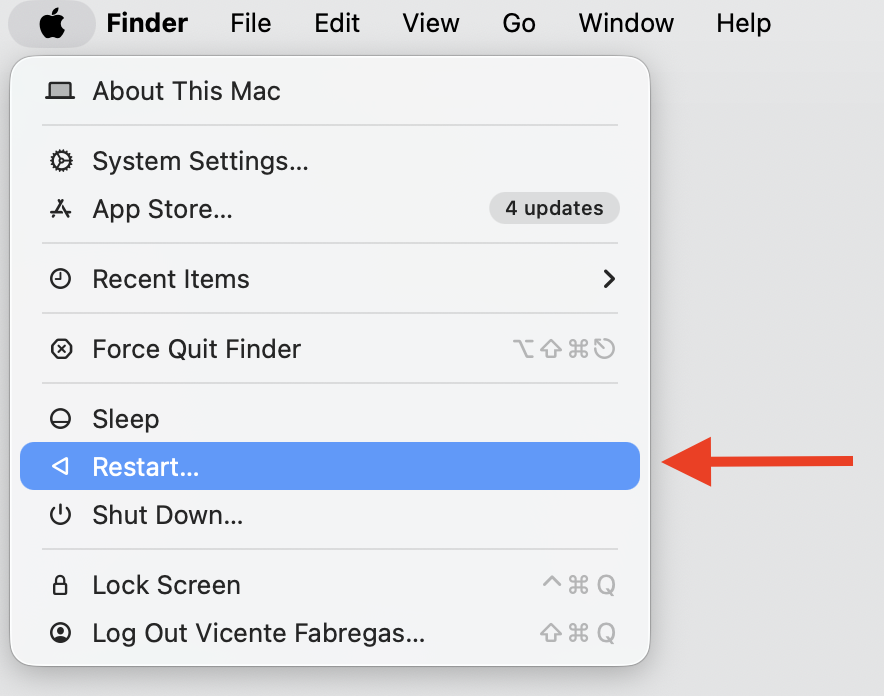
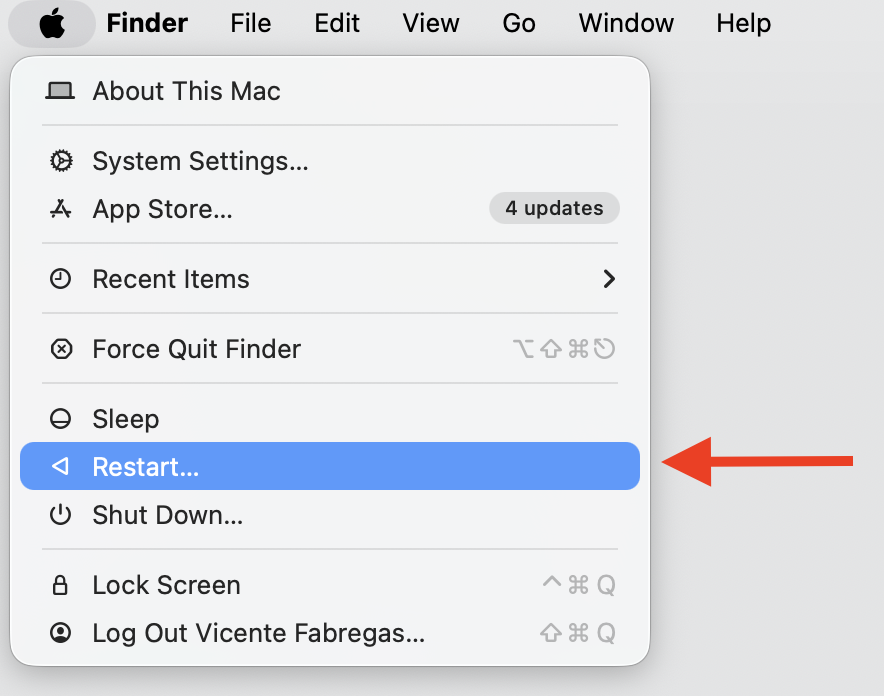
Click the Apple menu and select Restart.
After boot, open Activity Monitor and check whether installd is still using high CPU.
Step 1. Go to Apple Logo > RestartStep 2. Check installd’s CPU percentage in Activity Monitor
4. Stop the installd process (temporary fix)
You can force quit installd for immediate relief, but macOS may restart the daemon if tasks are pending. Do this:
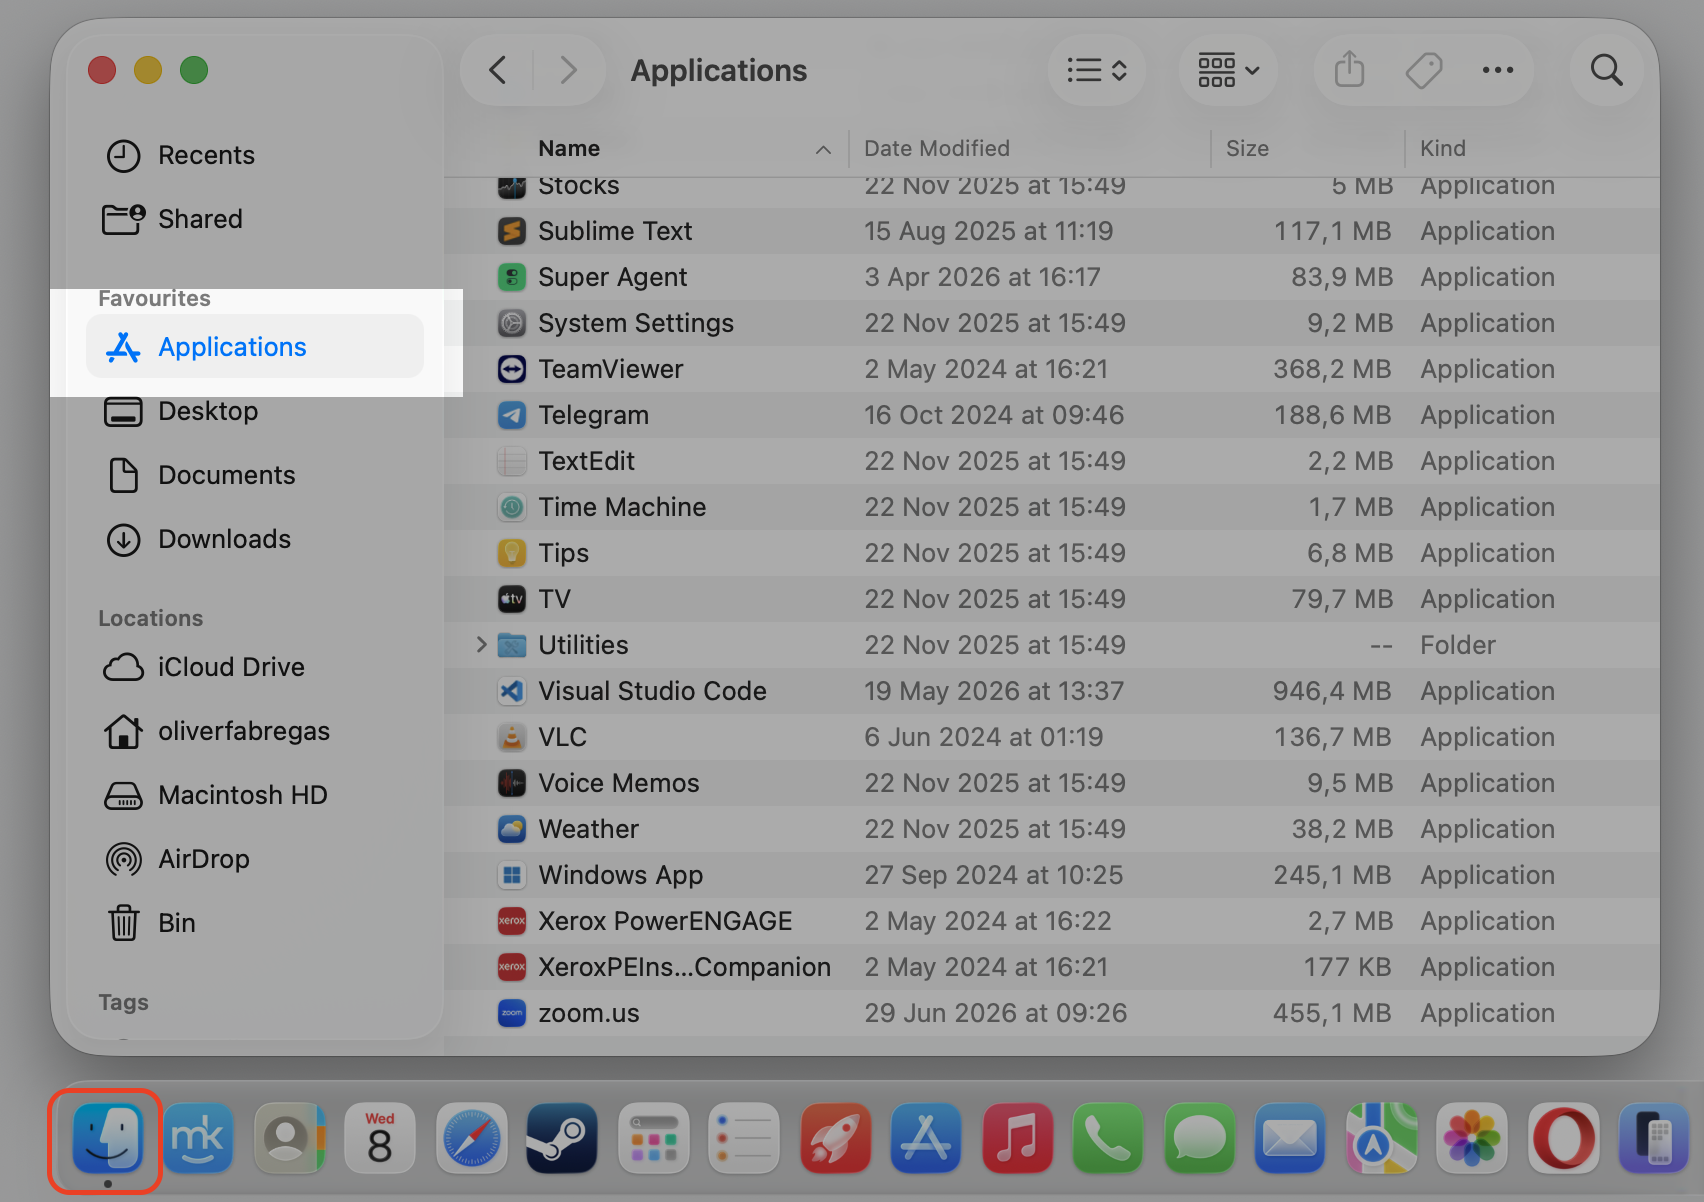
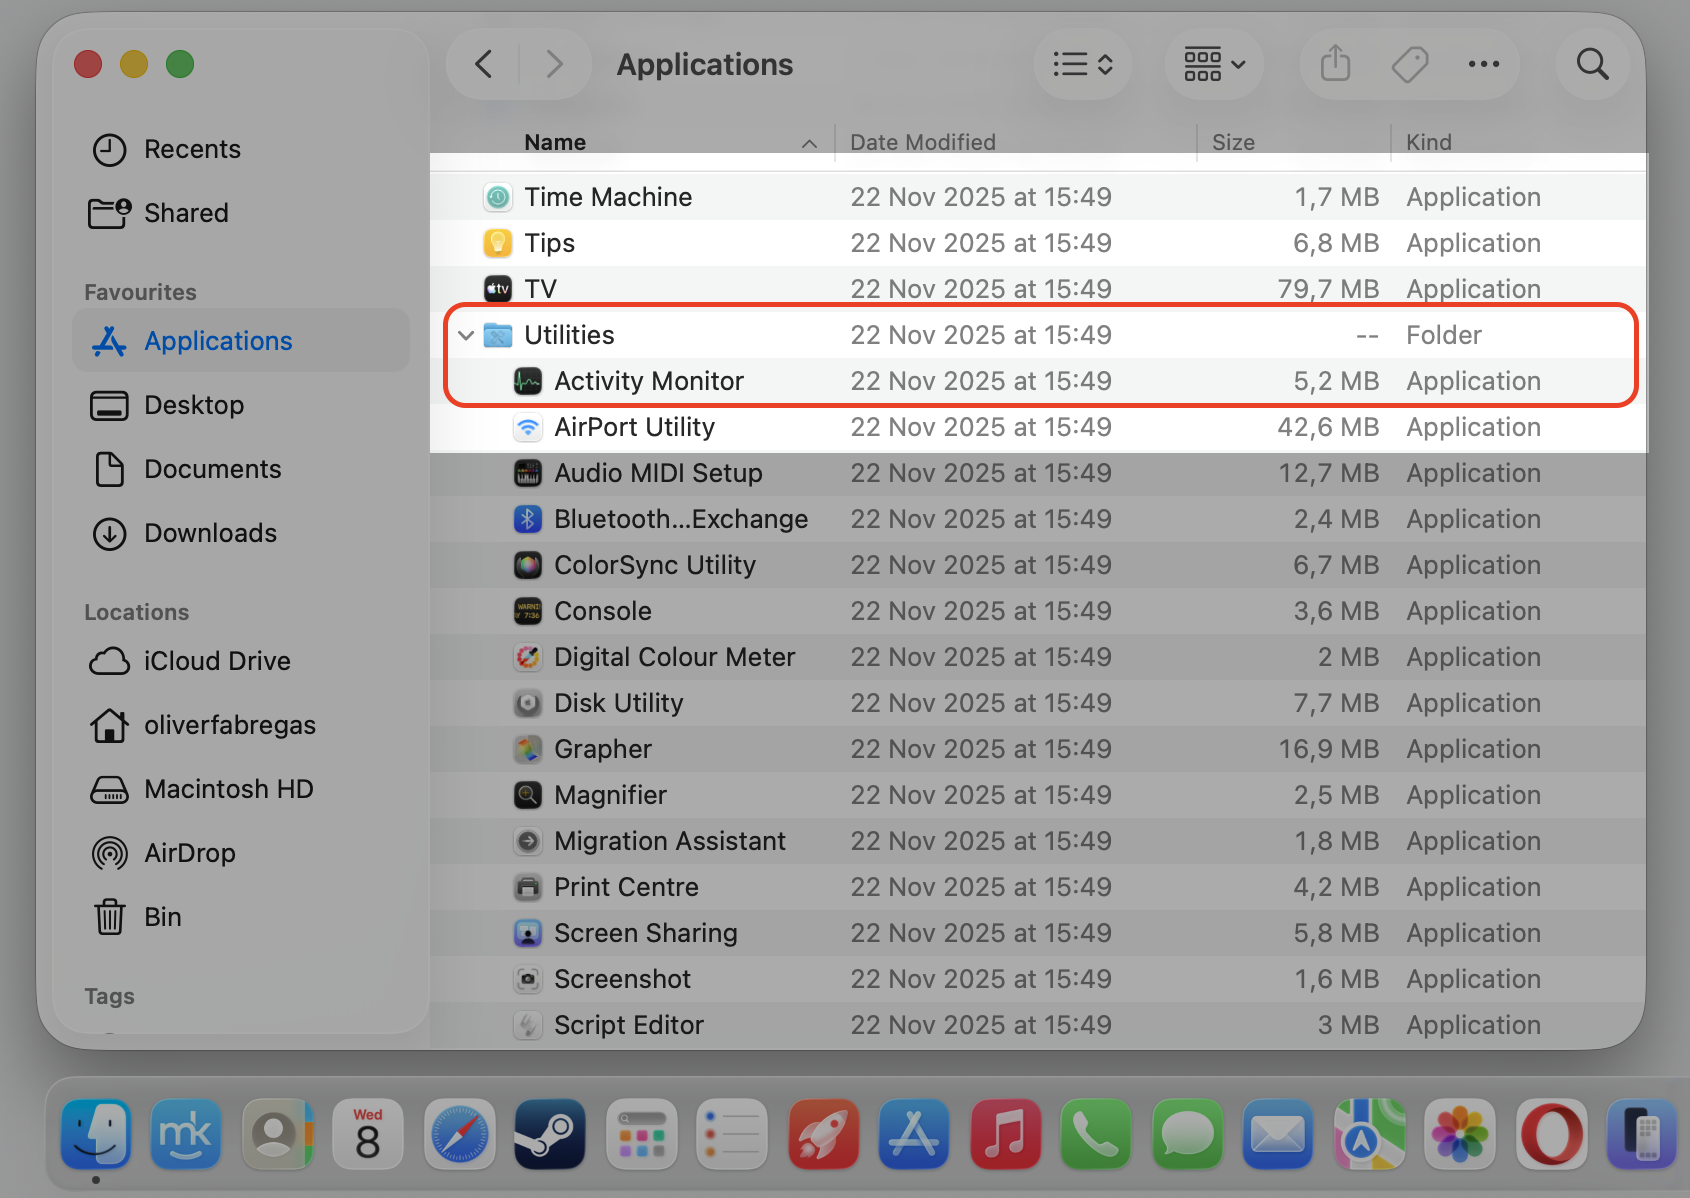
Open Activity Monitor from Applications > Utilities.
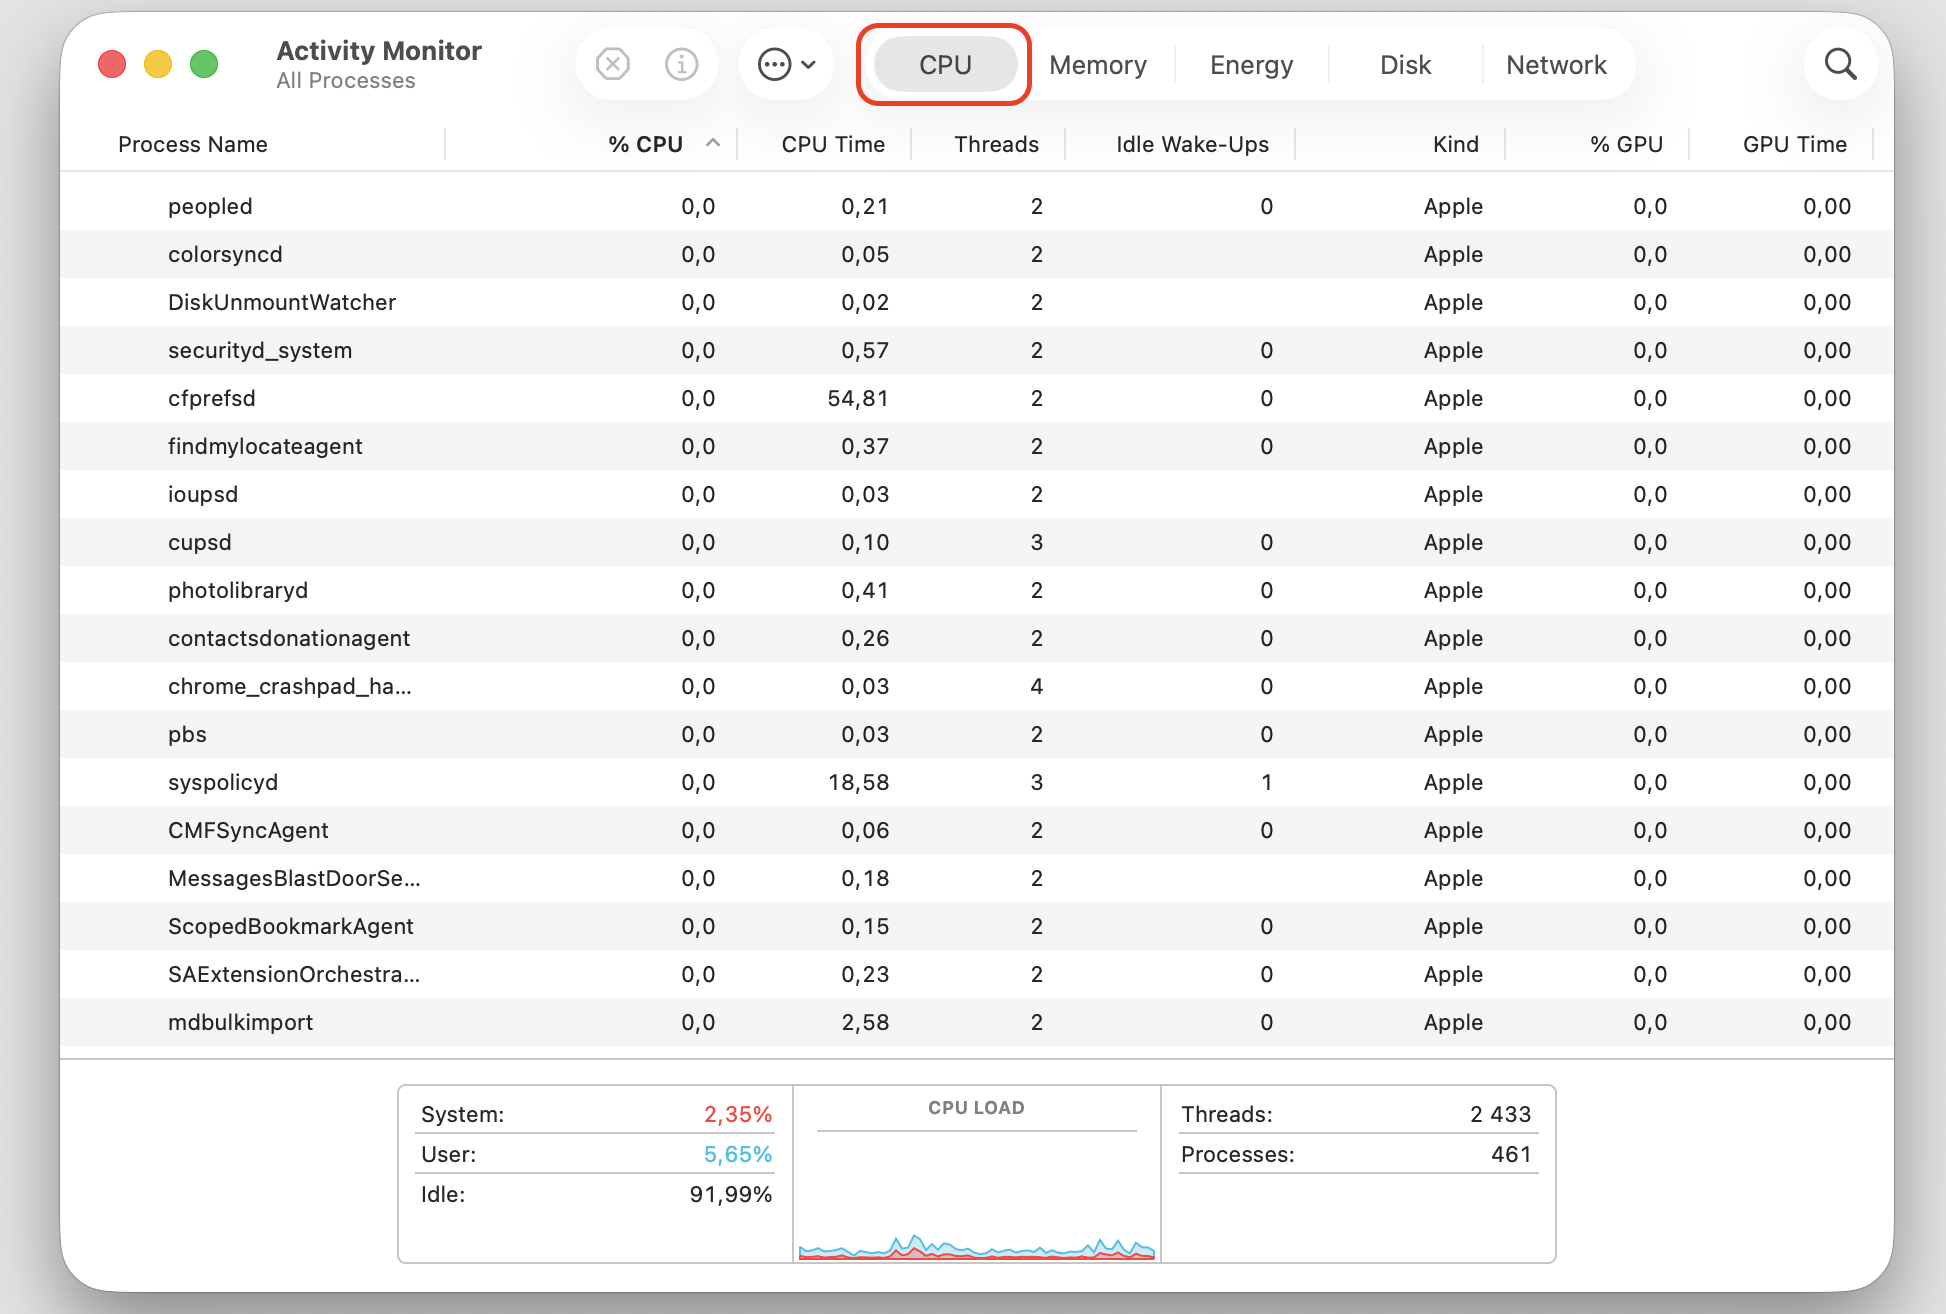
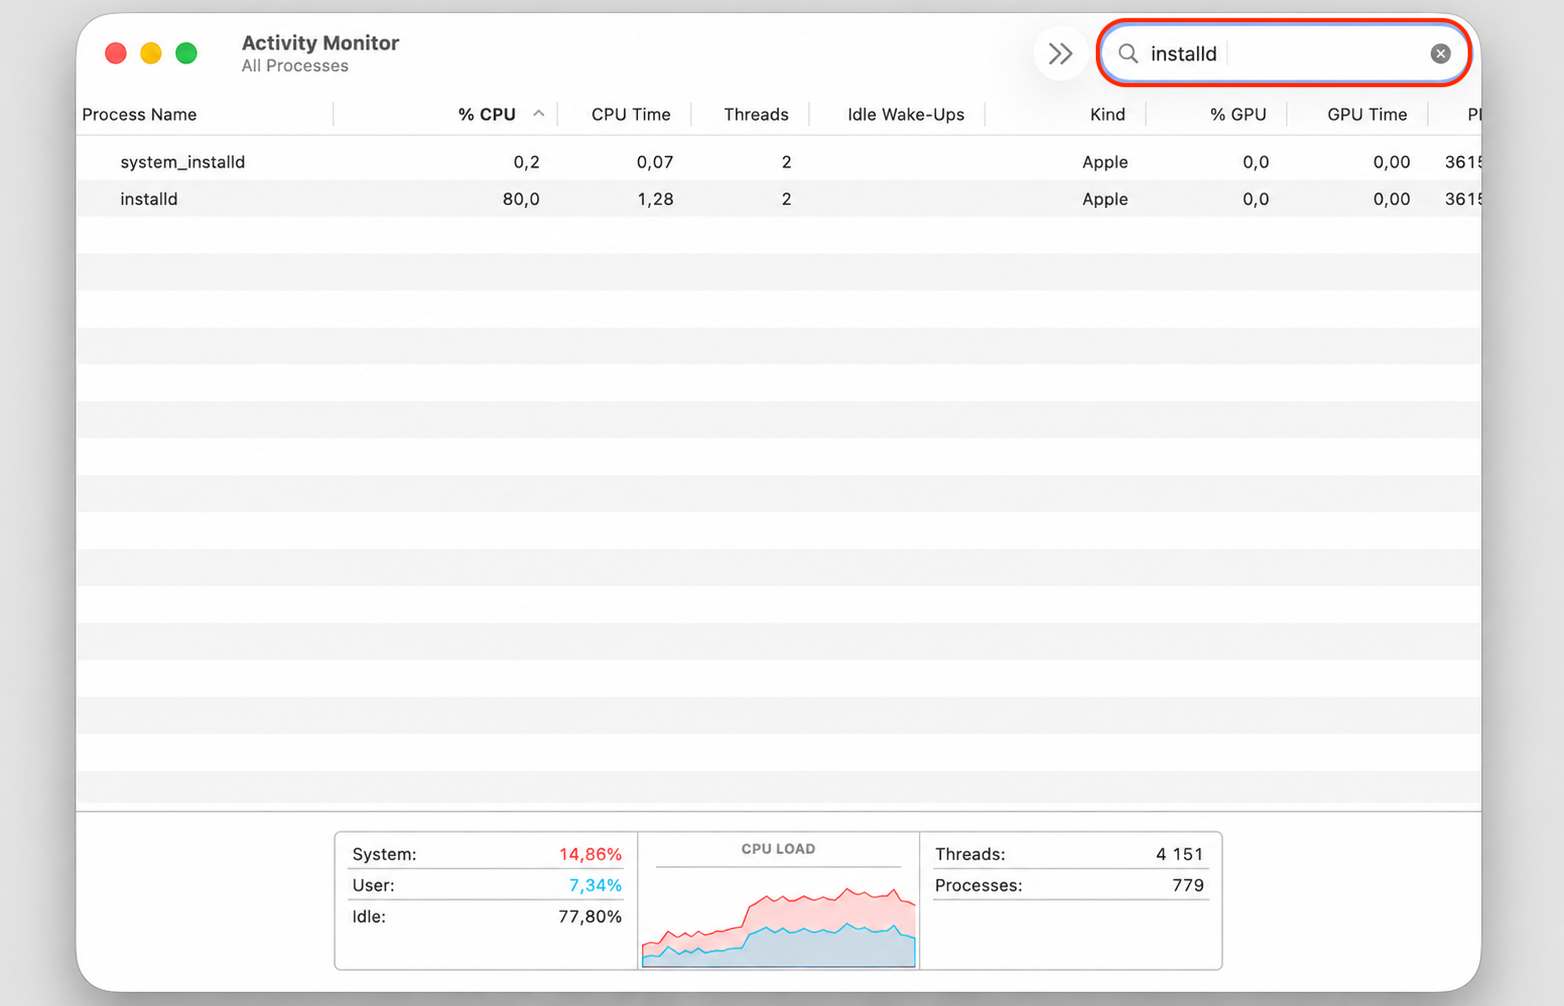
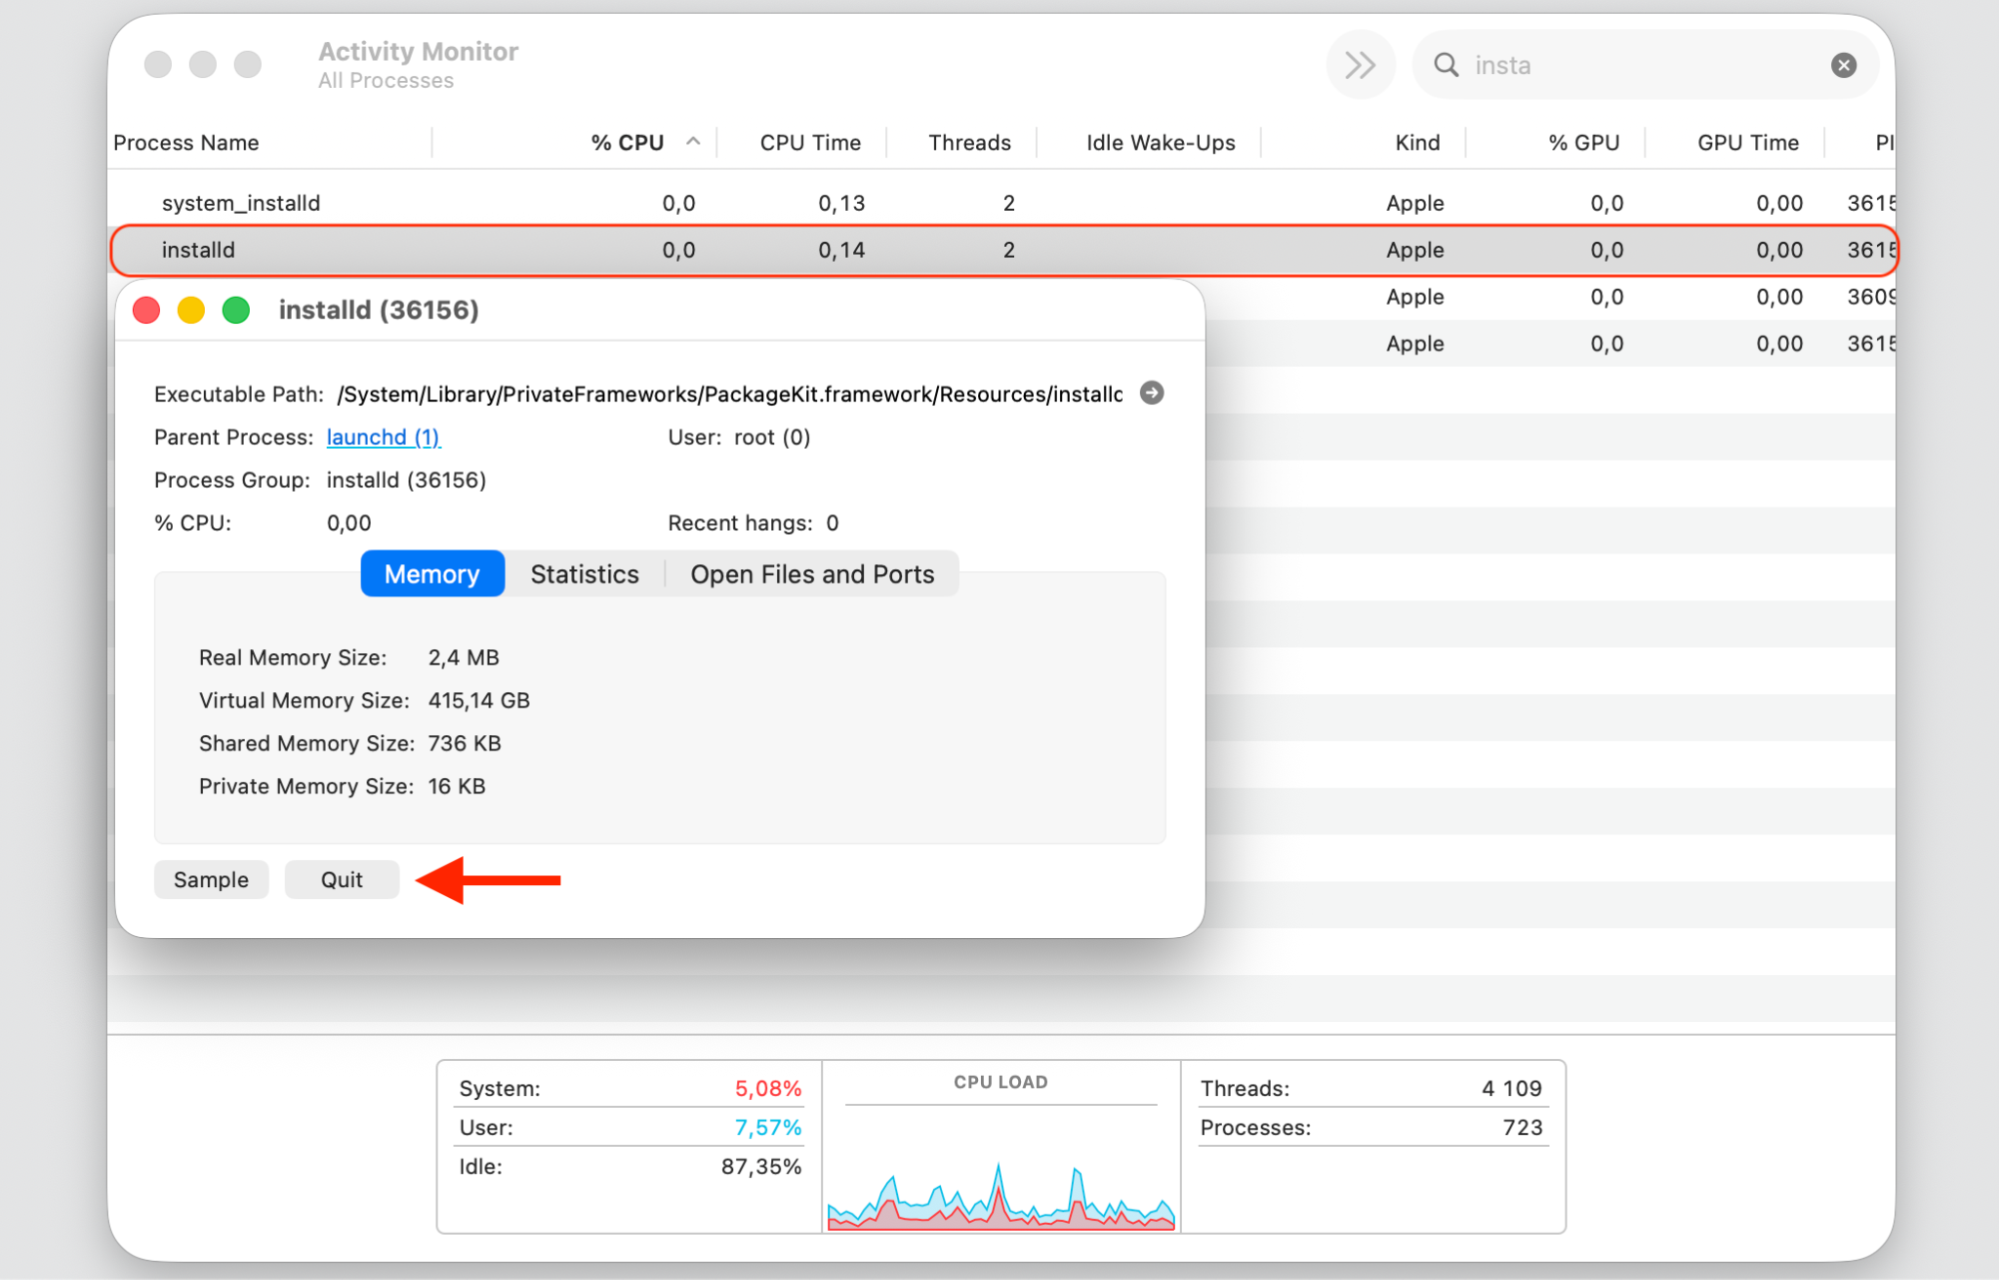
Find installd under the CPU tab and double-click the process. Then, click the Quit button.
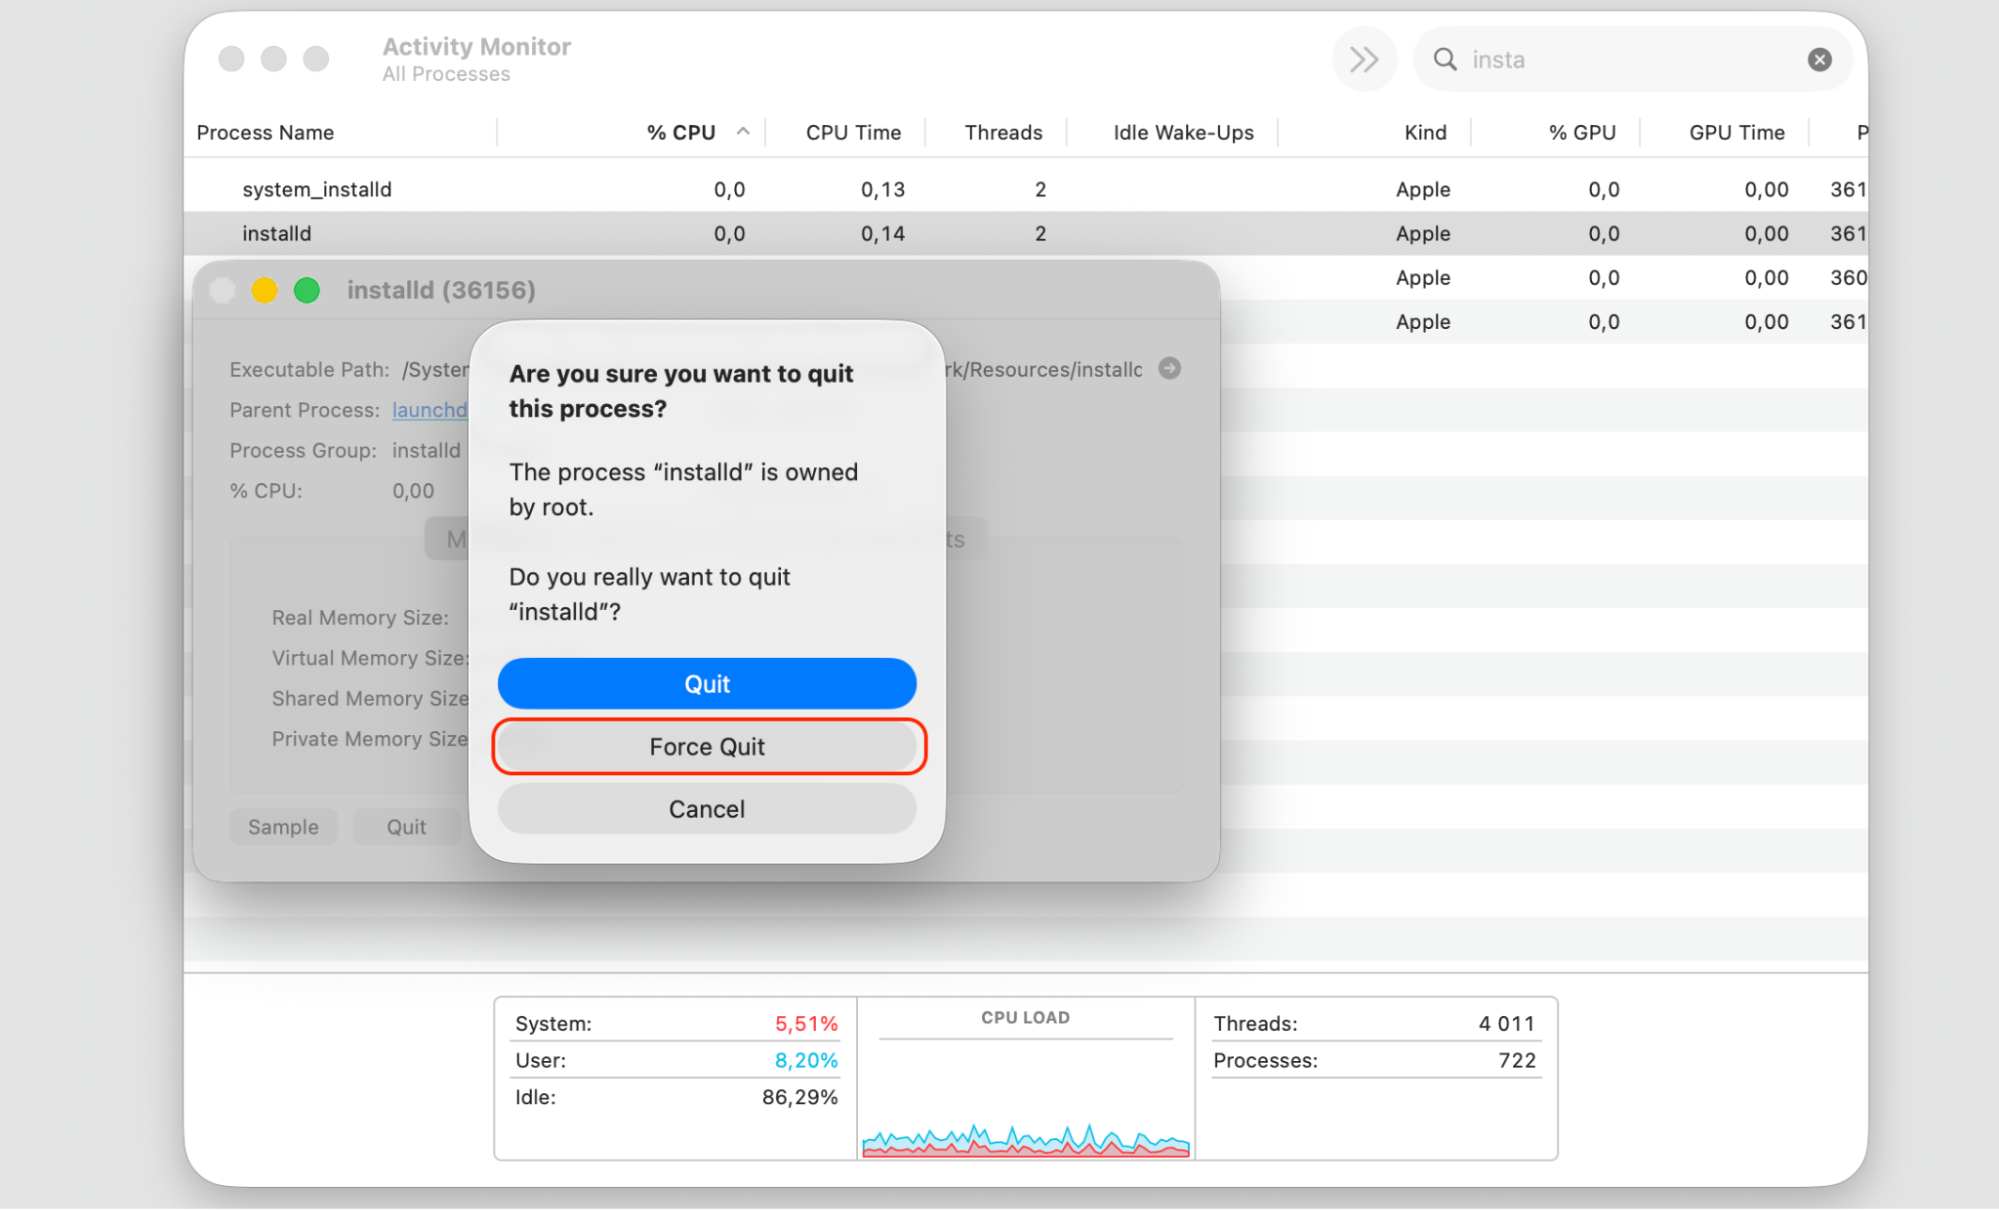
Choose Force Quit in the dialog.
Step 1. Go to Finder > ApplicationsStep 2. Expand the Utility folder and select Activity Monitor appStep 3. Select CPU tabStep 4. Type installd in the search windowStep 5. Double-click on the process and select Quit Step 6. Confirm the action by Force Quit
5. Disable automatic updates (optional)
If installd keeps firing up at inconvenient times, you can turn off automatic updates and run them manually instead. Remember to check for updates manually to keep your Mac secure:
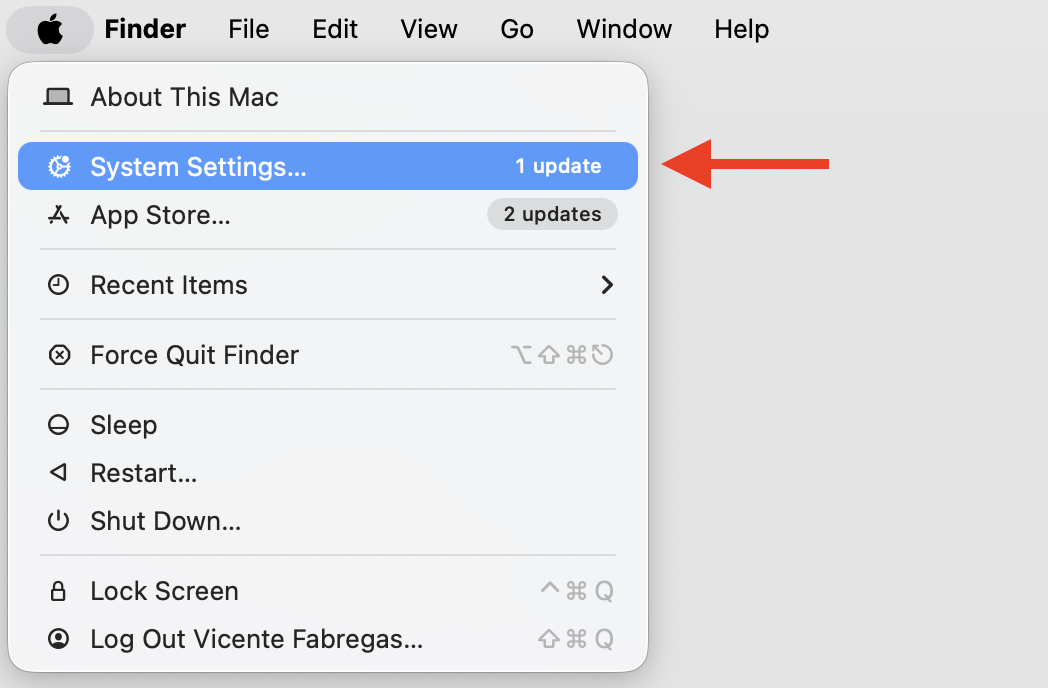
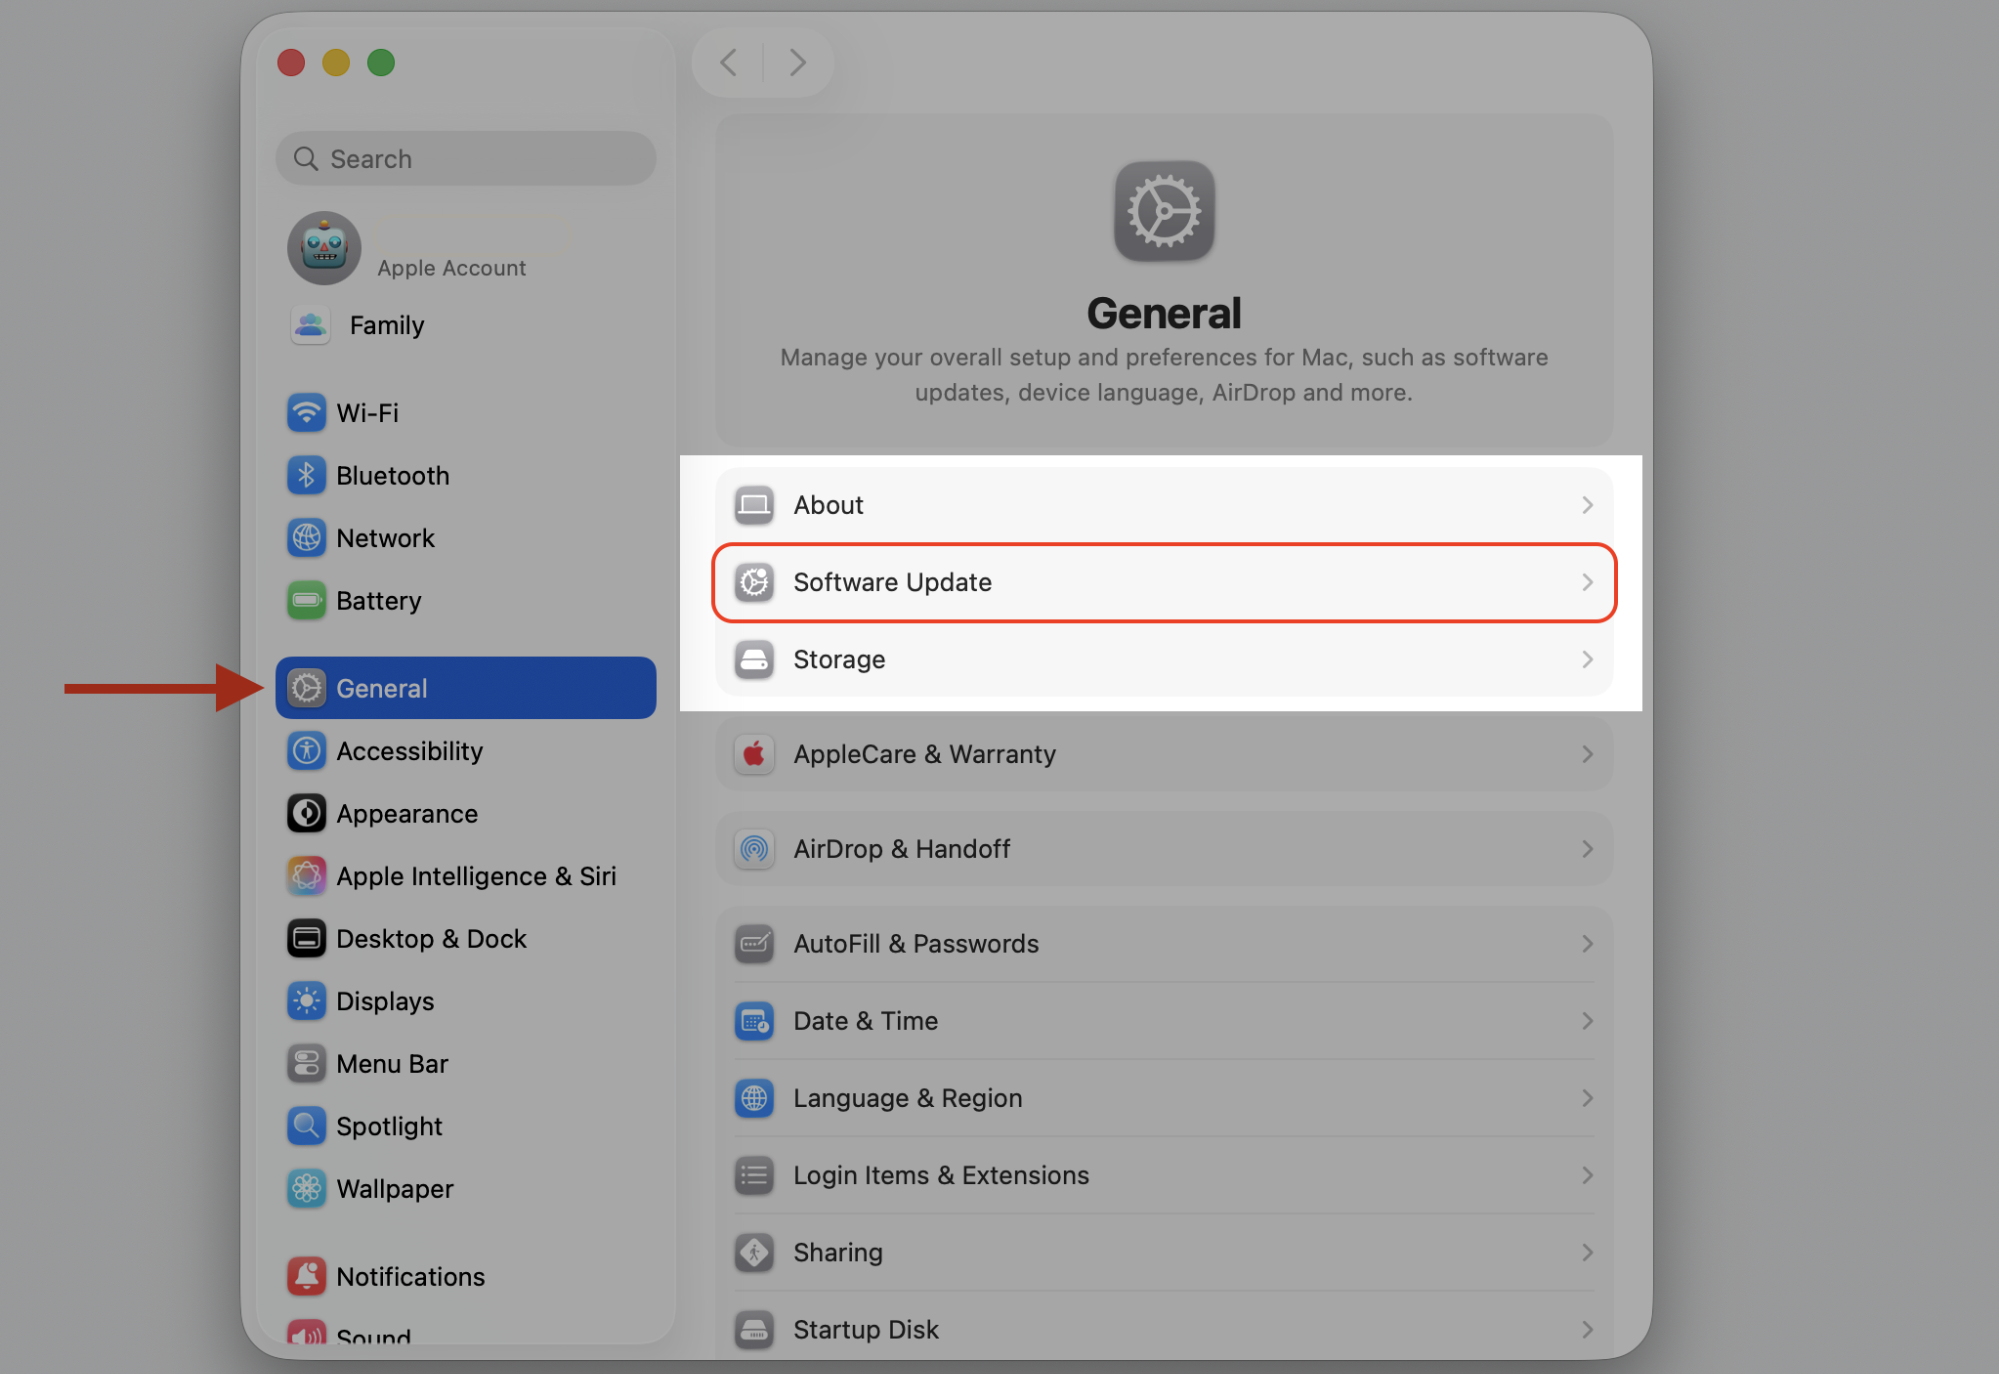
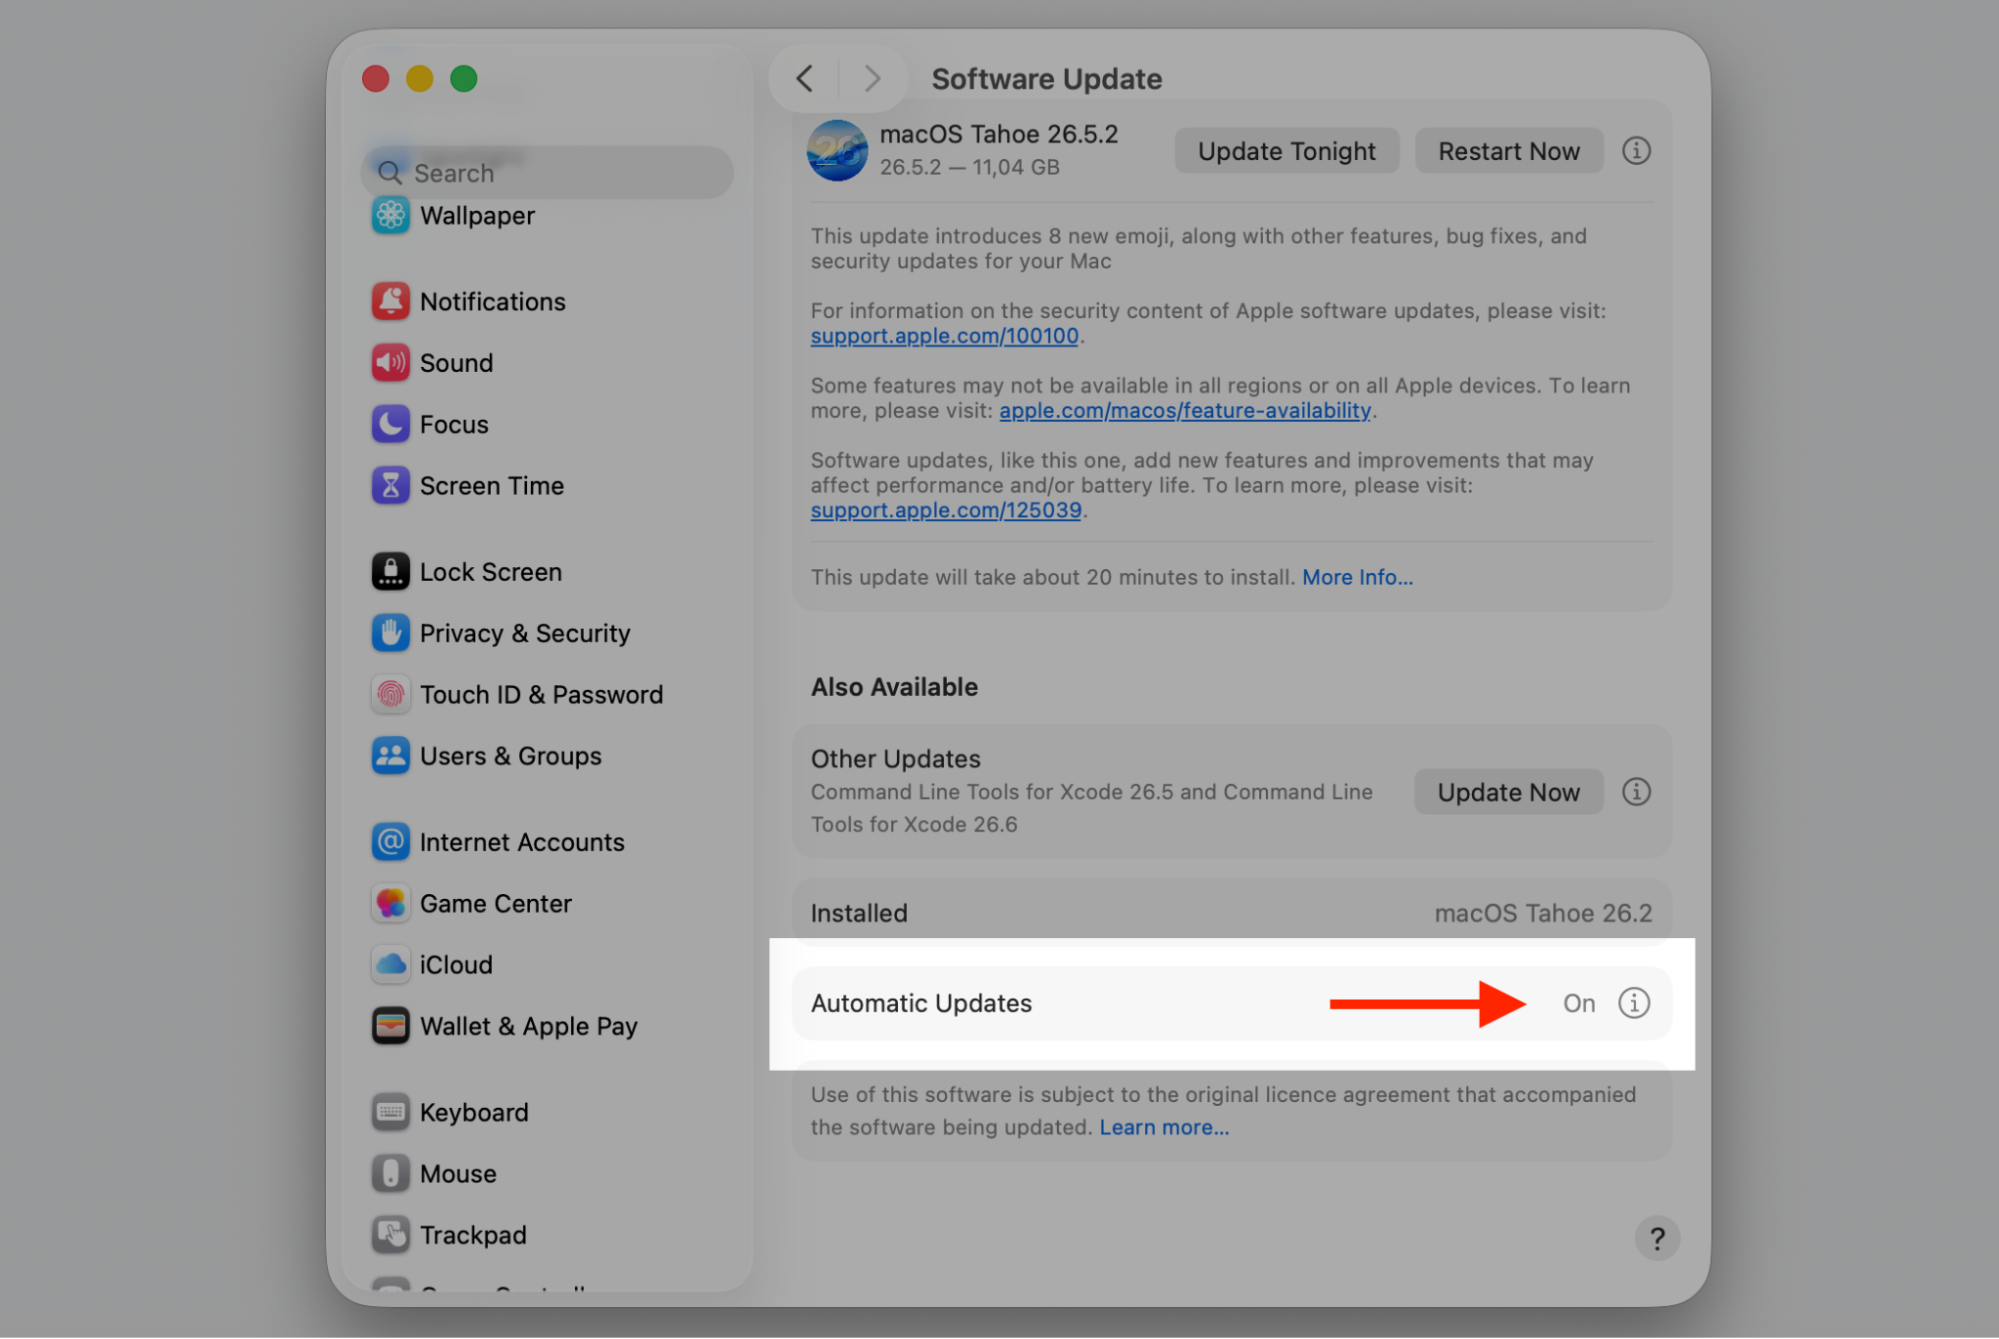
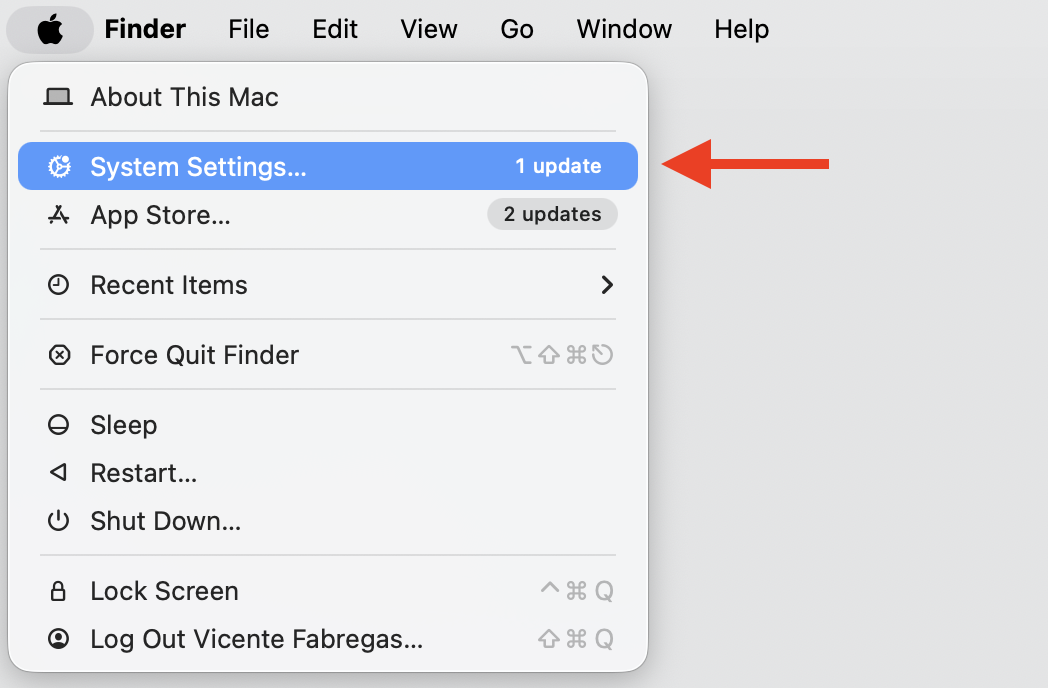
Open System Settings > General > Software Update.
Click the info (i) button next to Automatic Updates.
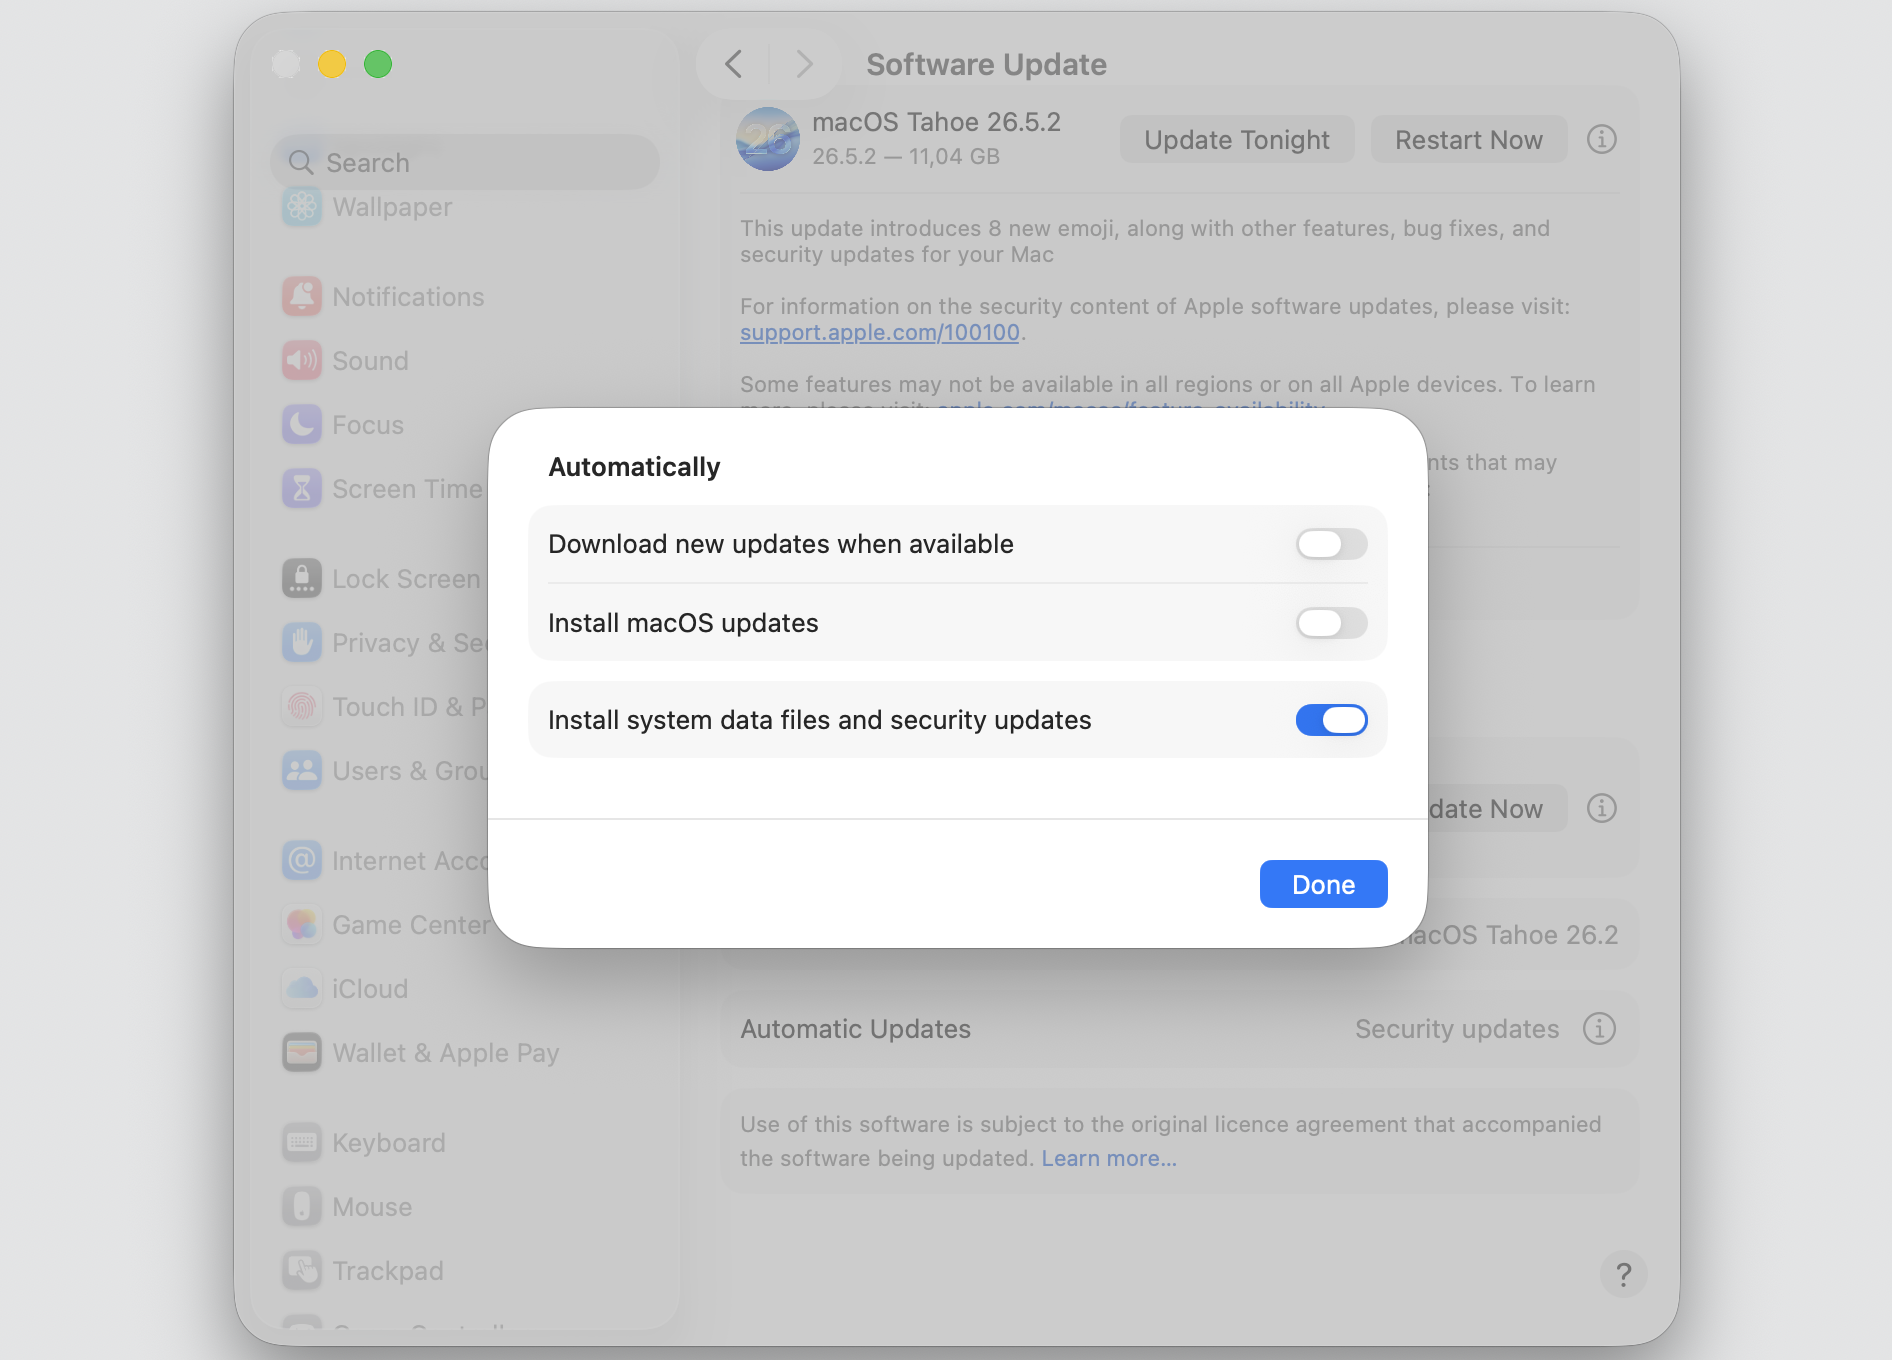
Toggle off Download new updates when available and Install macOS updates. Click Done.
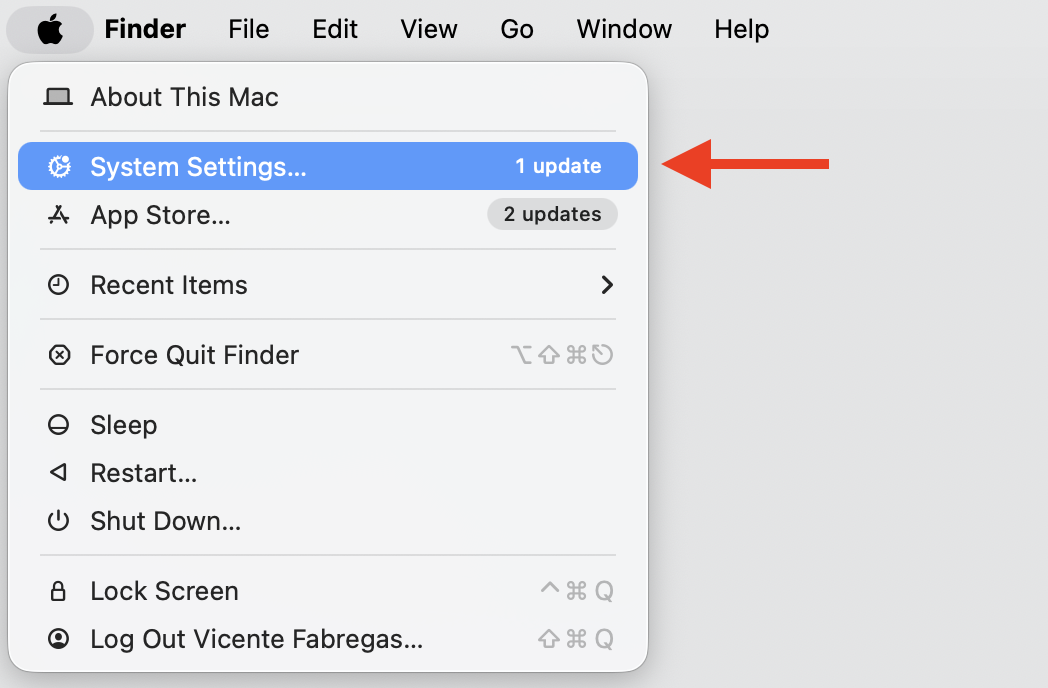
Step 1. Go to Apple logo > System SettingsStep 2. Go to General > Software UpdateStep 3. Click the info (ⓘ) button next to Automatic UpdatesStep 4. Turn off Download new updates when available and Install macOS updates > click Done
6. Clear App Store and installer cache
Corrupted update files can cause installd to run in a loop. If you’re unsure how to clear application cache on your Mac, follow these steps after quitting the App Store:
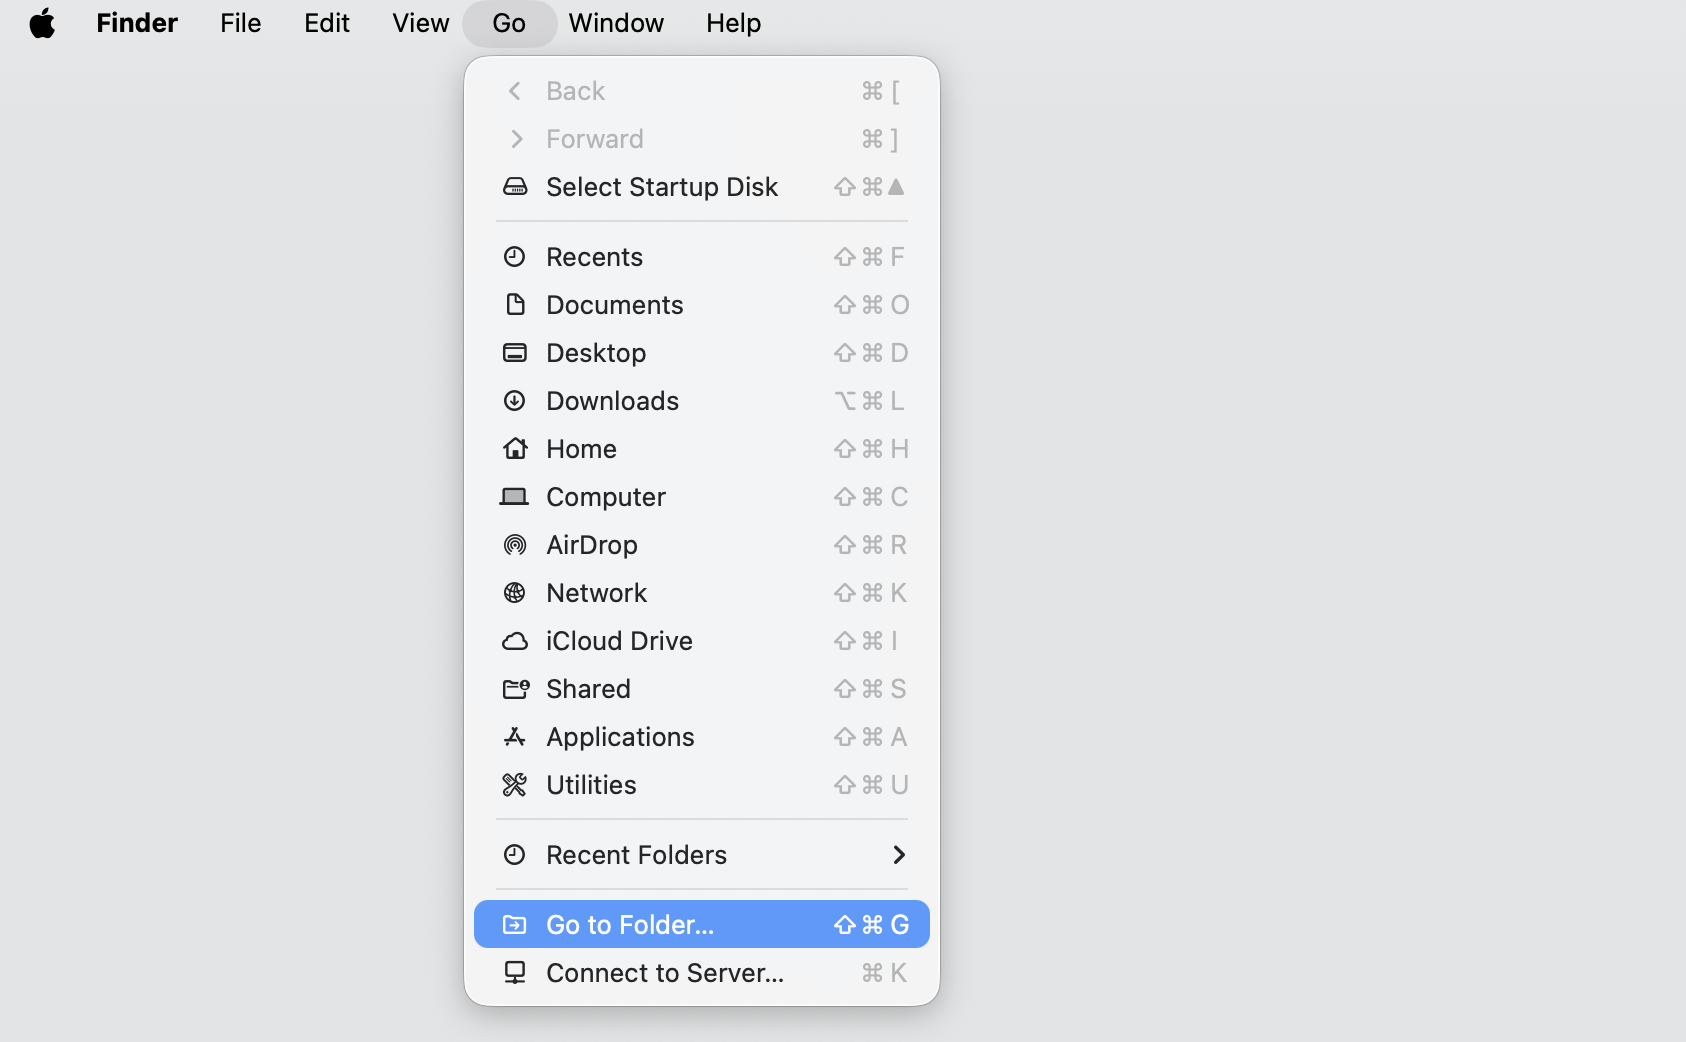
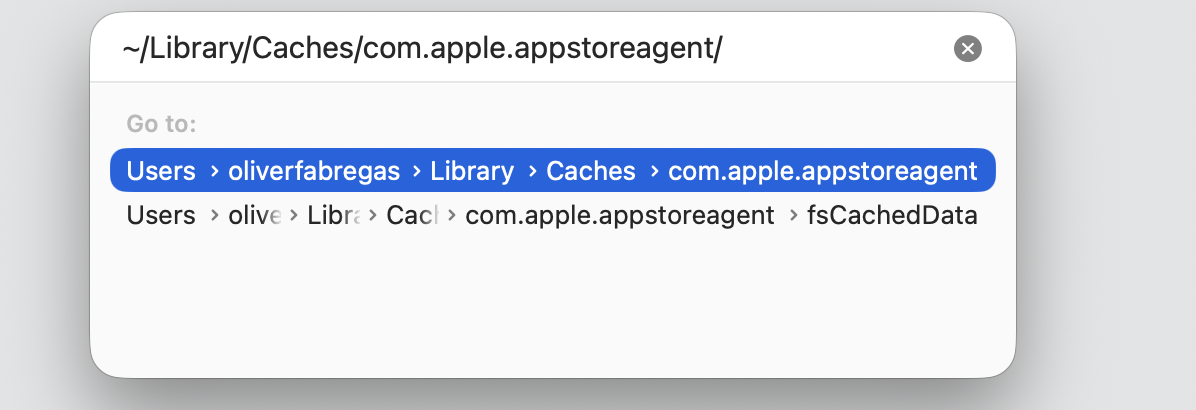
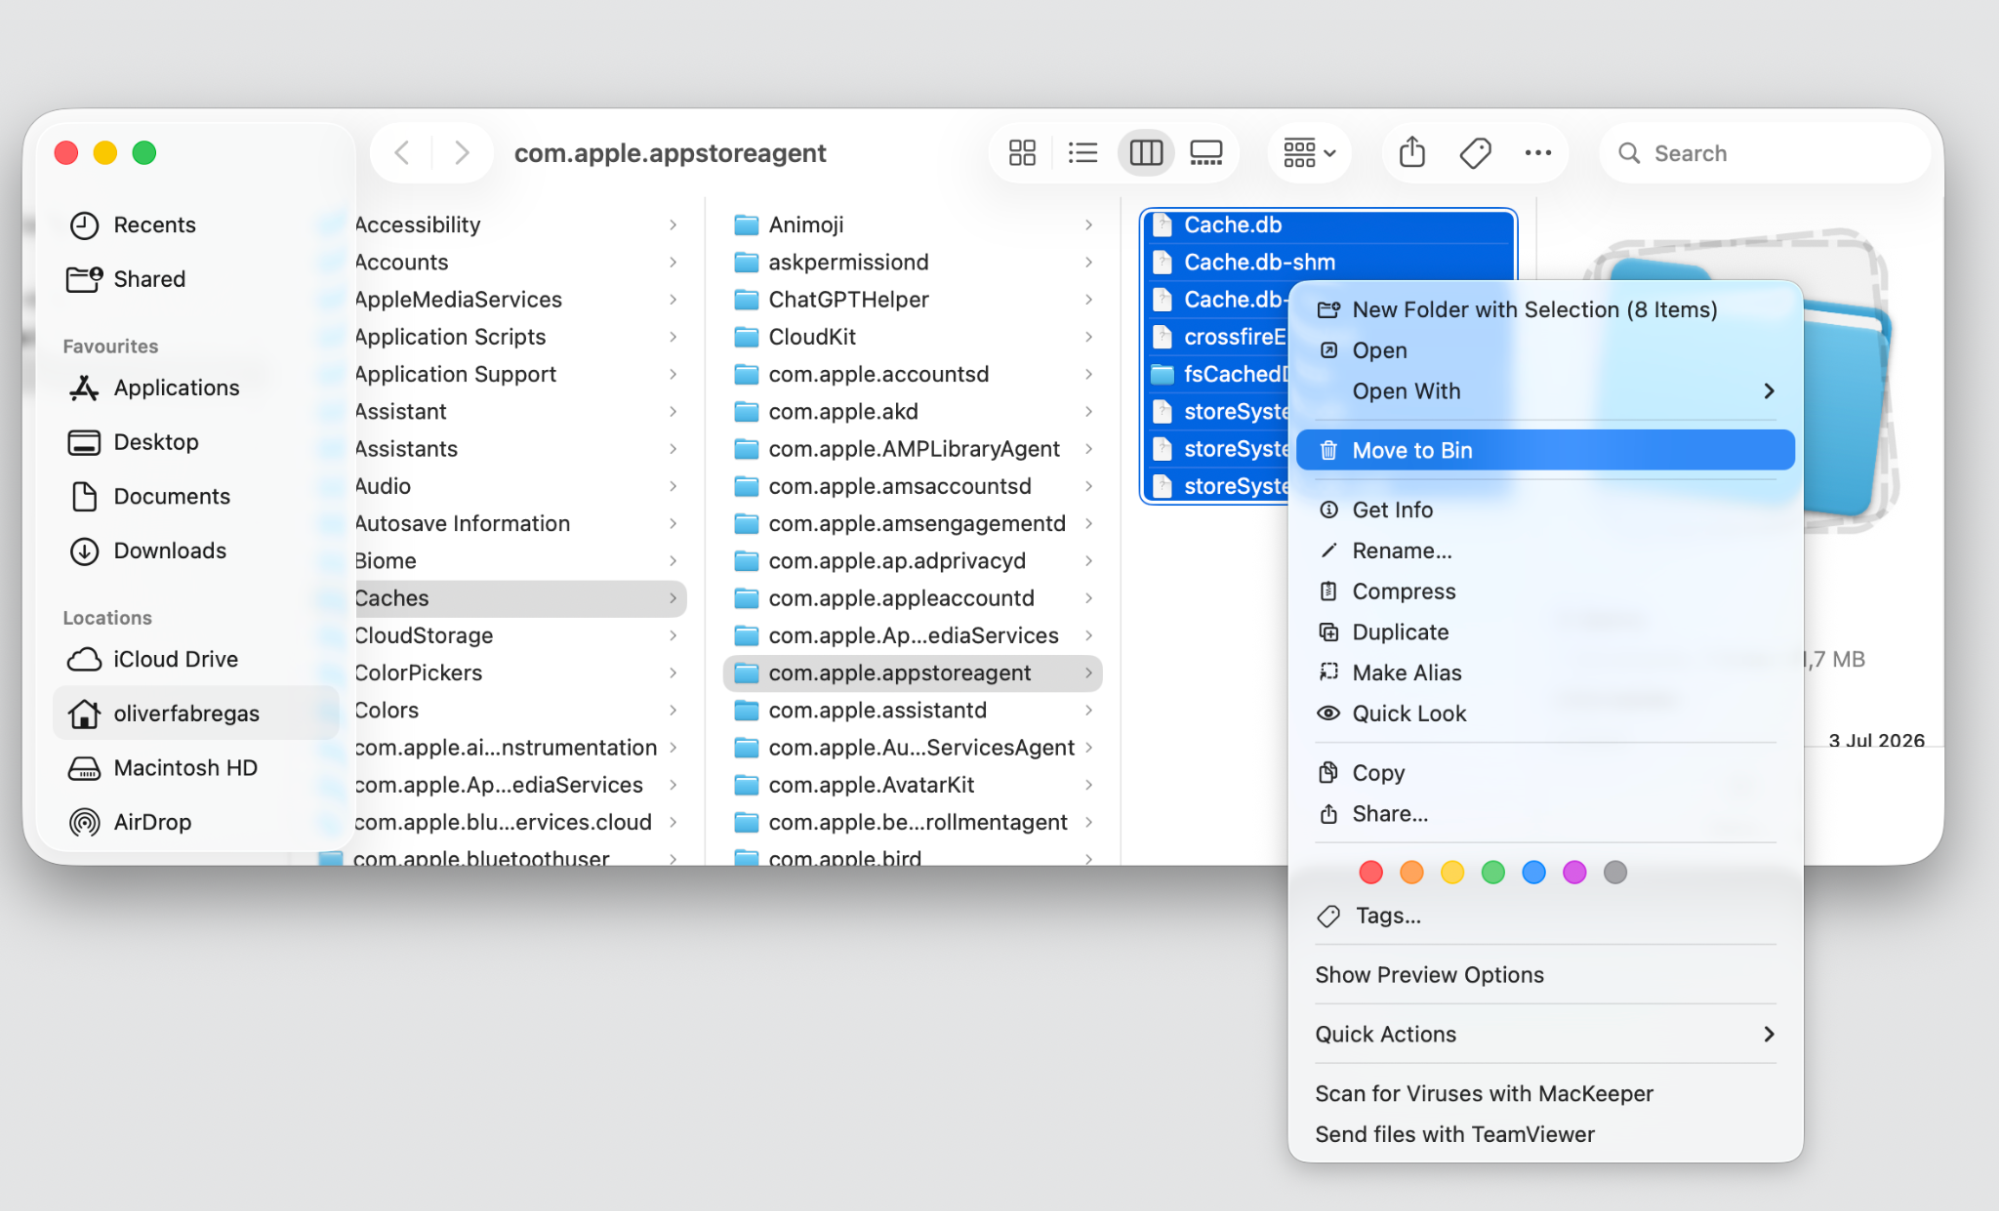
In Finder, click Go > Go to Folder and type the ~/Library/Caches/com.apple.appstoreagent/ command.
Delete the folder contents, not the folder itself, by moving the particular files to the Trash.
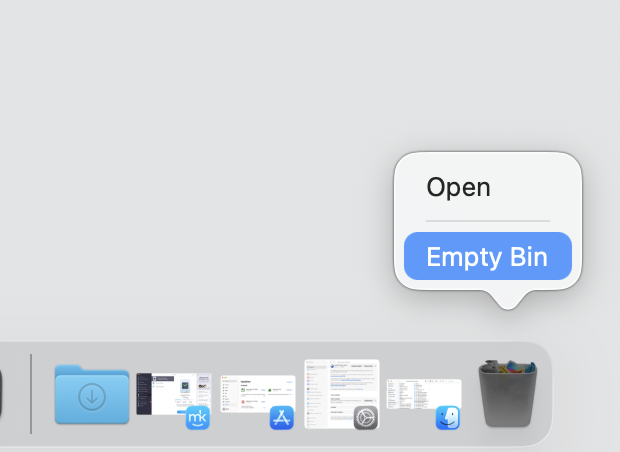
Empty the Trash and restart your Mac.
Step 1. In Finder, click Go > Go to FolderStep 2. Type ~/Library/Caches/com.apple.appstoreagent/Step 3. Select all files from Folder and move them to the BinStep 4. Empty the BinStep 5. Restart your Mac
7. Check available disk space and system condition
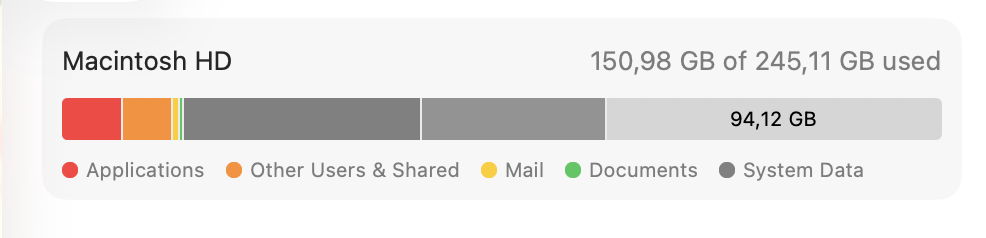
We’ve noticed many times that low storage can stall updates and keep installd retrying. You can check how much storage you have, and if space is tight, clean MacBook storage by removing old files and caches. Follow our instructions now:
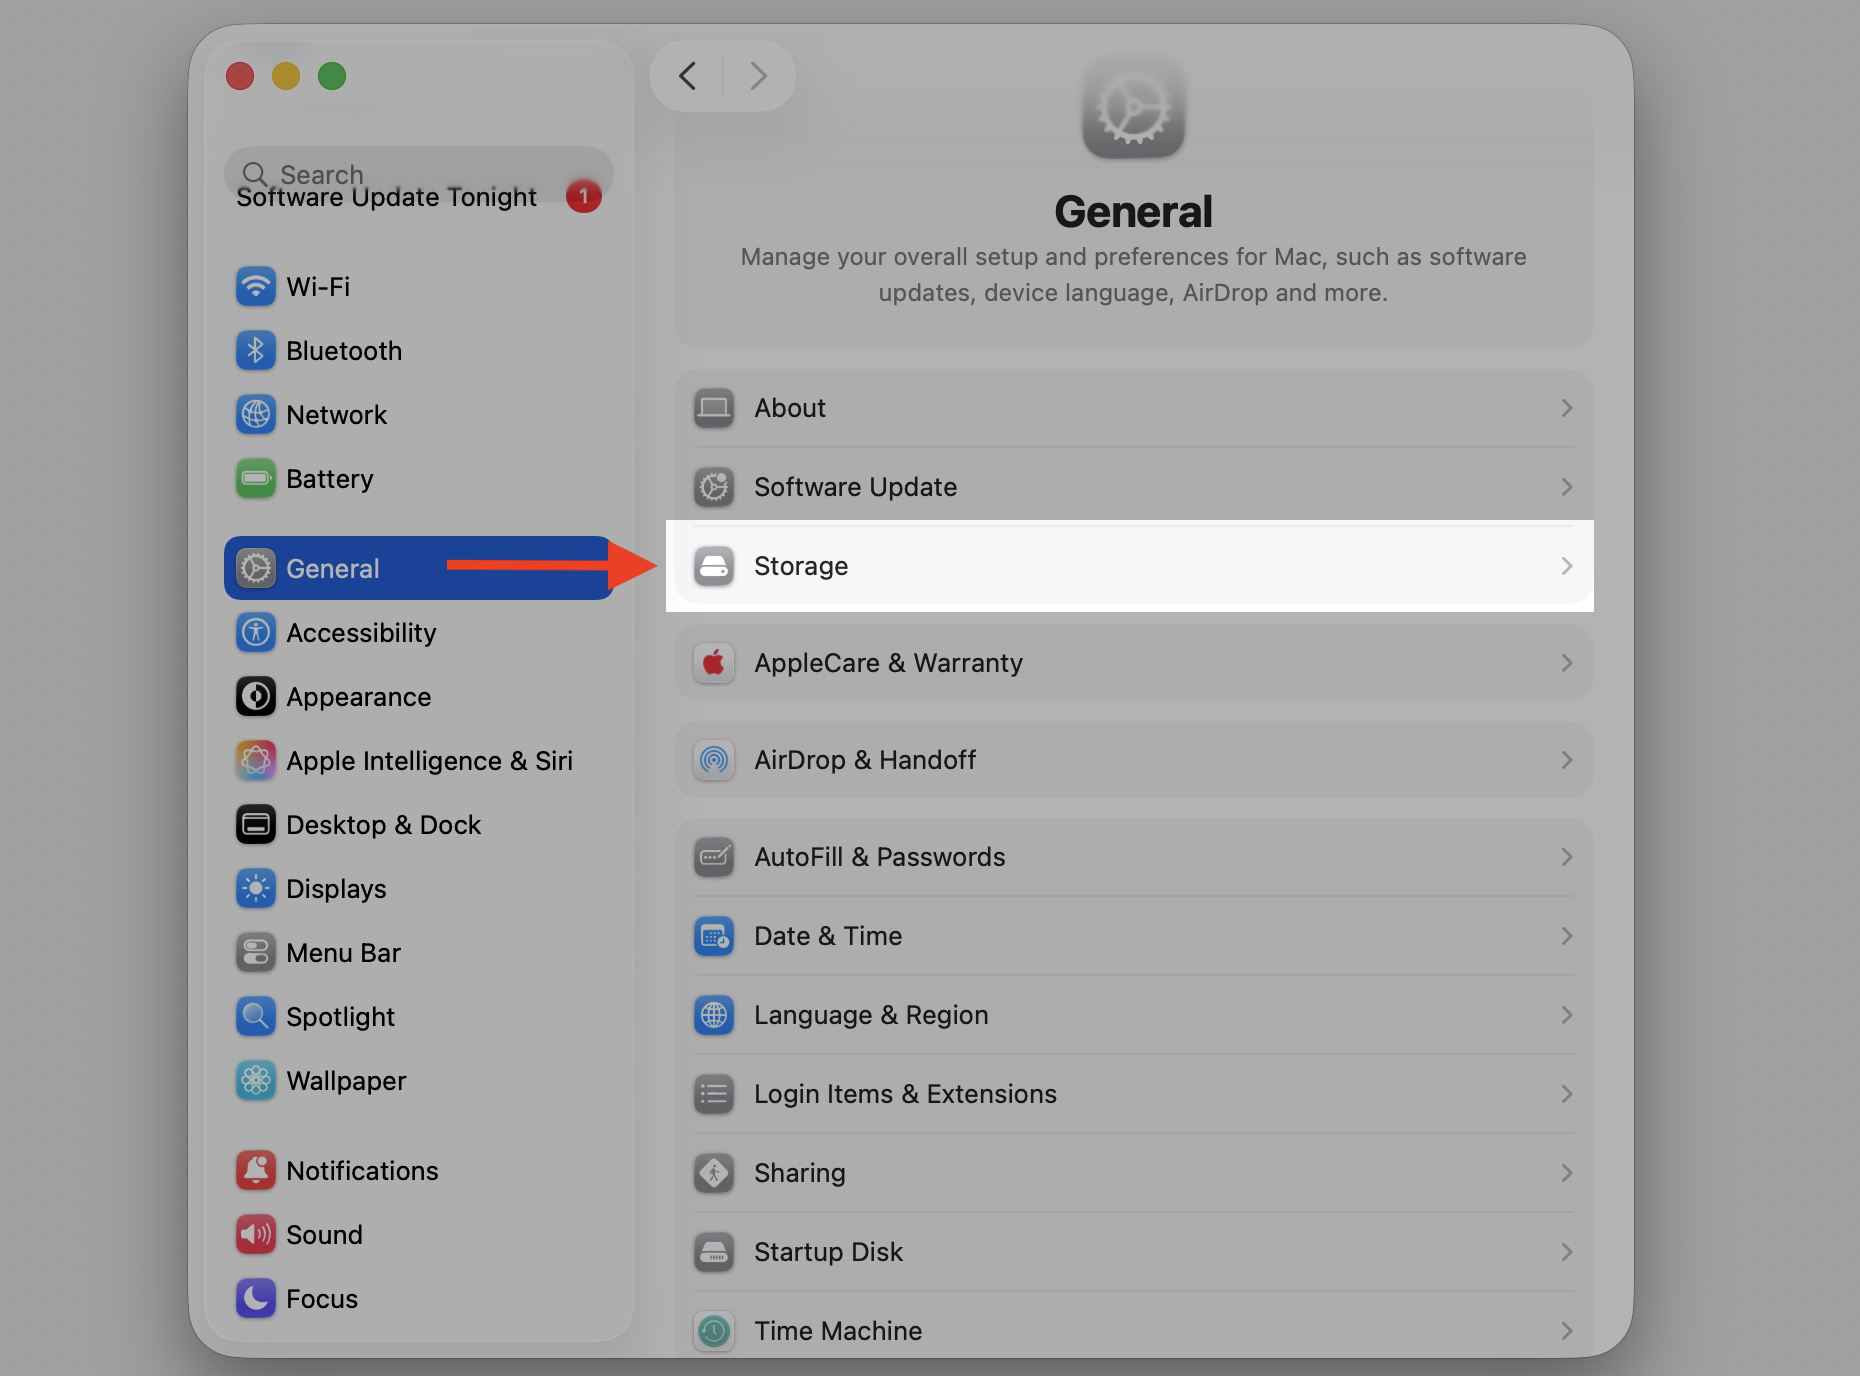
Open System Settings > General > Storage to review your disk usage.
Look at the storage breakdown and identify large files or unused apps.
Delete unnecessary files.
Restart your Mac and check whether installd’s CPU usage has dropped.
Step 1. Go to Apple logo > System SettingsStep 2. Select Storage from General sectionStep 3. Check if you have enough free space on disk. Otherwise, free up space
8. Update macOS and apps
Outdated software can cause bugs in background processes. Running a Mac update ensures your system has the latest patches. Act like this:
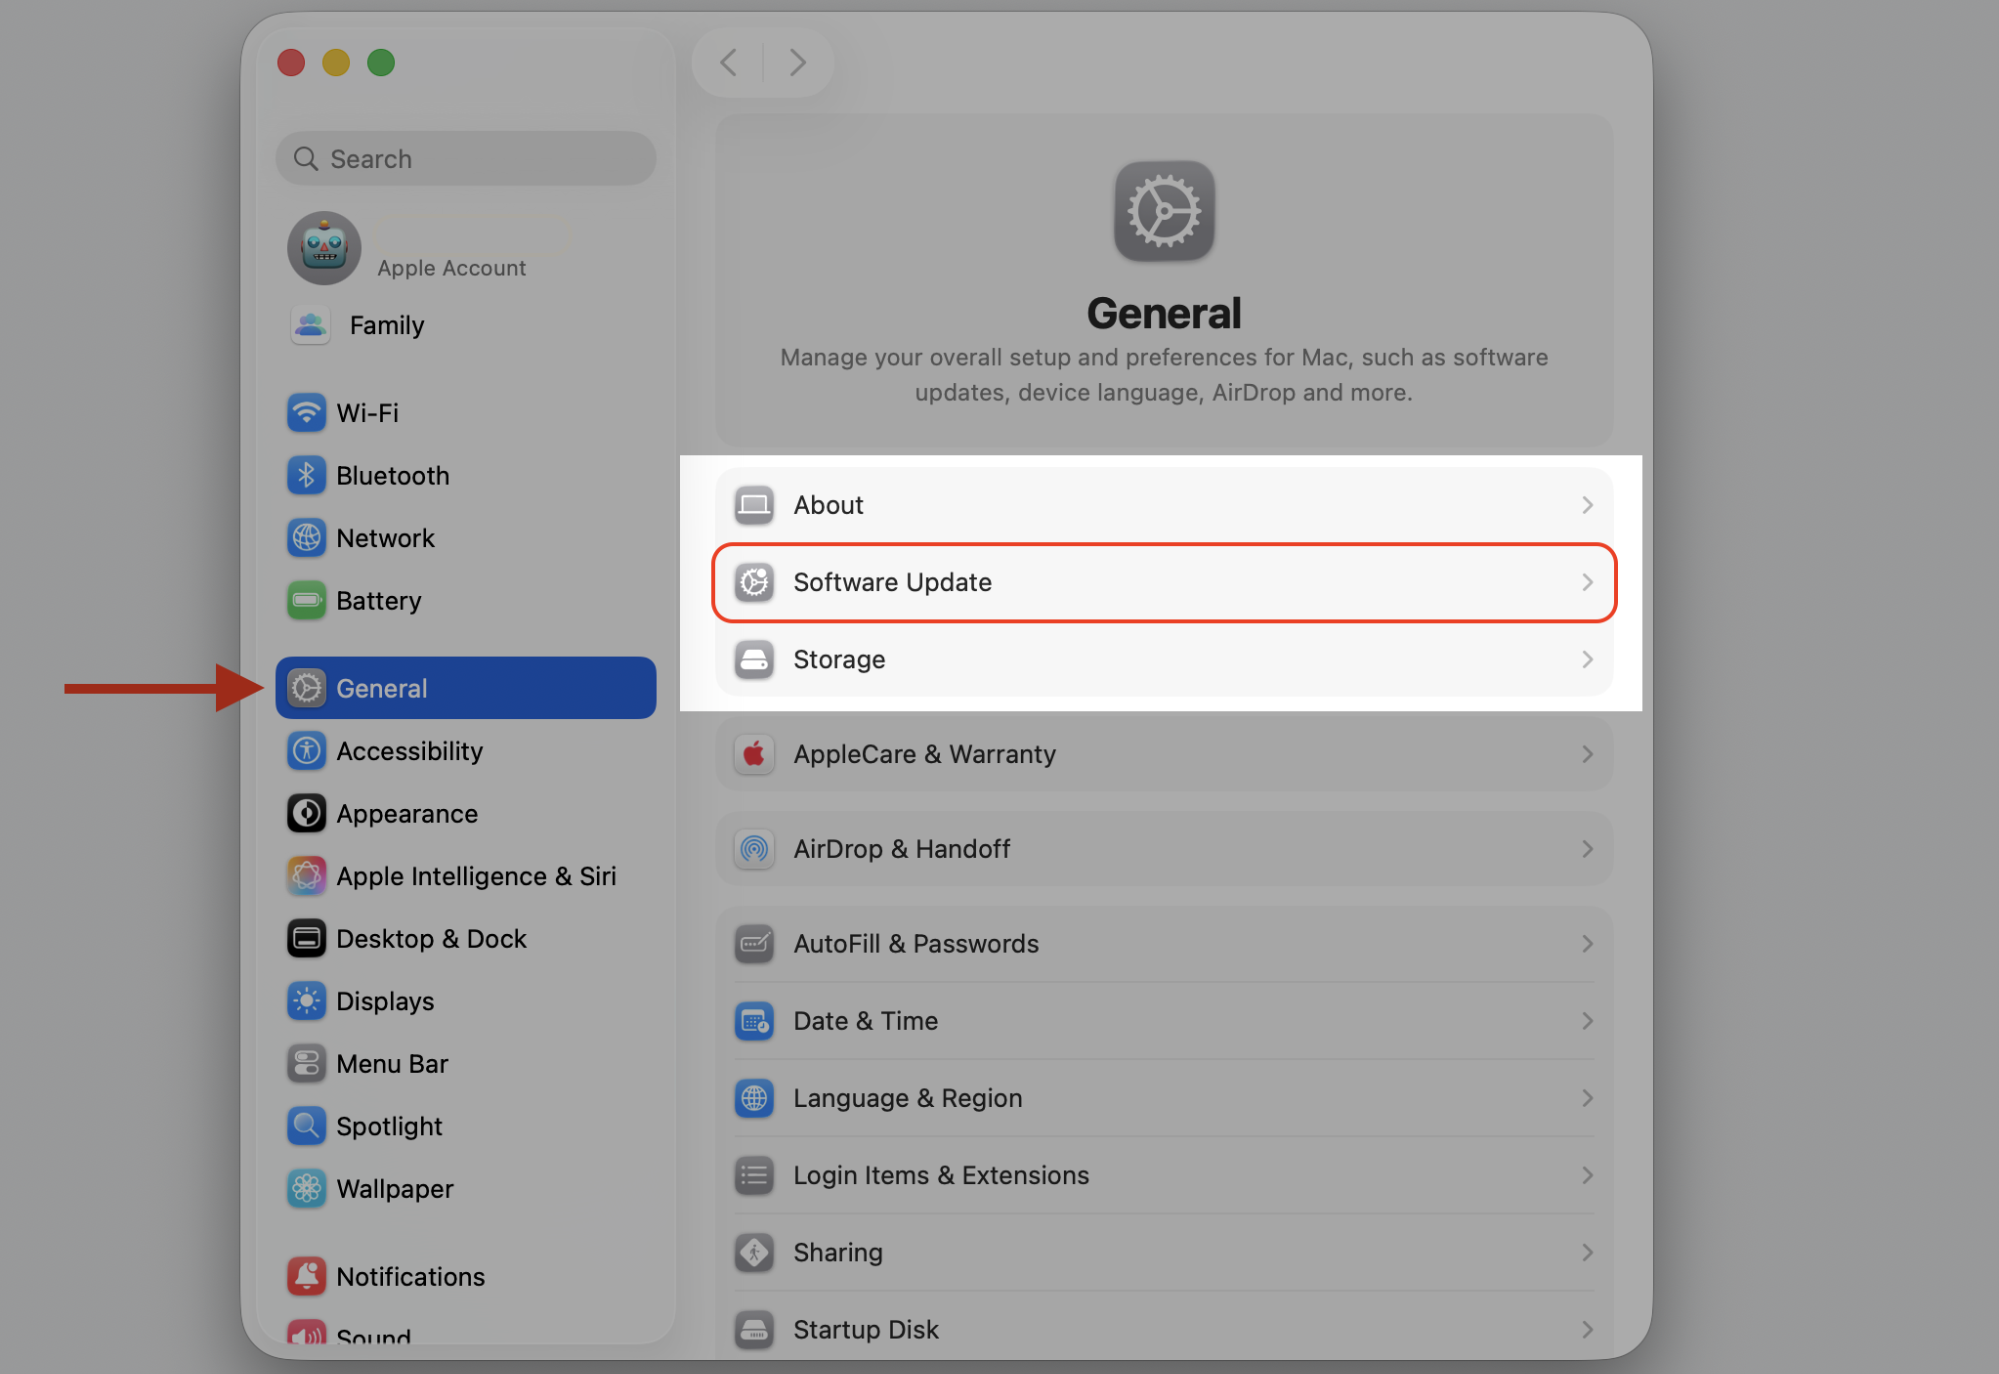
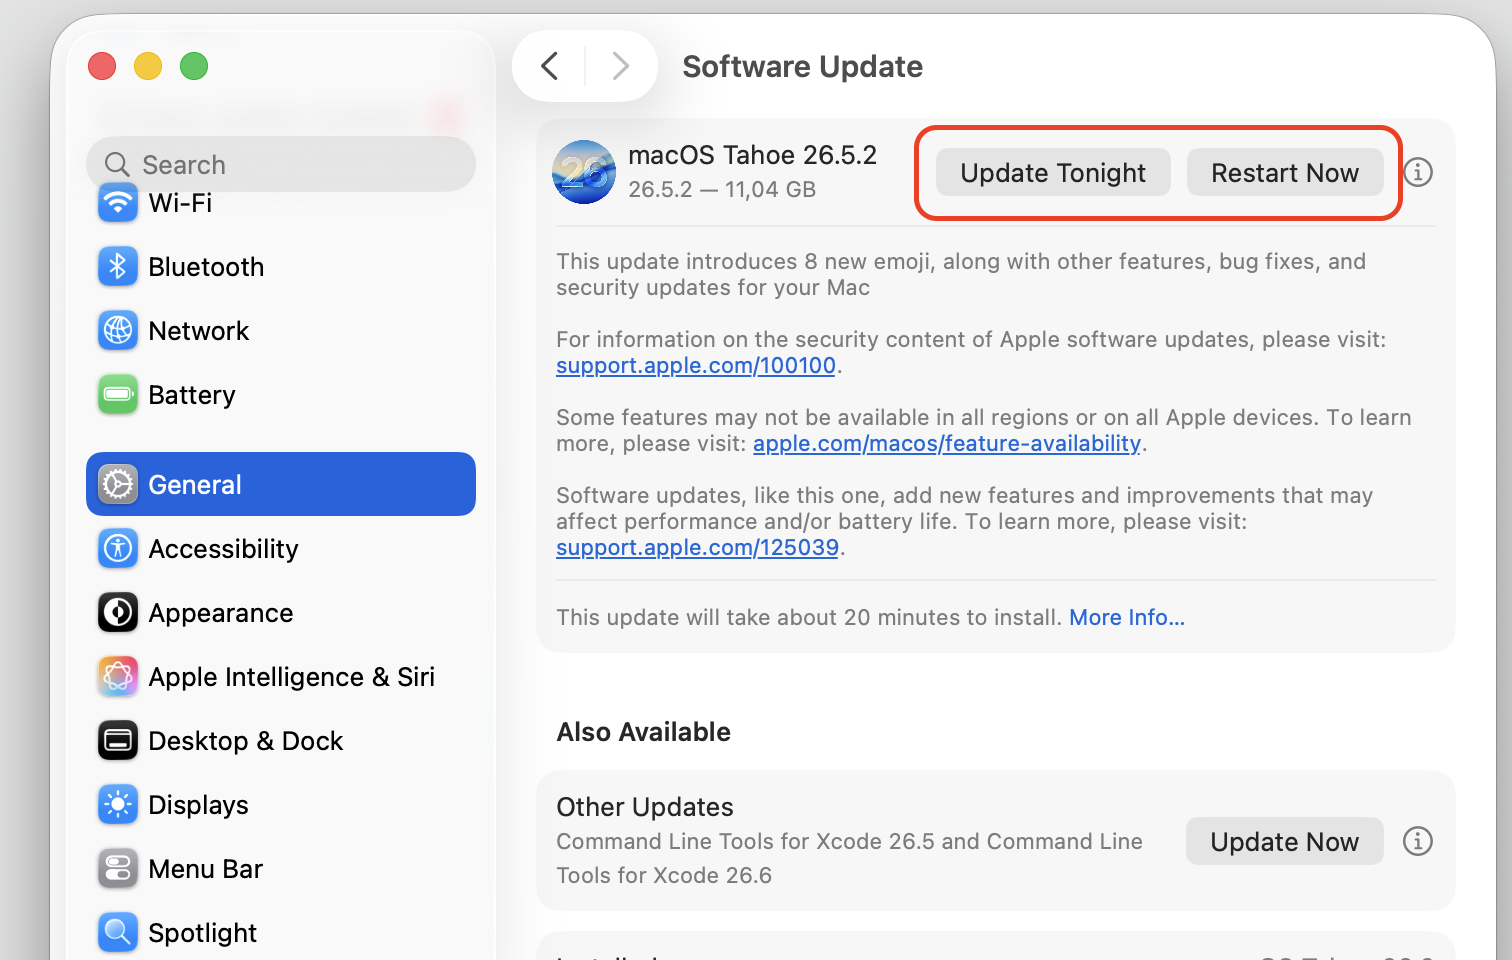
Go to System Settings > General > Software Update and install any available updates.
Open the App Store and update pending apps from the Updates tab.
Step 1. Go to Apple logo > System SettingsStep 2. Go to General > Software UpdateStep 3. Install the update and restart or schedule to updateStep 4. Go to Apple menu > App StoreStep 5. Run pending updates
9. Scan Mac for unwanted software
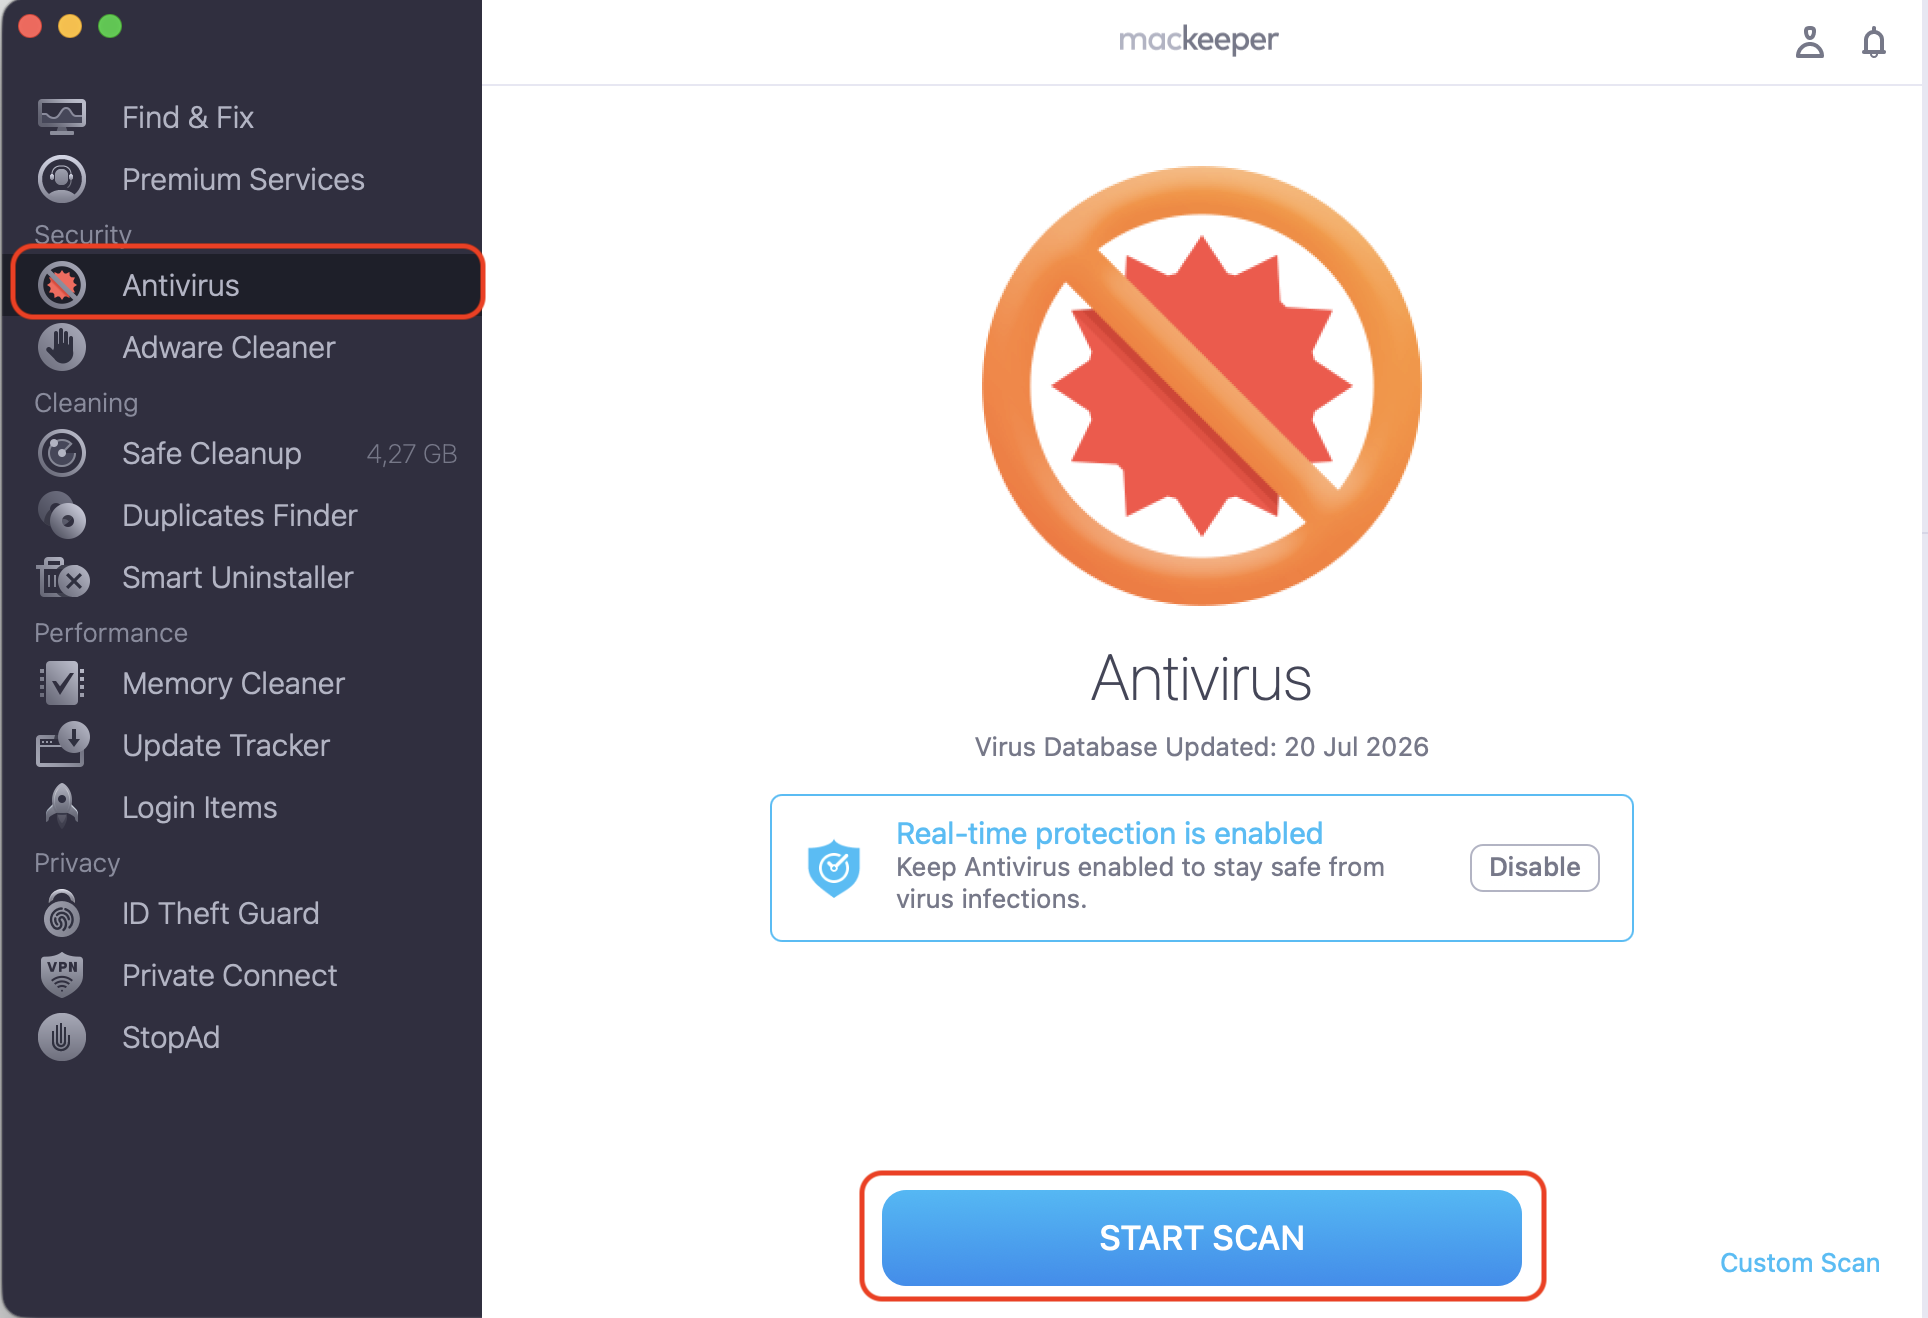
Unwanted apps can trigger repeated installations, keeping installd busy. Try to detect malware with a dedicated scan. MacKeeper’s Antivirus offers real-time protection and on-demand scanning for viruses, Trojans, and adware. Try it today:
Click Start Scan and follow the prompts to quarantine any threats.
Go to MacKeeper > Antivirus > Start Scan
Can you disable installd on Mac?
You should not disable installd on Mac, as it is a core macOS system process managed by Apple. Disabling it would break app installations, updates, and essential system functions. Without it, your MacBook wouldn’t be able to download new apps from the App Store or apply security patches.
What you can do is kill background processes temporarily through Activity Monitor when installd is consuming too many resources. You can also manage automatic updates to prevent the process from kicking in at inconvenient moments. Just don’t try to remove the daemon permanently—that’s a recipe for bigger issues.
Why installd uses high CPU?
To make it crystal clear, we’ve collected the most common triggers for installd consuming extra resources in the table below.
Trigger
What’s happening
macOS update
Your Mac is downloading and installing a system update, demanding heavy CPU and memory.
Multiple app updates
Several App Store apps update at the same time, keeping the daemon busy.
Stuck or corrupted cache
Damaged update files cause installd to retry installation repeatedly.
Low disk space
Not enough room to unpack updates, leading to repeated failed attempts.
Unwanted software
Adware or hidden apps may trigger repeated install activity.
We’d say that temporary spikes are normal. In contrast, prolonged high usage—lasting hours without visible update activity—usually points to stuck processes or system issues.
Moreover, not every CPU spike means something’s wrong. There are moments when your Mac is supposed to work harder, and installd is one of the processes that reflects that activity.
You’ll notice spikes during a major macOS upgrade—for example, moving from one version to another. Multiple App Store downloads running at the same time can also push CPU usage up. In these cases, the process should wind down within a few minutes, and your Mac’s performance will return to normal.
If your Mac so slow all of a sudden feeling lasts longer than fifteen minutes, that’s worth investigating. But quick bursts during boot or after a system update? Your Mac is just doing its job.
Conclusion
Installd is a normal macOS process that keeps your apps and system updated. High CPU usage from this daemon is usually temporary and resolves on its own within minutes.
When it doesn’t, the cause is almost always a stuck update, corrupted cache, low disk space, or unwanted software. Work through the steps above, and you’ll likely get your Mac running smoothly again.
For ongoing peace of mind, MacKeeper’s Memory Cleaner helps keep your system resources in check—so background processes like installd have the space they need to work efficiently.
We respect your privacy and
use cookies
for the best site experience.
Privacy Preferences Center
We use cookies along with other tools to give you the best possible experience while using the
MacKeeper website. Cookies are small text files that help the website load faster. The cookies we
use don’t contain any type of personal data meaning they never store information such as your
location, email address, or IP address.
Help us improve how you interact with our website by accepting the use of cookies. You can change
your privacy settings whenever you like.
Manage consent
All cookies
These cookies are strictly necessary for enabling basic website functionality (including page
navigation, form submission, language detection, post commenting), downloading and purchasing
software. The website might malfunction without these cookies.